 Add and edit schedules
With schedules you can automate the behavior of the lighting depending on a specific event. The event types are:
-
Regular day: a 24-hour schedule that occurs often, for example normal weekdays or weekends.
-
Special day: a 24-hour schedule that occurs only one time. A special event can span multiple days and can be used for opening hours that are applicable for special occasions, for example during a special season.
-
Holiday: one or more recurring days that allow for their own 24-hour schedule, for example (national) holidays (site can also be closed).
| When schedules differ per day or between weekdays and weekends, you need to create specific schedules for these days. |
Add new schedule
Add a schedule
-
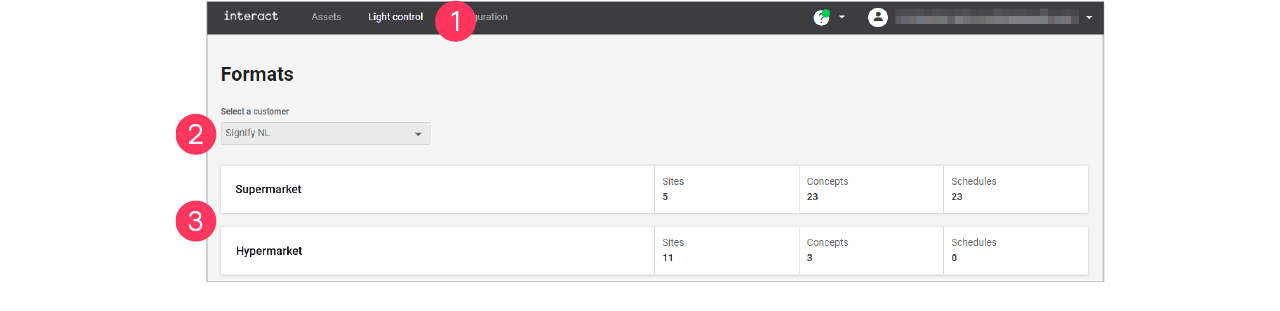
In the menu, click Light control.
-
If applicable, in the dropdown Select a customer, select the customer to show the known formats.
-
Select a format.
-
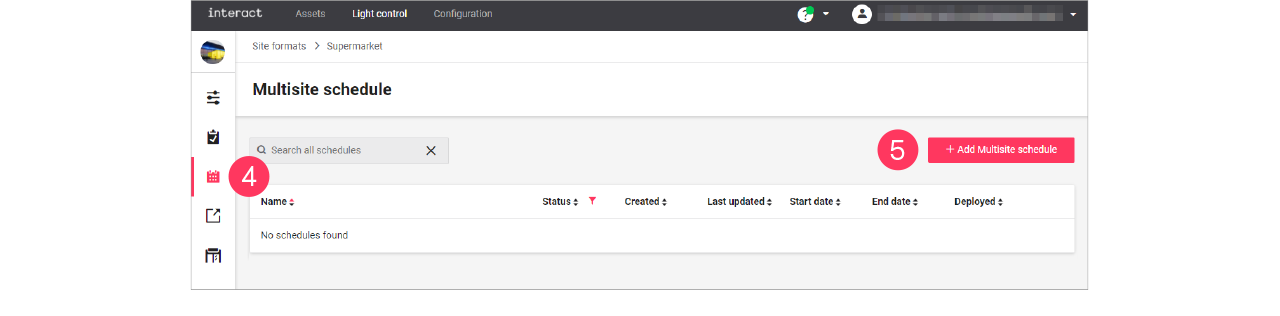
Click Schedules (
 ).
). -
Click + Add Multisite schedule.
-
Enter the Name for the schedule.
Click Save.
-
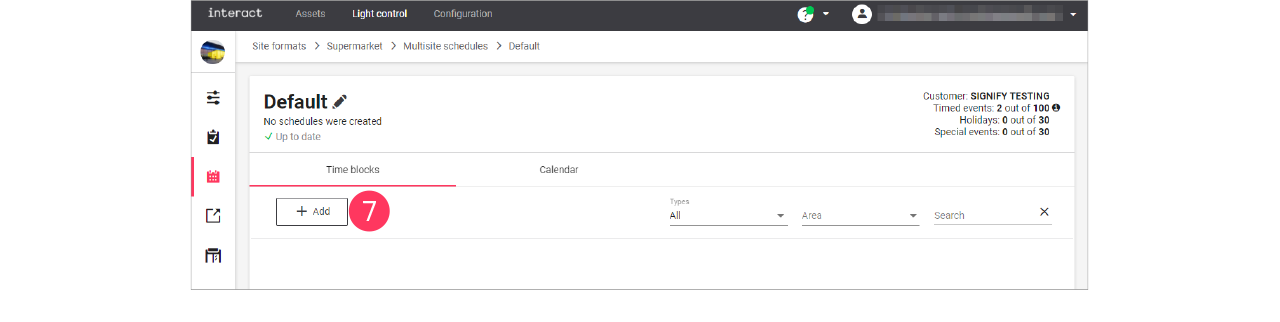
Click + Add to start creating the schedule.
Create the schedule
When creating and editing schedules, keep in mind that the wizard follows a structured order:
-
When: start/end date, weekdays, and months
-
Where: area(s) the schedule applies to
-
What: what happens on the defined times
-
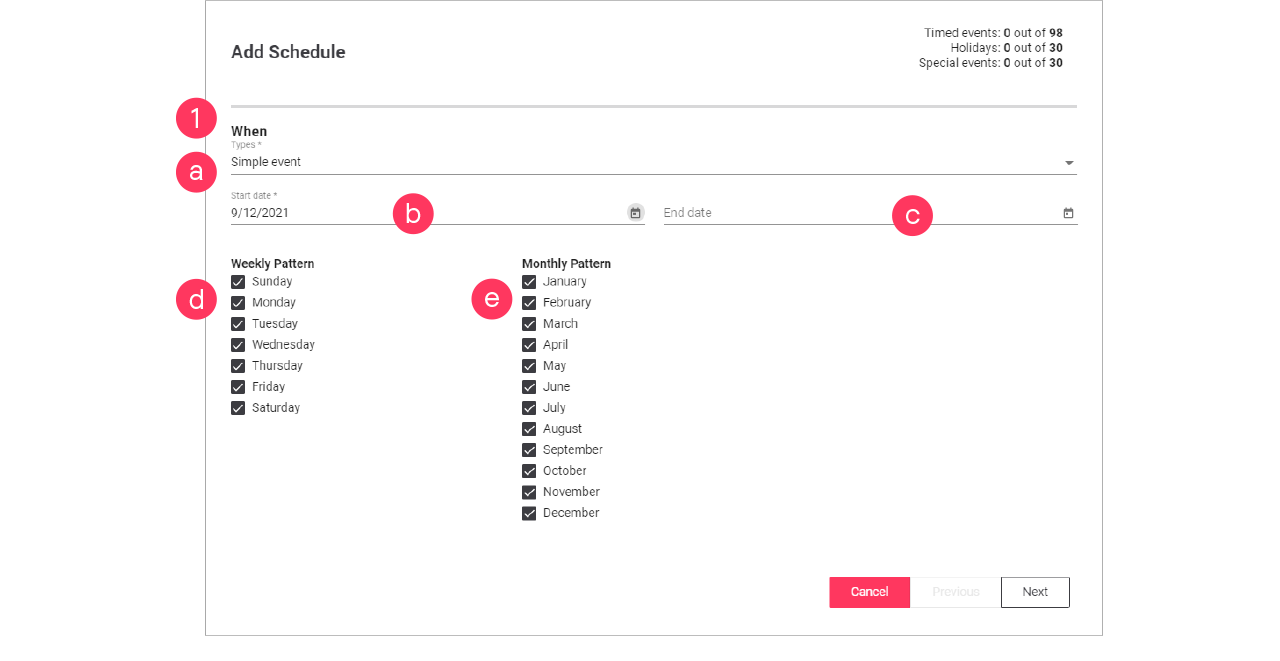
On the When page, make the calendar selections:
-
Select the Type of event:
-
Click the calendar (
 ) to select the Start date.
 -
Click the calendar (
) to select the End date (optionally). -
Clear/select the days for the Weekly Pattern.
-
Clear/select the months for the Monthly Pattern.
Click Next.
When creating a Special day, specify an End date in the far future. Select a date using the calendar and change the year manually to, for example, 2099. -
-
On the Where page, select the Areas the schedule applies to.
Click Next.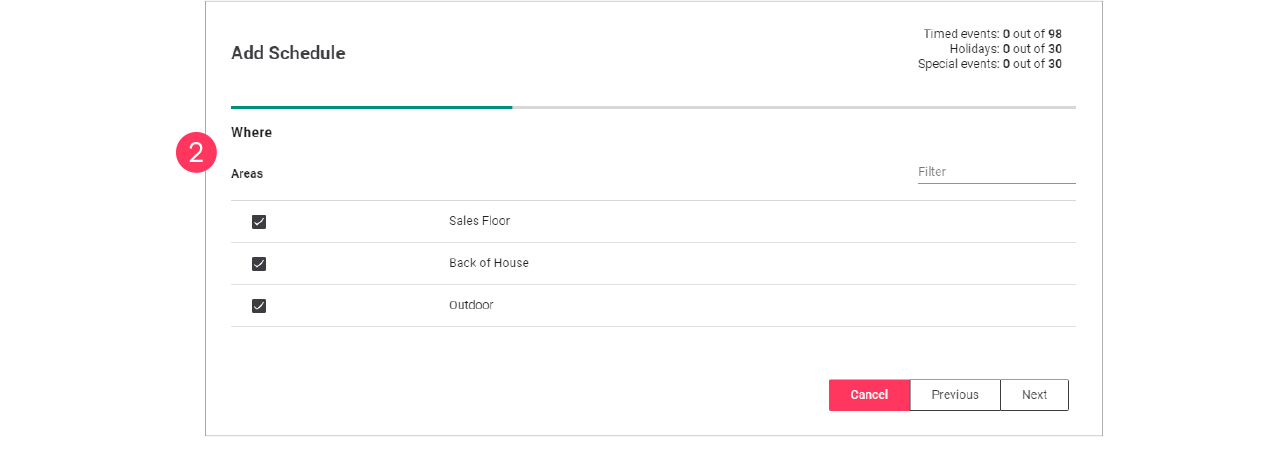
-
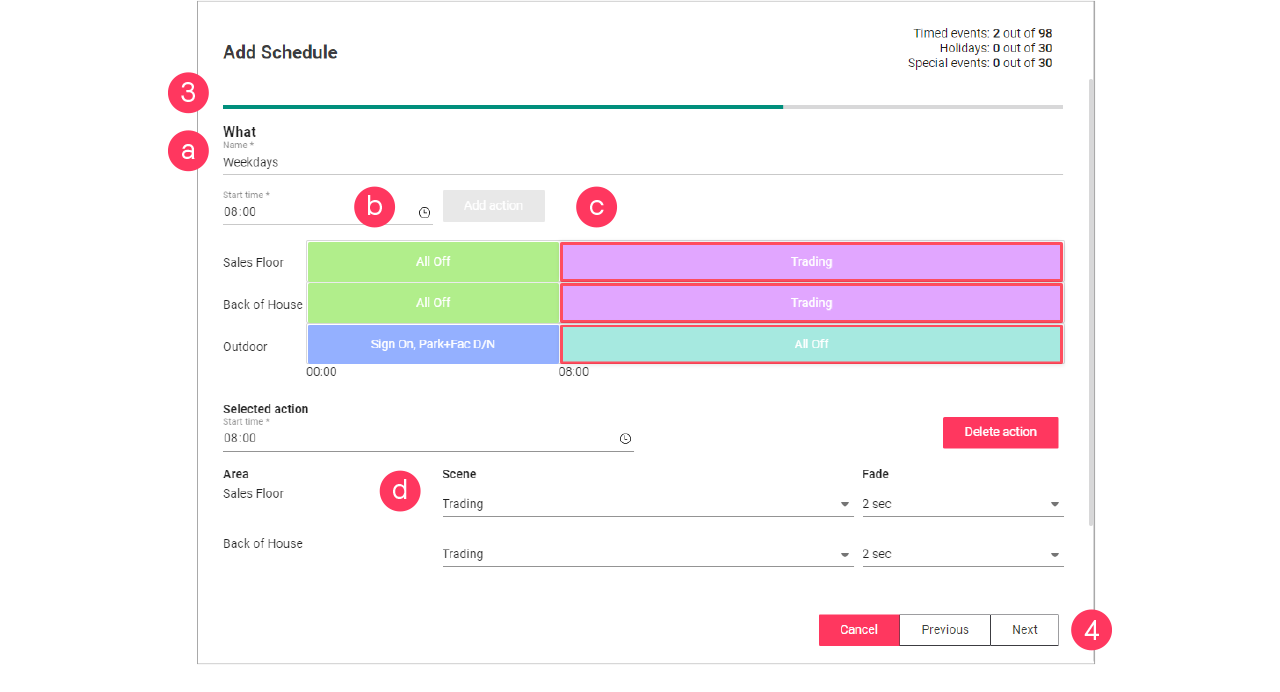
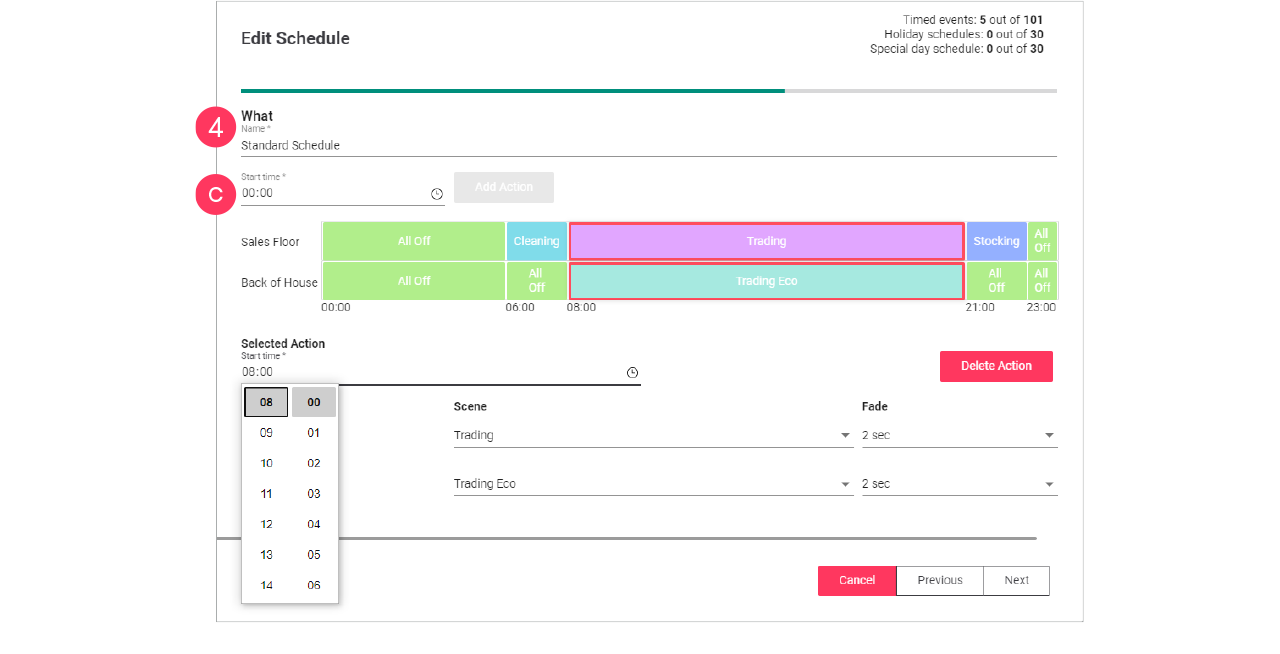
On the What page, make the timer selections:
-
Enter the Name for the schedule.
-
Click the clock (
 ) to define the Start time.
 -
Click Add Action.
-
Select the Scene and Fade.
-
-
Repeat for other timeframes.
Make sure to select the Scene and Fade for all timeframes on the timeline.
Click Next.Always make sure that the timeline covers 24 hours. A timeframe labeled Unknown is not allowed. -
Check the summary. Click Previous to correct the settings.
Or: Click Add to close the wizard and add the schedule to the list.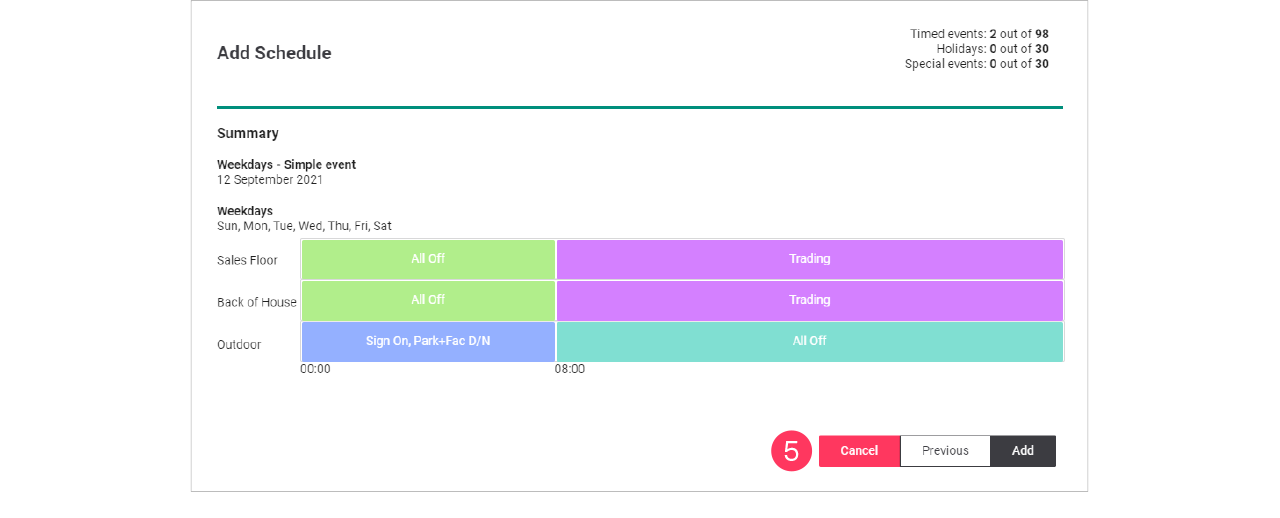
Adjust site opening hours
When the opening hours of a site may differ during the season, for example because of holidays or another event. The simplest way to do this is to clone a schedule and copy an event and change this to the specific needs.
Clone the schedule
-
In the menu, click Light control.
-
If applicable, in the dropdown Select a customer, select the customer to show the known formats.
-
Select a format.
-
Click Schedules (
). -
In the list of Multisite schedules, find one the deployed schedules for the site
The currently running schedule is labeled Default. -
With the mouse, hover over the Action menu icon (
 ) of the Multisite schedule to clone. Click Clone.
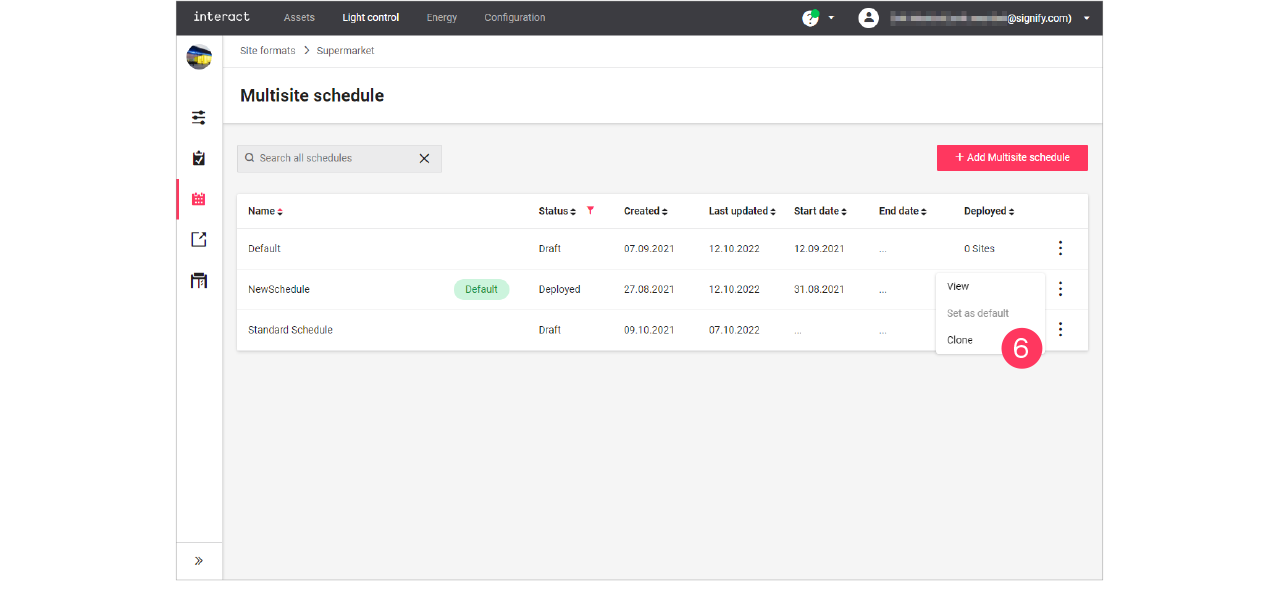
-
Enter the Name of the New Multisite schedule.
Click Clone.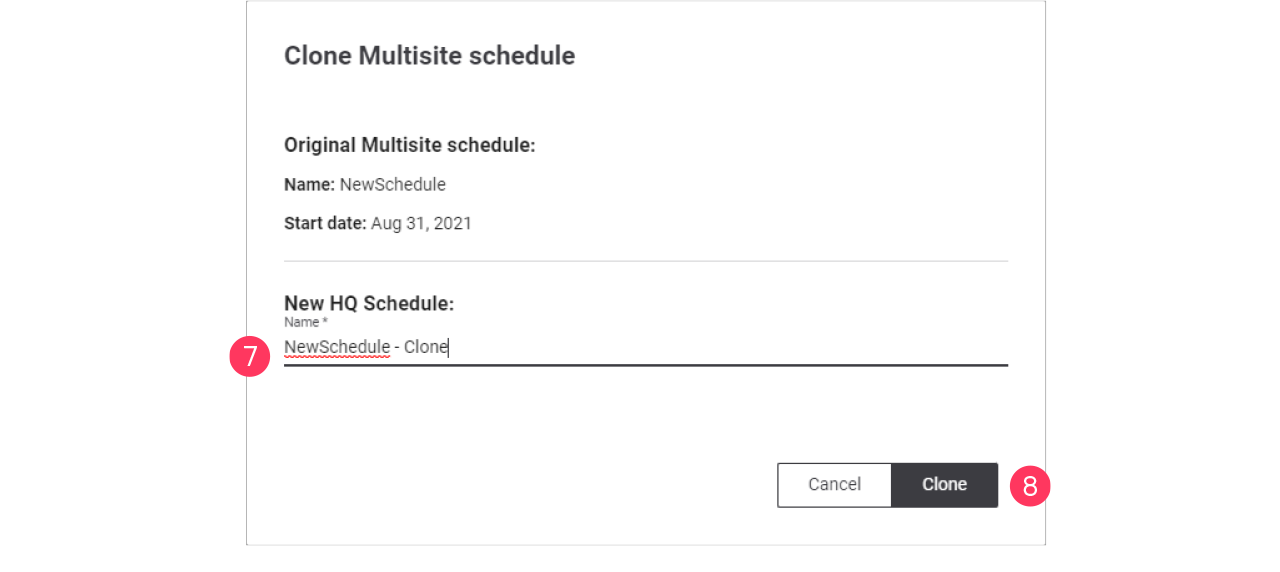
Edit the schedule
-
In the list of Multisite schedules, find the cloned schedule.
-
With the mouse, hover over the Action menu icon (
) of the schedule to edit. Click Edit.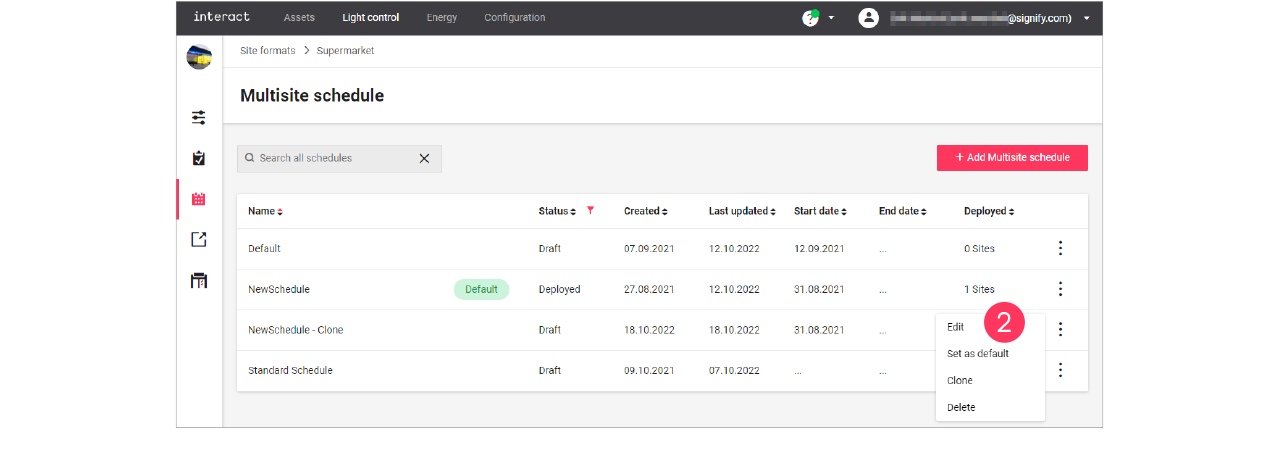
-
With the mouse, hover over the Action menu icon (
) of the event to edit. Click Edit schedule.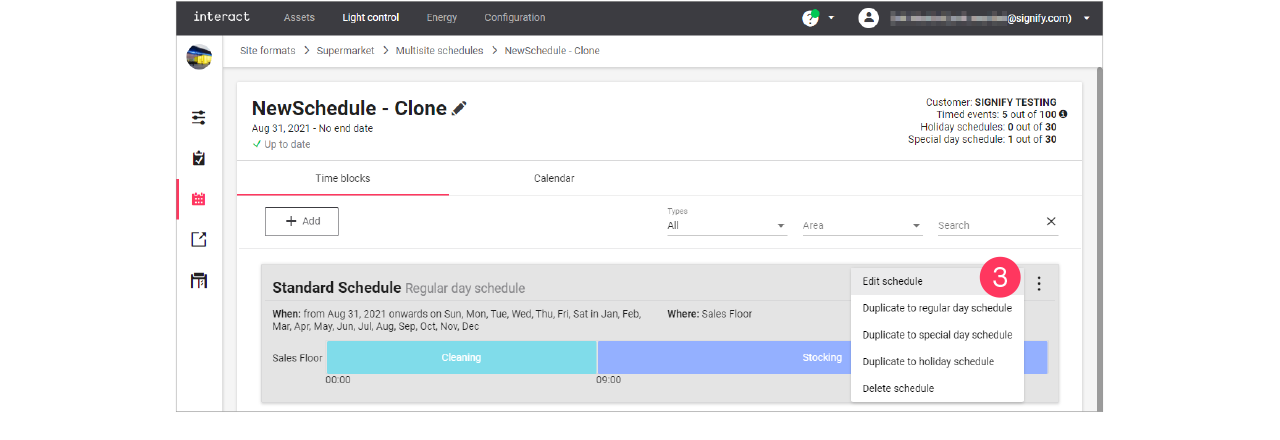
-
Following the wizard, change the settings of the schedule:
-
When page: select the Start date and if applicable the Weekly pattern and the Monthly pattern.
Click Next.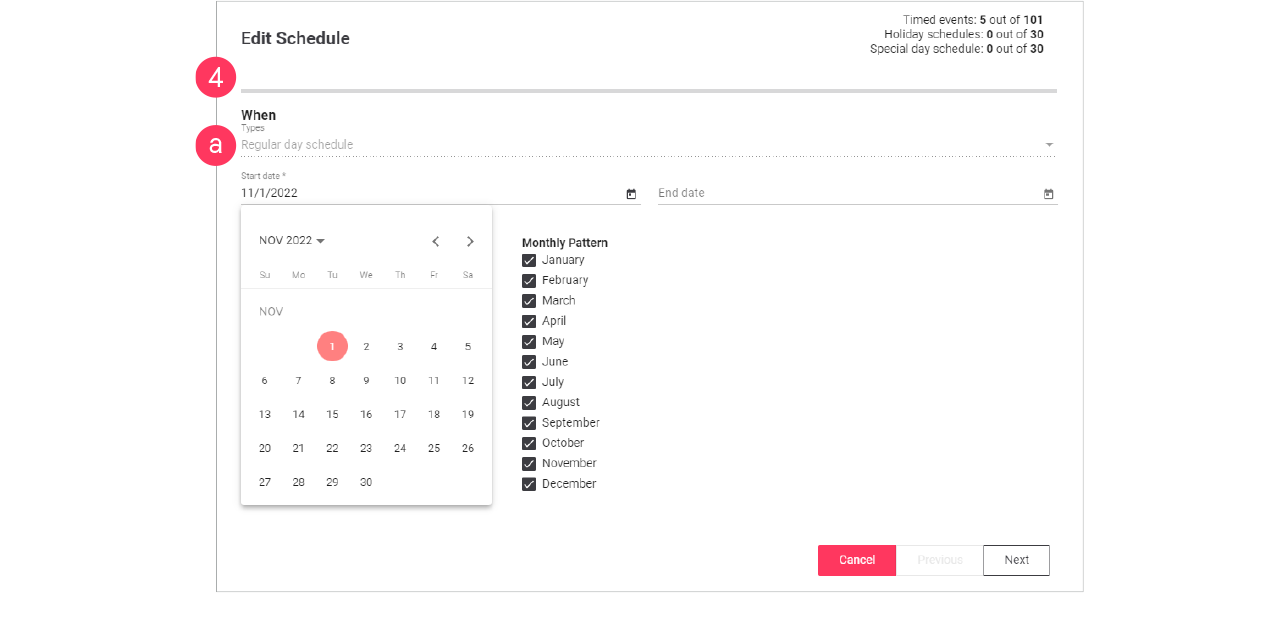
-
Where page: select the areas the schedule applies to. Make sure if a change is required.
Otherwise, click Next. -
What page: change the Start time(s) of the actions in the schedule.
Click Next.
-
-
Check the summary. Click Previous to correct the settings.
Or: Click Update to close the wizard. -
Repeat for the other regular day events in the schedule.
Adjust seasonal opening times
When the opening hours of a site may differ during the season, for example because of holidays or another event. The simplest way to do this is to clone a schedule and copy an event and change this to the specific needs.
Clone the schedule
-
In the menu, click Light control.
-
If applicable, in the dropdown Select a customer, select the customer to show the known formats.
-
Select a format.
-
Click Schedules (
). -
In the list of Multisite schedules, find one the deployed schedules for the site
The currently running schedule is labeled Default. -
With the mouse, hover over the Action menu icon (
) of the Multisite schedule to clone. Click Clone.
-
Enter the Name of the New Multisite schedule.
Click Clone.
Duplicate event
-
In the list of Multisite schedules, find the cloned schedule.
-
With the mouse, hover over the Action menu icon (
) of the schedule to edit. Click Edit.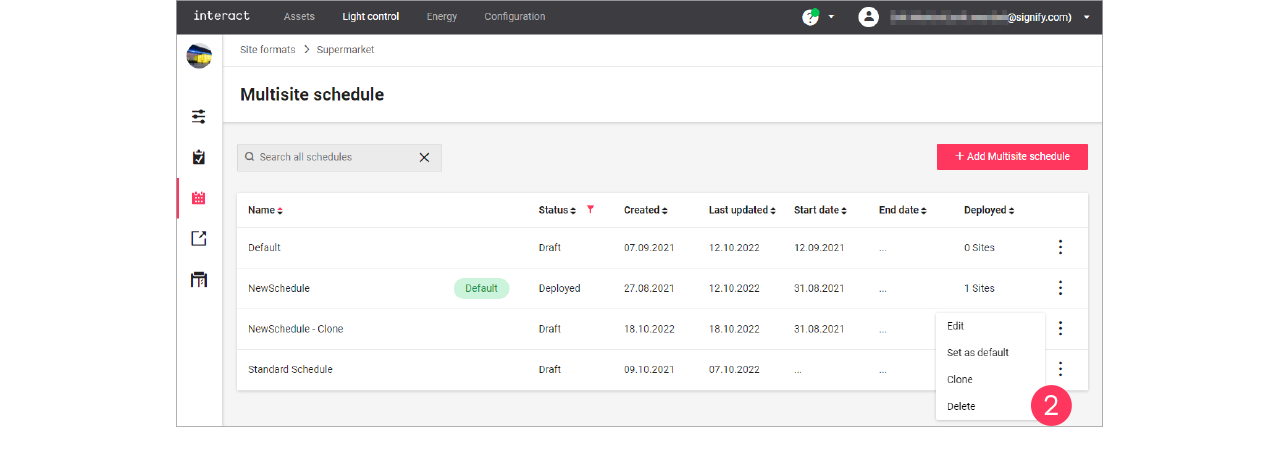
-
With the mouse, hover over the Action menu icon (
) of the event to edit. Click Duplicate to special day schedule.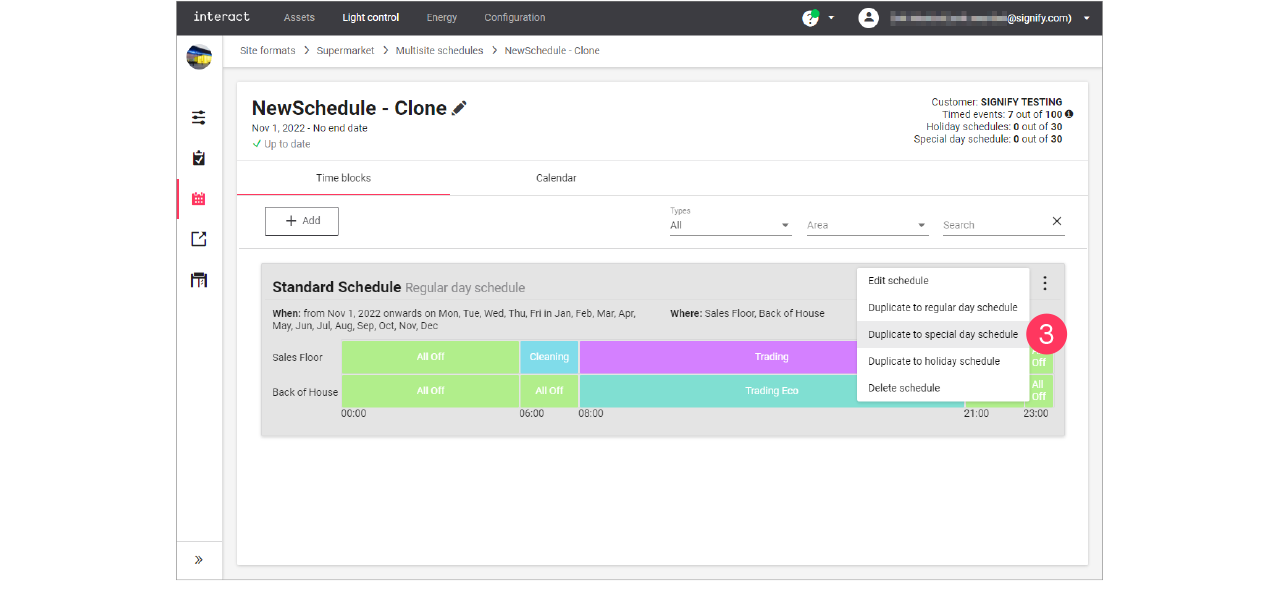
Edit the schedule
-
In the list of events, find the duplicated event.
You can find it by the word (copy) in the name. -
With the mouse, hover over the Action menu icon (
) of the schedule to edit. Click Edit schedule.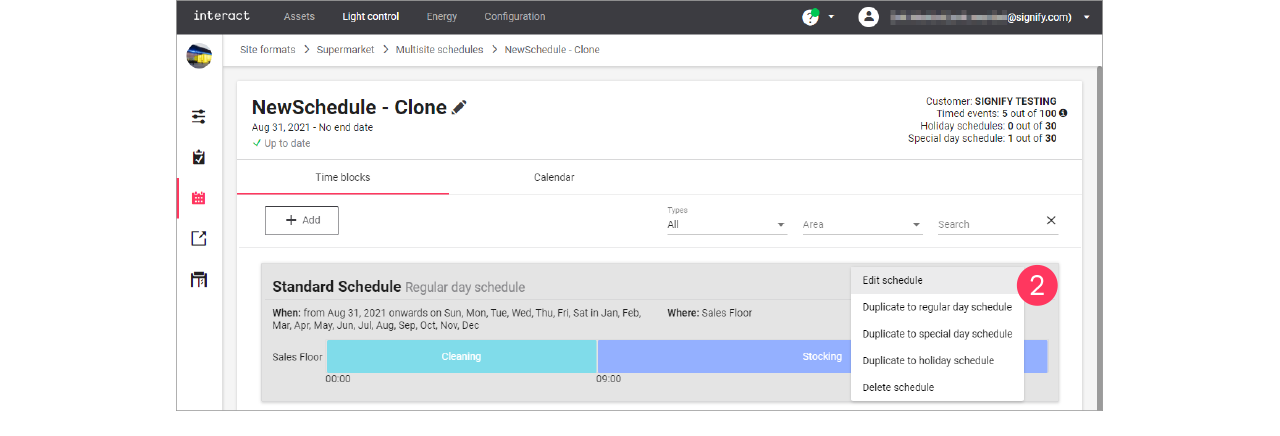
-
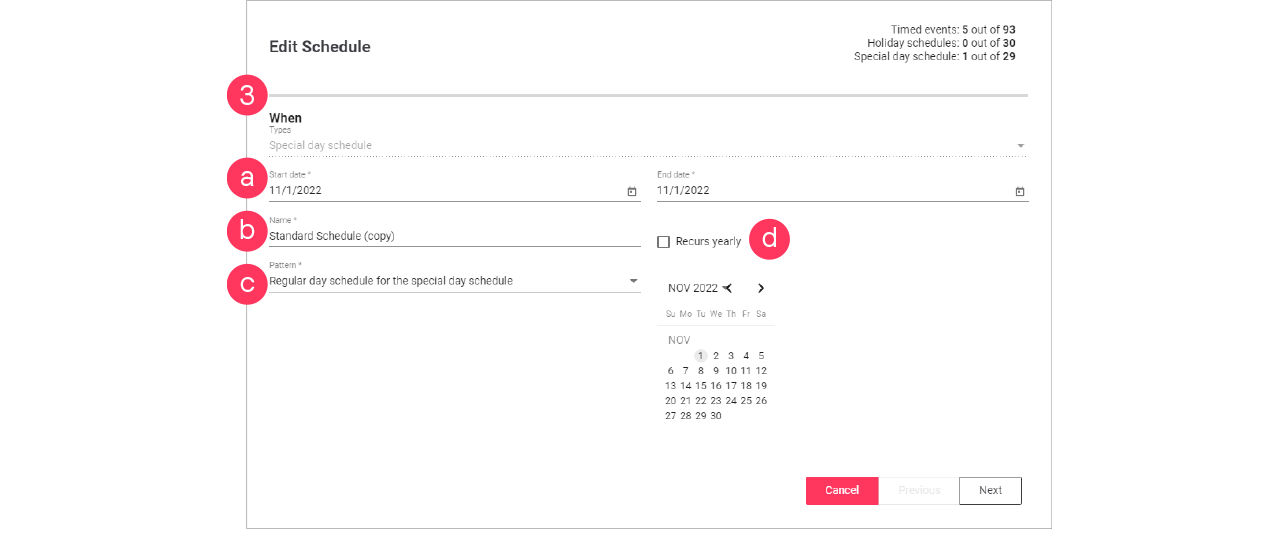
When page: make the calendar selections:
-
Start date and End date
-
Name
-
Pattern (single schedule for all days, or two schedules different for weekdays and weekends)
-
If applicable, select the Recurs yearly checkbox.
Click Next.
-
-
Where page: select the Areas the schedule applies to.
Or: Select Reuse an existing schedule and select an existing schedule for the selected date/pattern.
Click Next. -
What page: change the Name and change the Actions to the desired settings.
Click Next.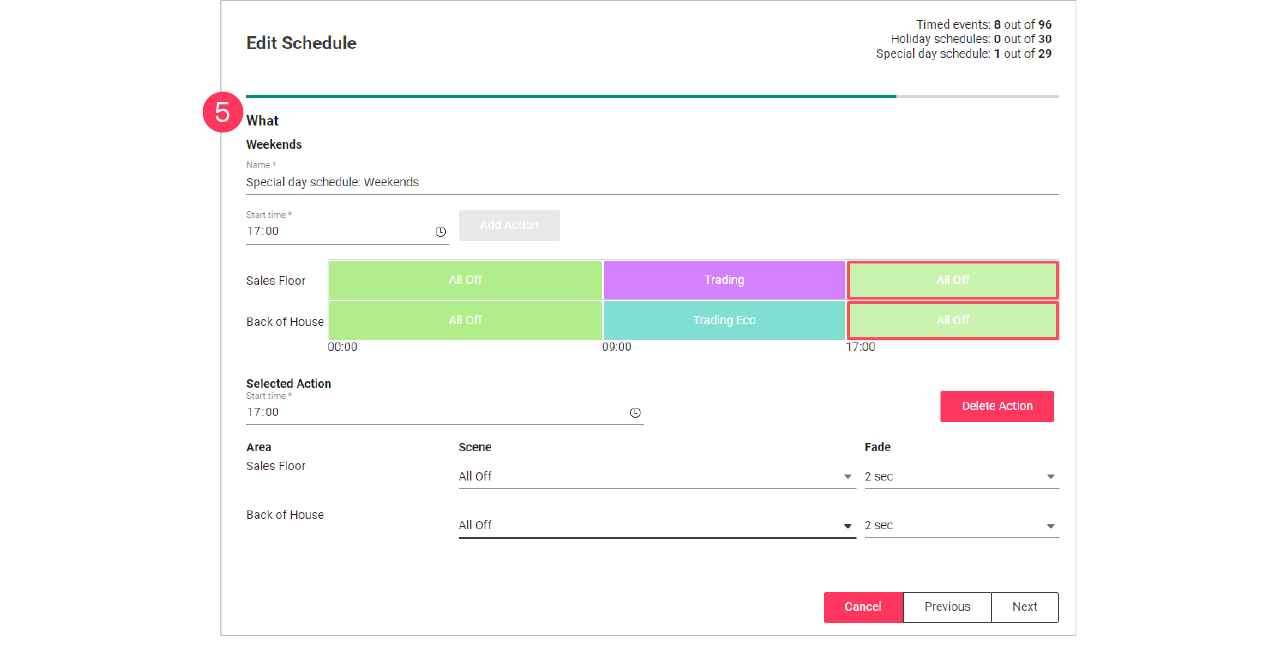
-
In case of two schedules, you now start editing the schedule for the weekend.
-
You can also select Reuse the weekday schedule to copy this schedule to the weekend.
-
-
Click Next.
-
Check the summary. Click Previous to correct the settings.
Or: Click Update to close the wizard.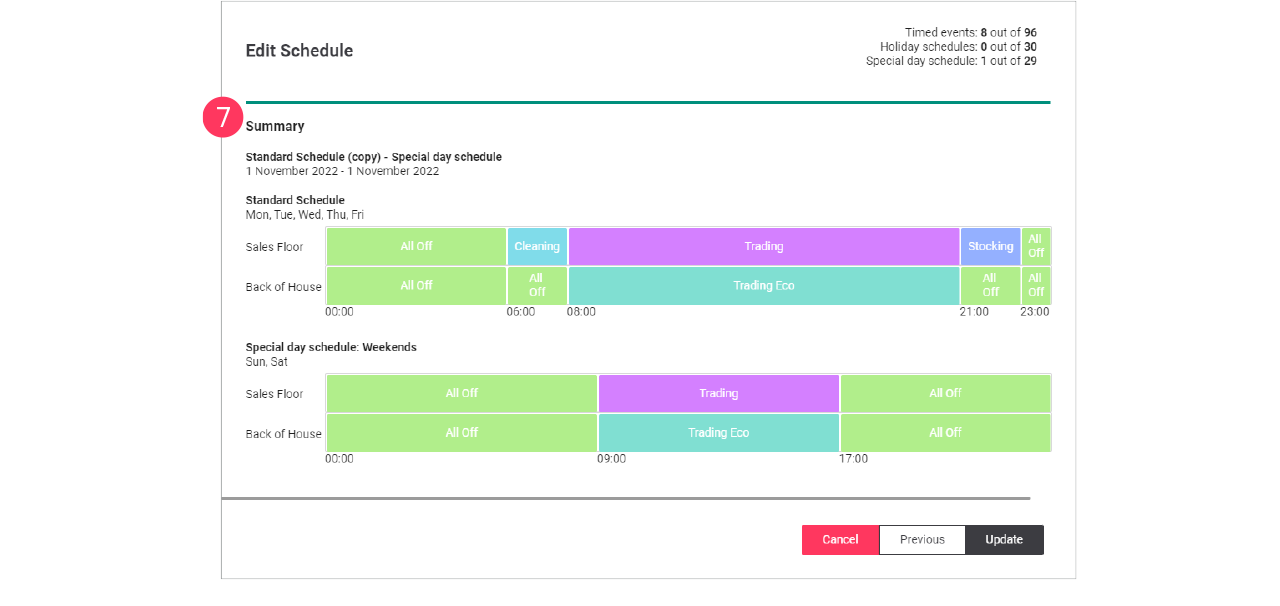
Create holiday schedule
To create a holiday schedule, you can either Add a new schedule, and select the type Holiday schedule, or duplicate an existing schedule using Duplicate to holiday schedule.
| It’s possible to create only one (1) schedule of the type Holiday schedule, but you can add up to 30 days to this schedule. |
When editing the schedule:
-
On the When page, make the calendar selections:

-
Select the date the holiday schedule applies to.
-
If applicable, select the Recurs yearly checkbox.
-
Give the schedule a Name. Click Add.
-
Repeat for other dates the holiday schedule applies to.
Click Next.
-
Use the Recurs yearly checkbox for example for bank holidays that always occur on the same date (New Year’s Day, etcetera).
-
For holidays with shifting dates (Easter, etcetera), don’t select the Recurs yearly checkbox. You need to create these separately every time.
-
Use the Bin icon (
 ) to delete a specific date (for example when it’s the past).
-
-
On the Where page, select the Areas the schedule applies to.
Click Next.
-
On the What page, change the Name and change the Actions to the desired settings.
Click Next.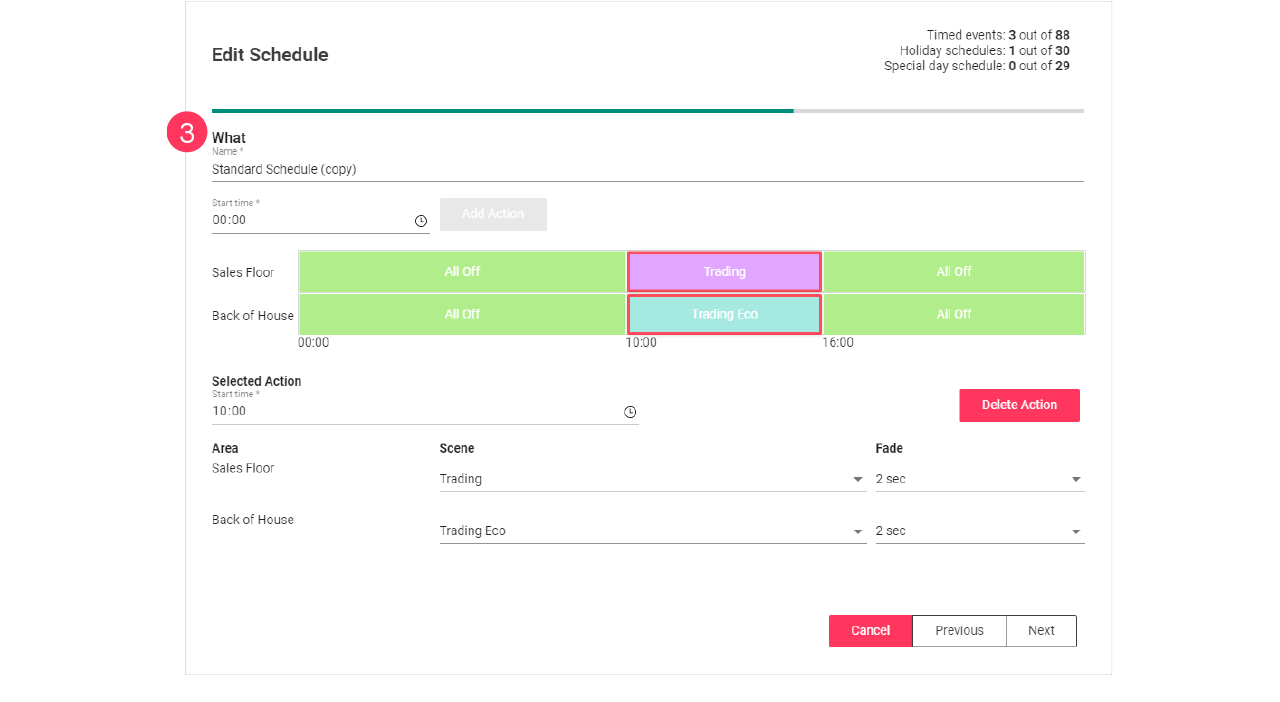
-
Check the summary. Click Previous to correct the settings.
Or Click Add or Update to close the wizard.