Configuration
About formats
In the retail industry, each brand identifies a hierarchy of formats, all having their own characteristics. The typical characteristics per format are listed here, but brands may differentiate in the exact definition.
Convenience stores and express formats

Convenience stores and express formats are smaller local stores.
-
Stores with a smaller assortment
-
Convenient formats are found in smaller villages, city centers or for example holiday resorts
-
Express formats are typically found in places with high traffic
Typical size:
-
Floor area: ≤ 500 m2
-
Light points: ≤ 200
Supermarkets

Stores in this format are typically larger supermarkets, fashion, and DIY retail formats.
-
Stores with a large assortment
-
Supermarkets and fashion retails found in all kinds of shopping areas, e.g., city centers
-
DIY retails mostly found at the edges of a town
Typical size:
-
Floor area: 500 to 3,000 m2
-
Light points: 200 to 1,000
Hypermarkets

This format includes all very large stores that often have more assortments than groceries alone, or department stores.
-
Stores with multiple assortments
-
Hypermarkets/Wholesalers mostly found at the edges of a town
-
Department stores often in the city centers
Typical size:
-
Floor area: 3,000 to 10,000+ m2
-
Light points: 1,000 to 5,000+
About scenes and naming
This section introduces the scenes that are most recognized in the retail industry and how these are applied.
Trading
The lights adapt to the specific settings defined in this scene, to attract the customer with. This can also include areas with RGB lighting that highlight special areas with discounts or seasonal articles.
Stocking
The lights adapt to levels that makes the visual task of stocking comfortable. Some areas may be switched off or at low light levels (office, cash registers), where other areas are 100 % on (storage area, sales floor). Special lighting is switched off.
Cleaning
For cleaning purposes, other light levels are required when compared to stocking, think of the area with cash registers, office, canteen etcetera. Special lighting is switched off.
Areas and Scenes
Add, edit and reorder areas
| Keep in mind that adding or editing areas impacts all sites that use the selected format. Therefore, this should be done with caution. |
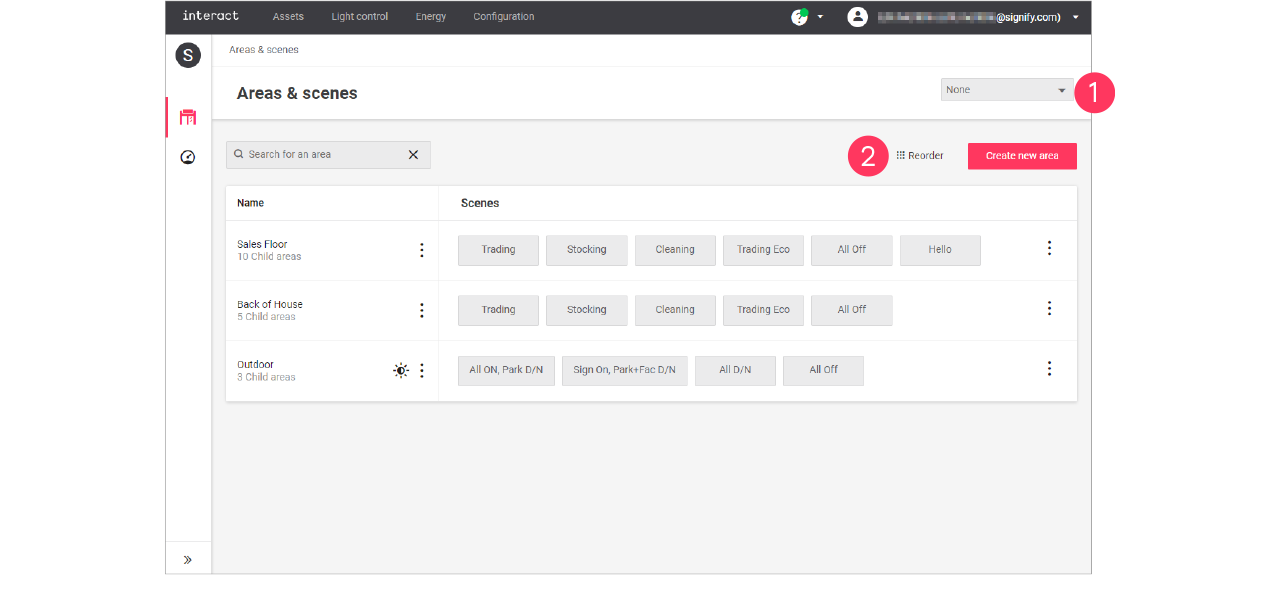
Add area
-
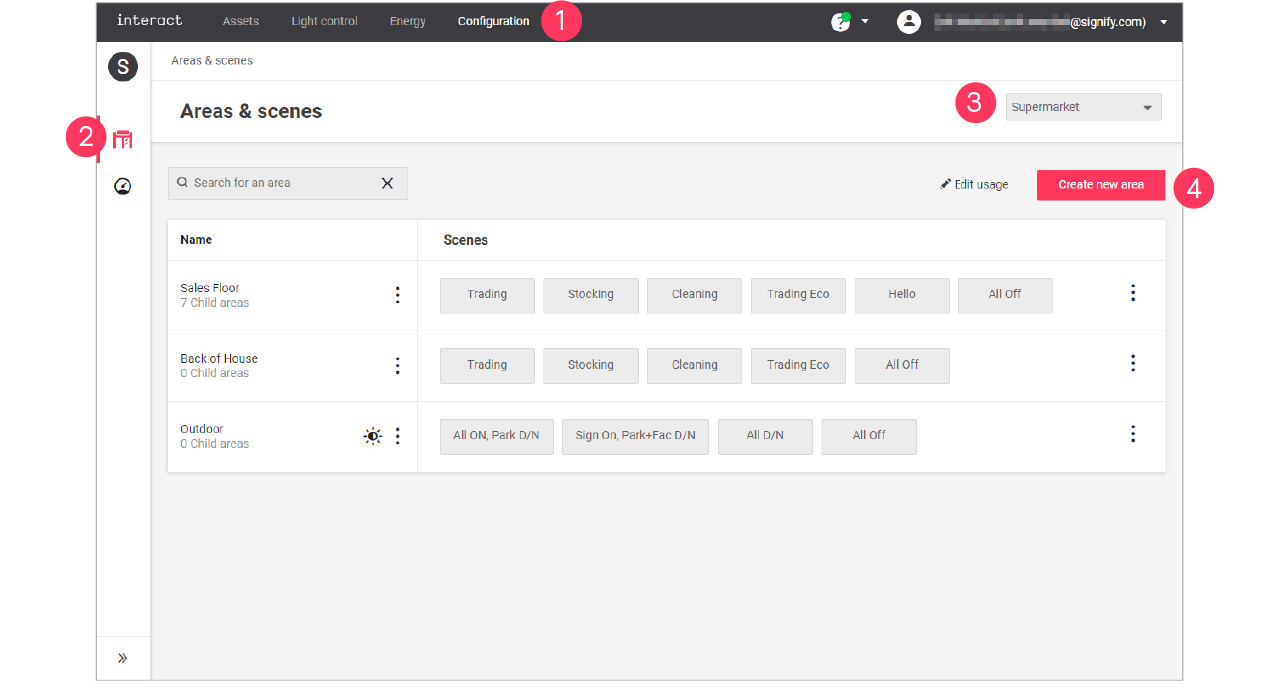
In the menu, click Configuration.
-
Select Areas & scenes (
 ).
). -
Optionally, select the Format.
-
Click Create new area.
-
Enter the ID number for the area.
Area IDs are part of the intake document and correspond with area usage for all sites. It’s important to use IDs consistent on newly created areas and not reusing them. 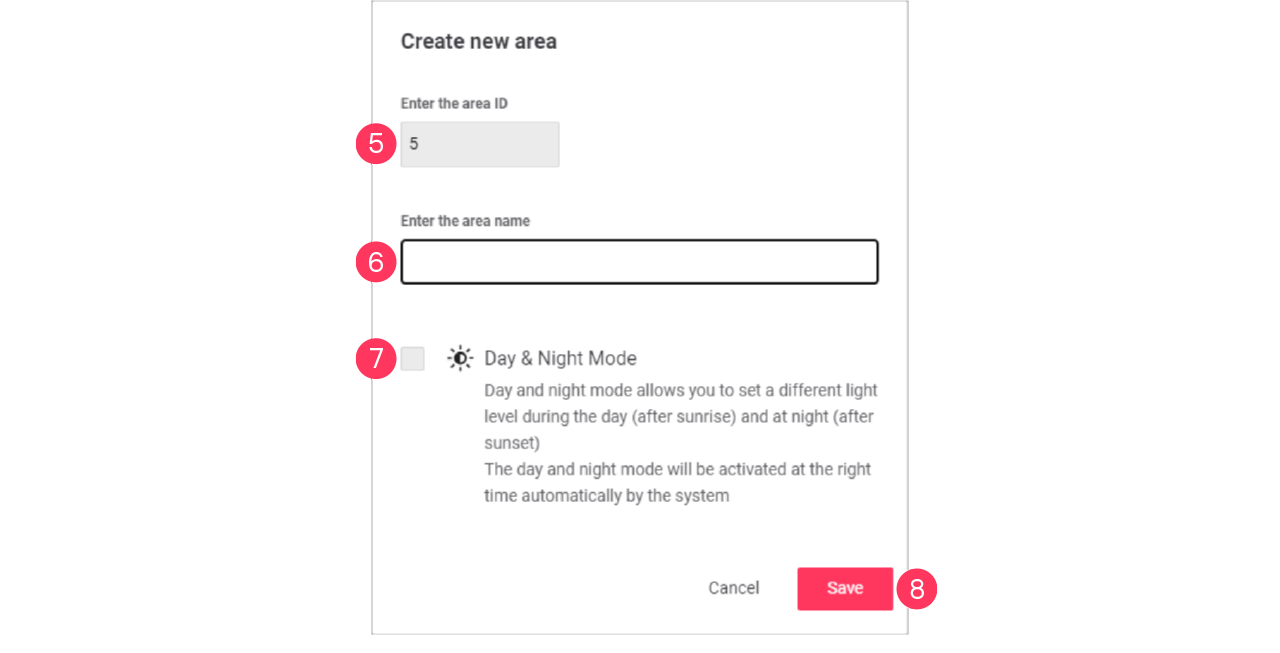
-
Enter the Name of the area.
-
Optionally, select the checkbox
 Day & Night Mode to enable this option.
 -
Click Save.
|
Edit area
-
With the mouse, hover over the Action menu icon (
 ) of the area to edit.
Click Edit area.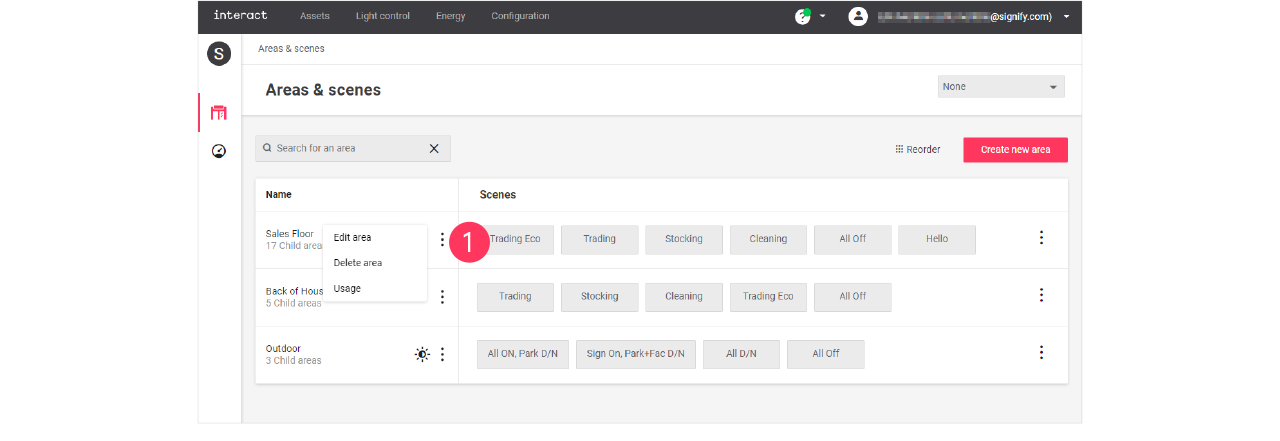
-
In the Edit area menu, change the required settings (ID, Name, Day & Night Mode).
Click Save.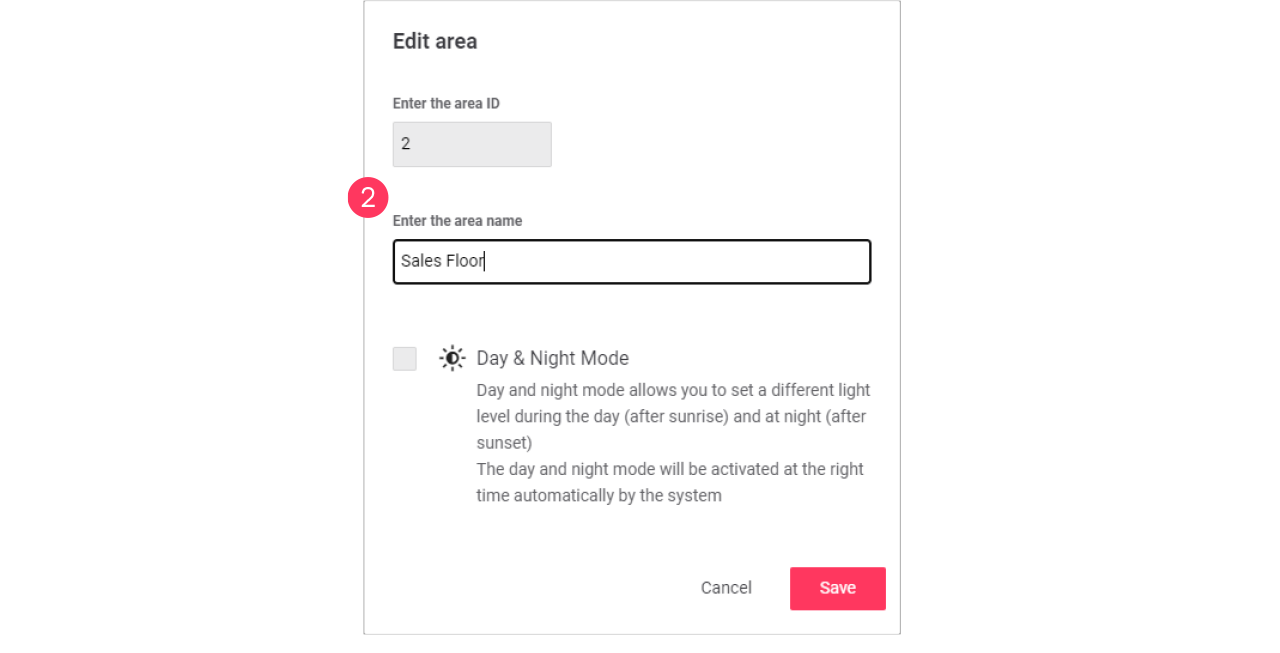
-
Enabling the day and night mode activates automatic switching of the area by the system based on sunrise and sunset.
-
Areas with the day and night mode enabled can be identified by the
icon. -
See section Day and night mode for more information.
-
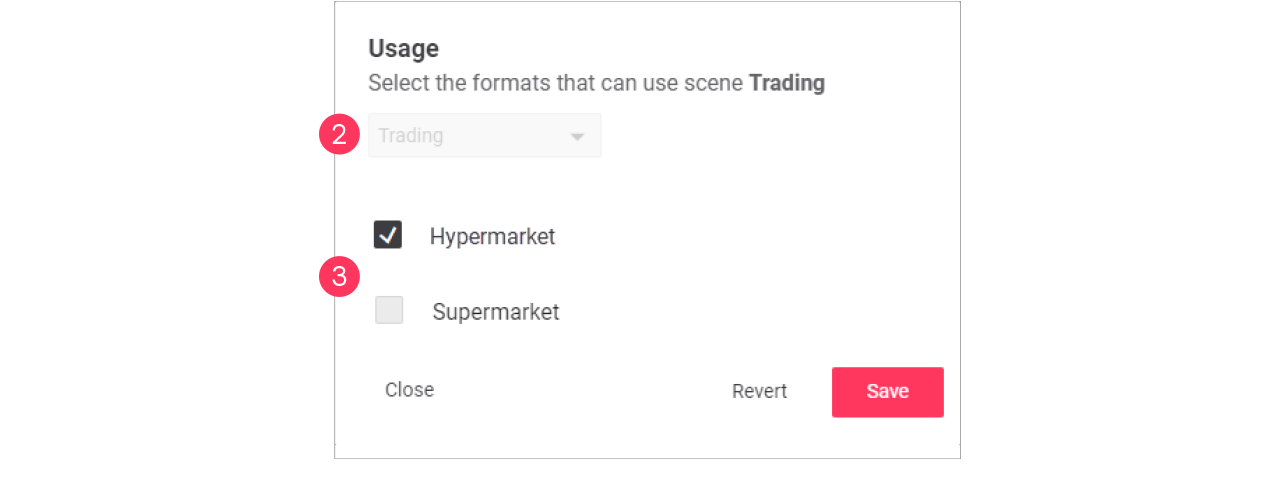
Edit usage of an area
-
With the mouse, hover over the Action menu icon (
) of the area to edit.
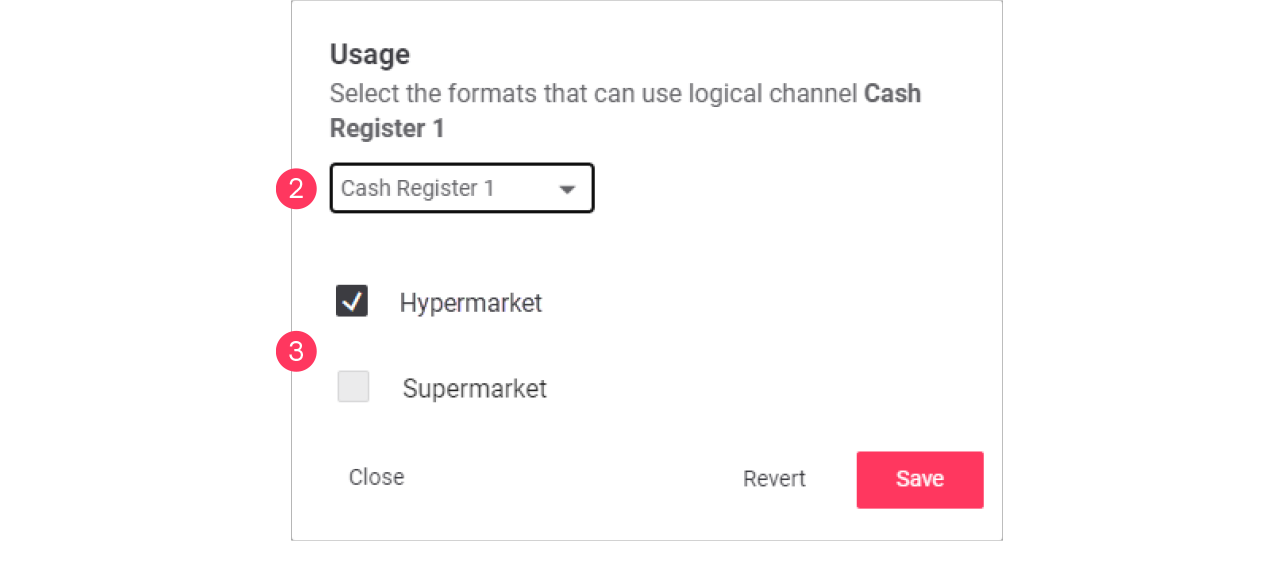
Click Usage to change which format can use the area.
-
In the Usage menu, select the formats that can include the selected area.
Click Save.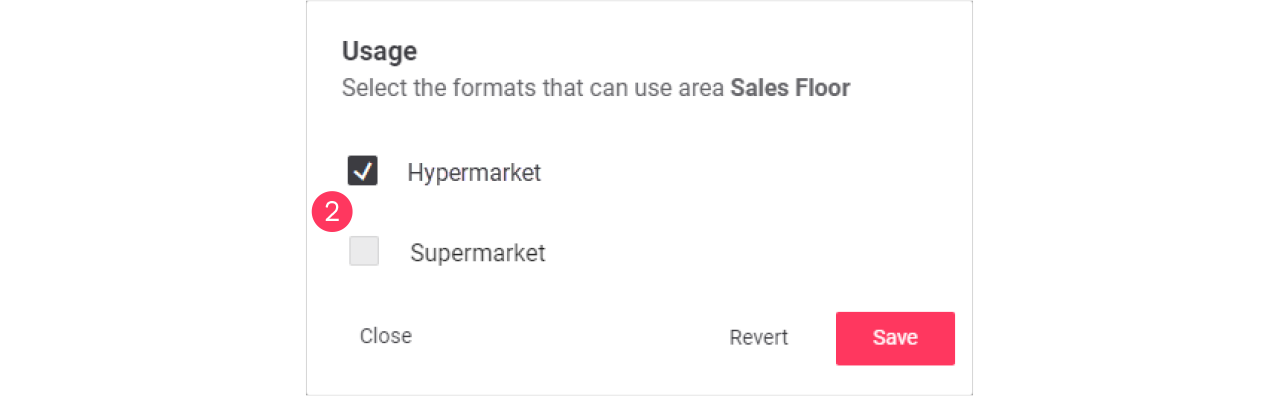
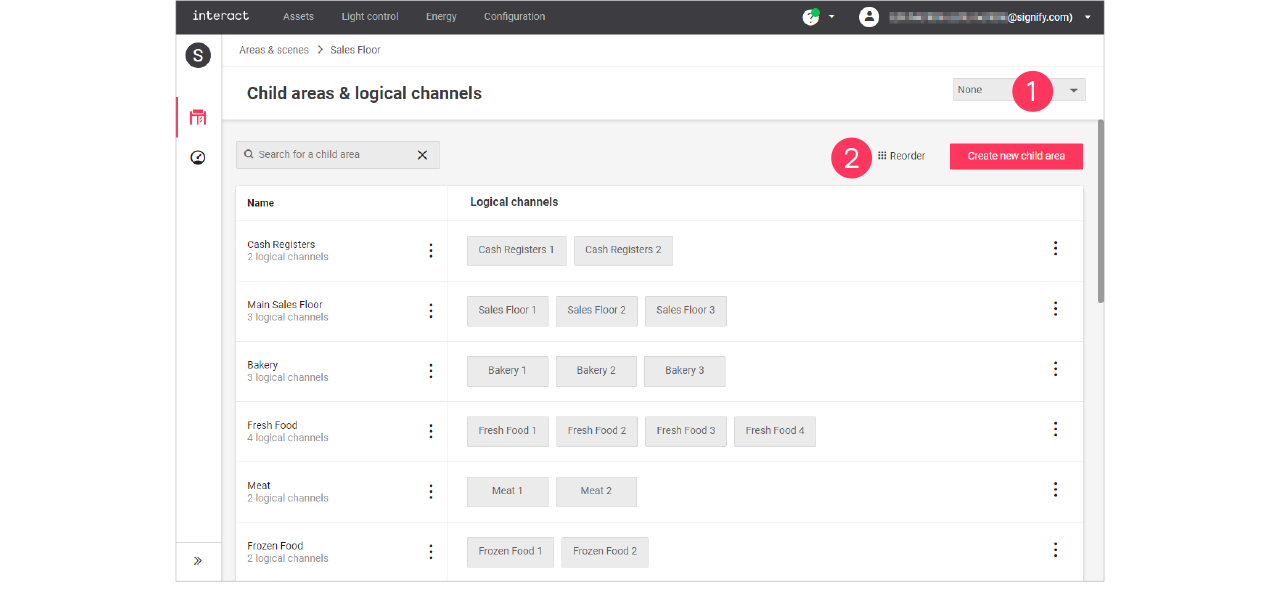
Advanced usage editing
Most brands operate multiple formats, that have their commonalities and differences. Usage editing gives you the possibility to enable or disable the usage of areas for a specific format.
-
Start with selecting the Format.
-
Click (
 ) Edit usage.
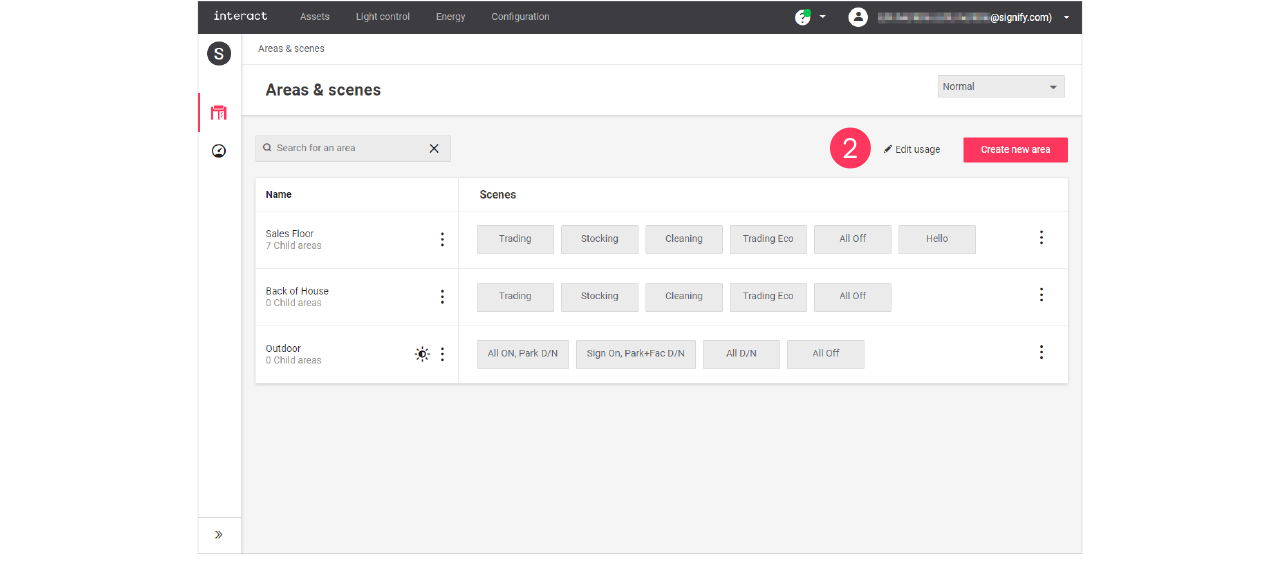
-
Clear the checkmark next to the Name of the area to change its usage in the format.
-
Click the names of the Scenes to change usage of the area in the format.
Click Save.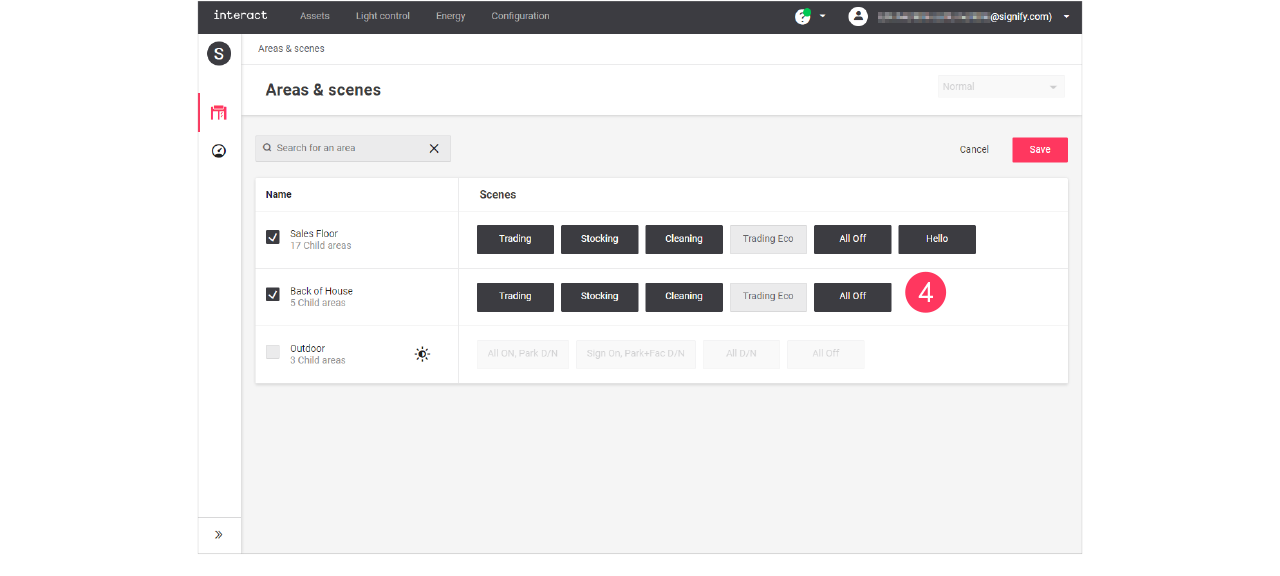
Areas and/or scenes that are greyed out are excluded for usage in the selected format.

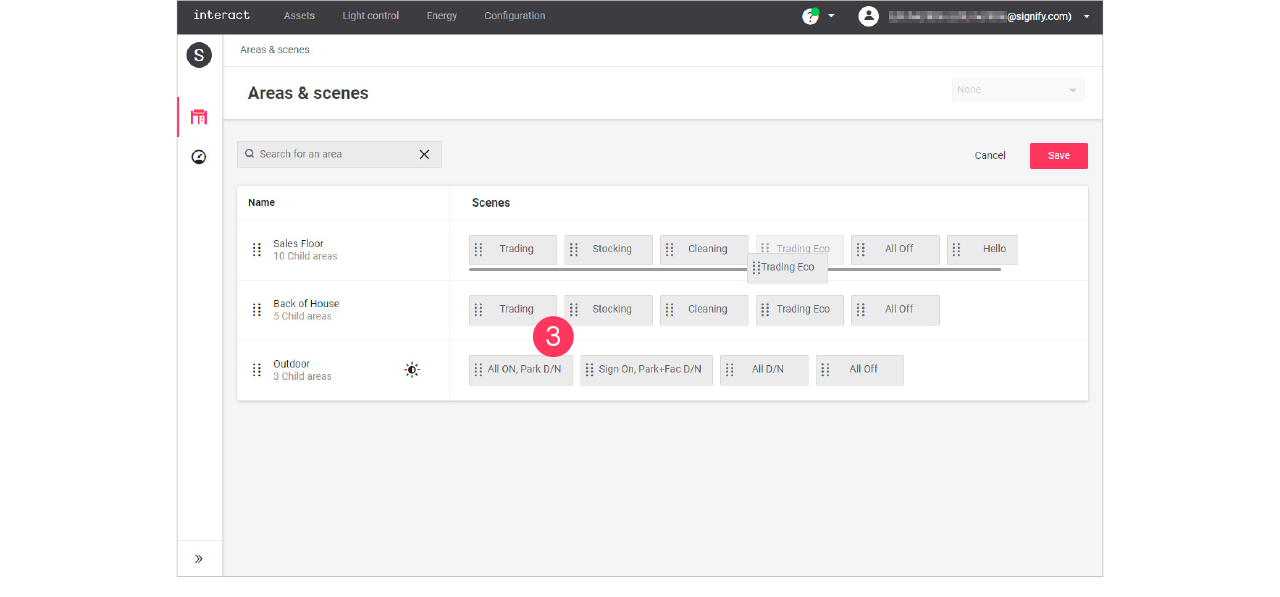
Add, edit and reorder scenes
Add scene
-
In the menu, click Configuration.
-
Select Areas & scenes (
).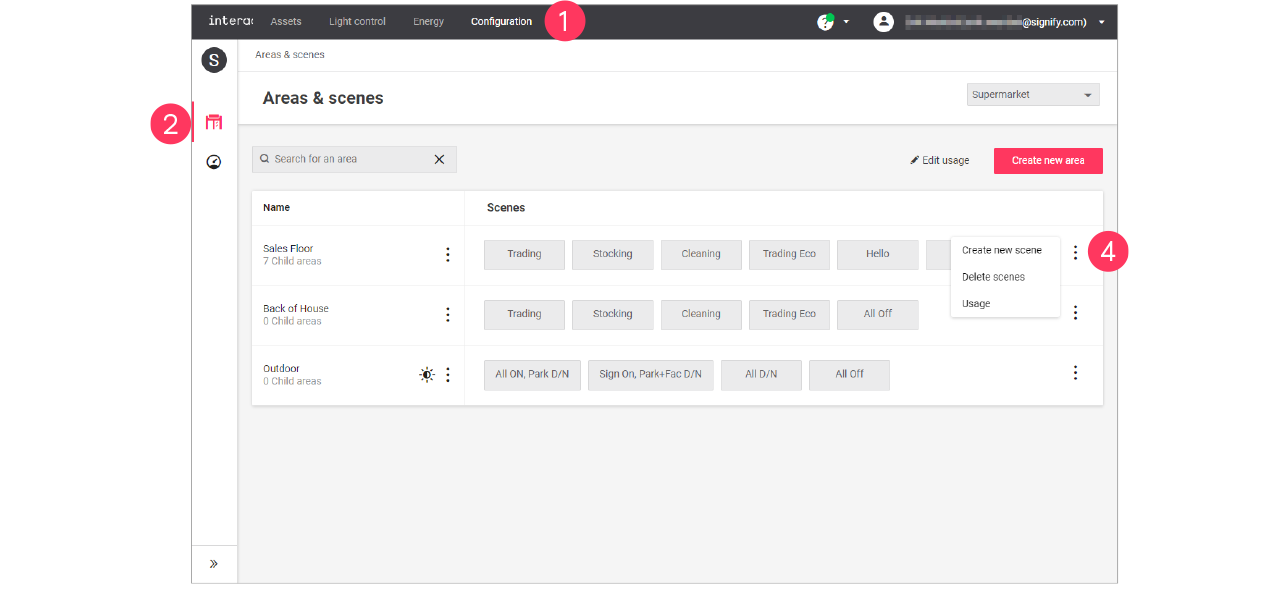
-
Optionally, select the Format.
-
With the mouse, in the Scenes column next to the area to add the scene to, hover over the Action menu icon (
).
Click Create new scene. -
Enter the ID number for the scene.
The ID numbers follow a sequential order. -
Enter the Name of the scene.

Click Save.
Edit a scene
-
With the mouse, in the Scenes column, click the Scene to edit.
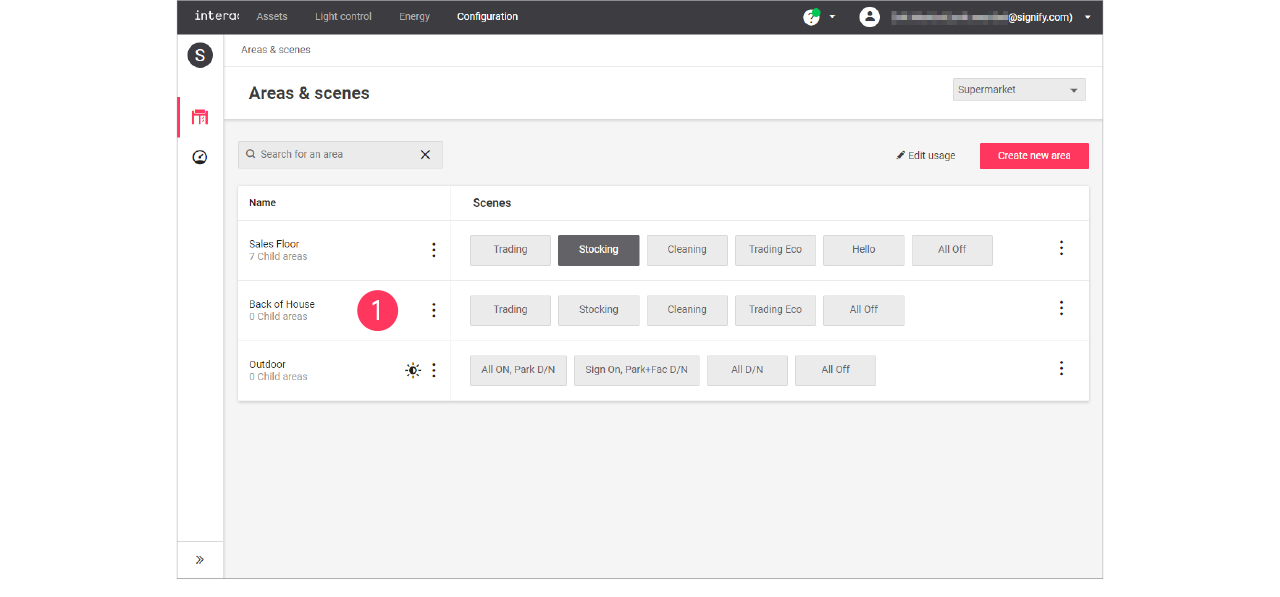
-
In the Edit scene menu, change the required settings (ID, Name).
Click Save.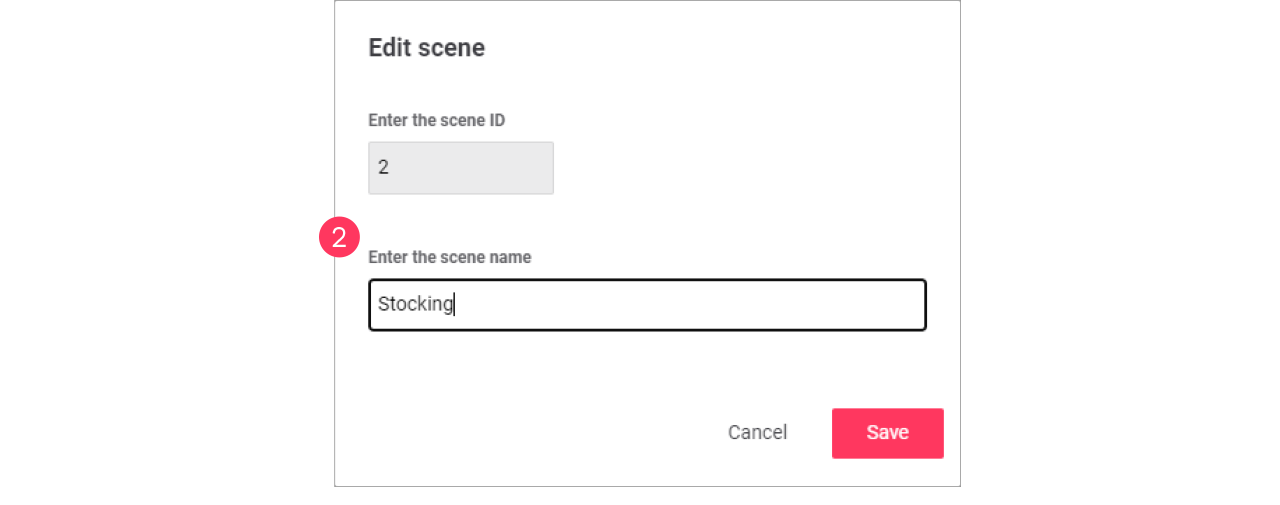

Zones and Channels
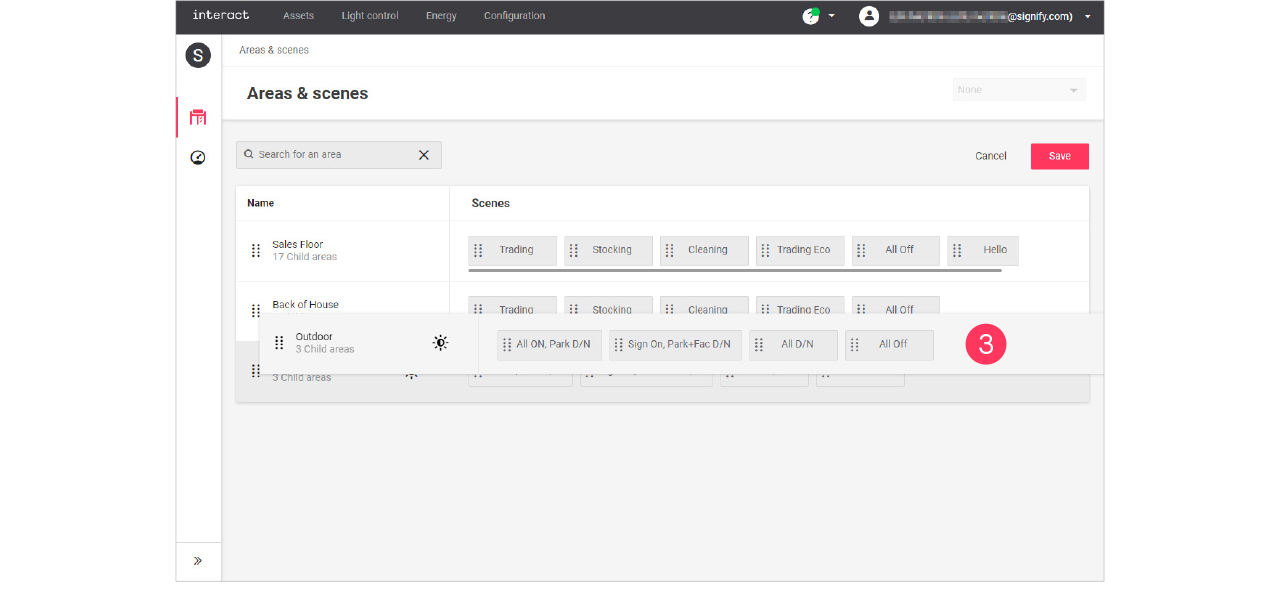
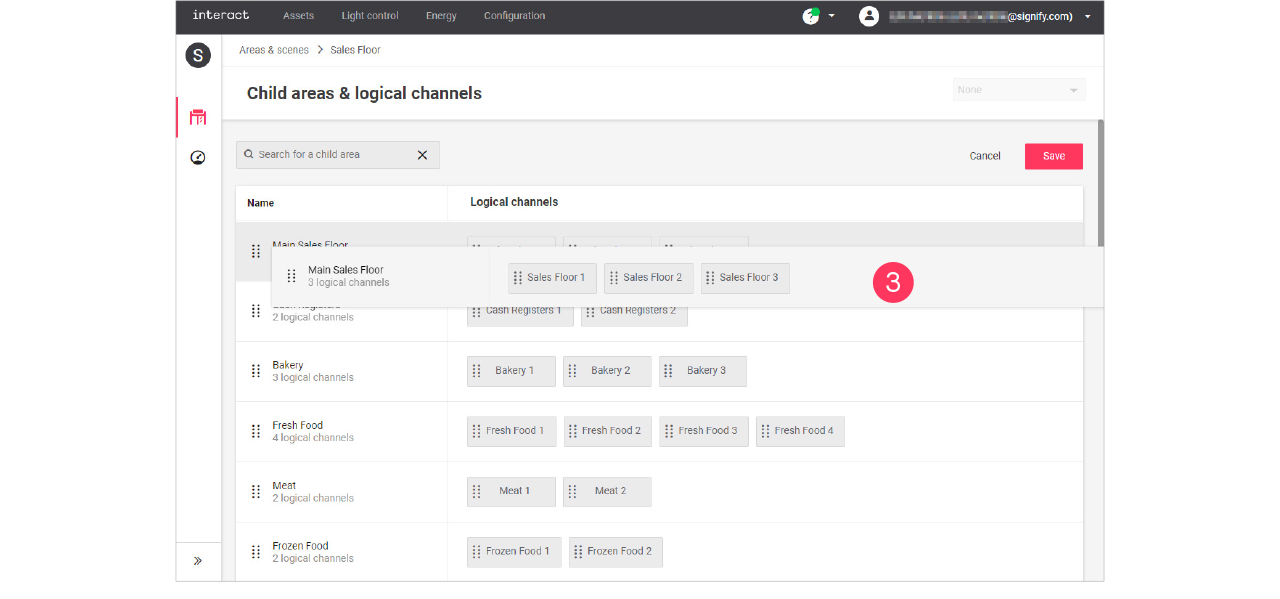
Add, edit and reorder control zones
| Keep in mind that adding or editing control zones impacts all sites that use the selected format. Therefore, this should be done with caution. |
| Control zones are also called child or nested areas. |
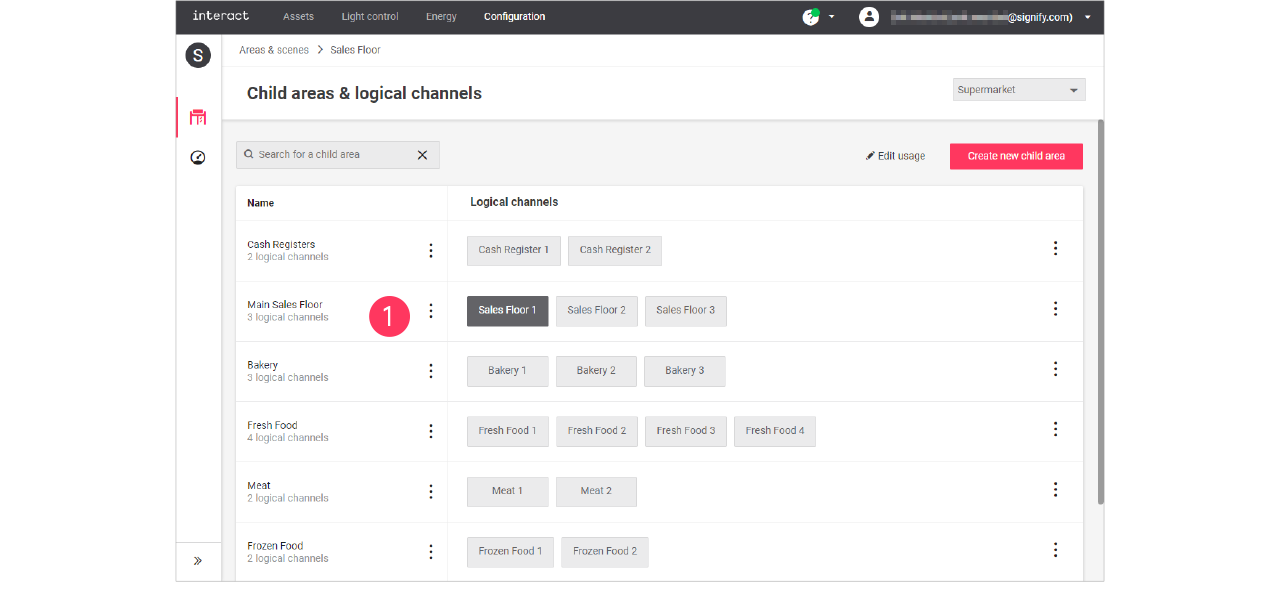
Child areas, or control zones, are smaller groups of lights that can have their own setting in the area.
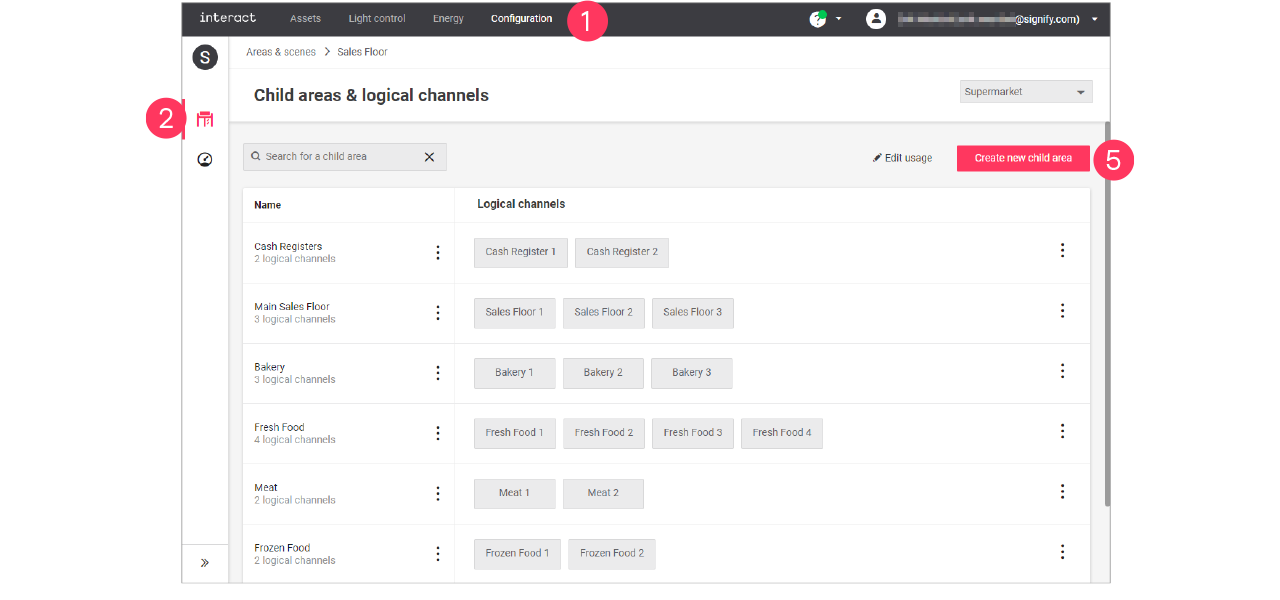
Add child area
-
In the menu, click Configuration.
-
Select Areas & scenes (
). -
Optionally, select the Format.
-
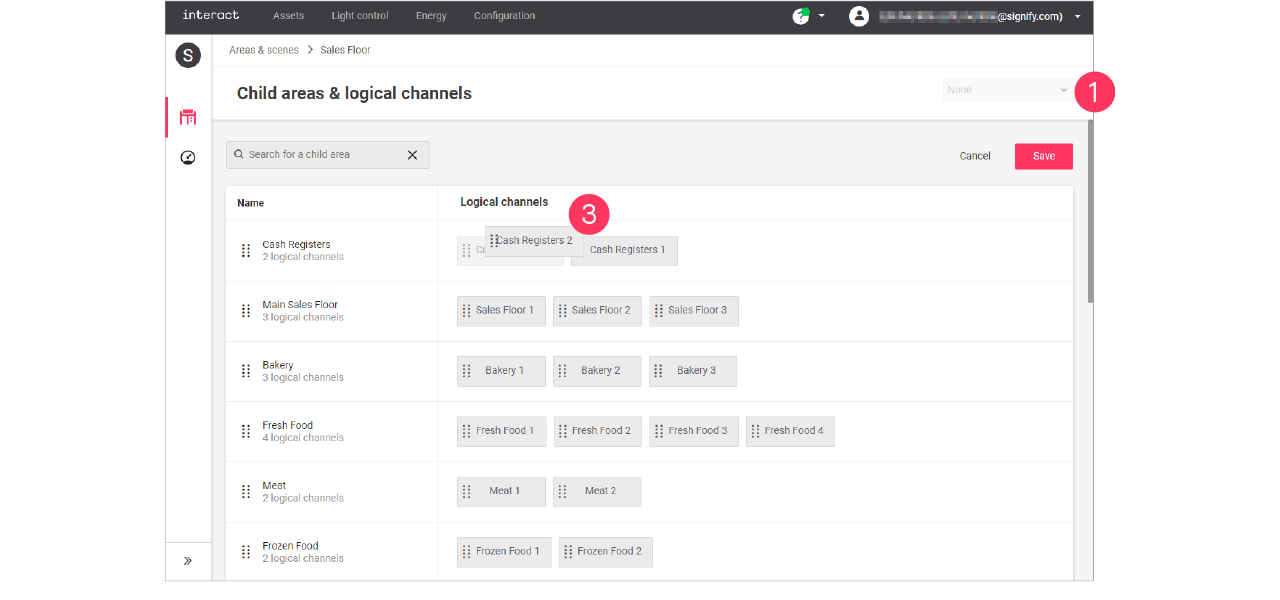
Click an Area to show the list of child areas.
-
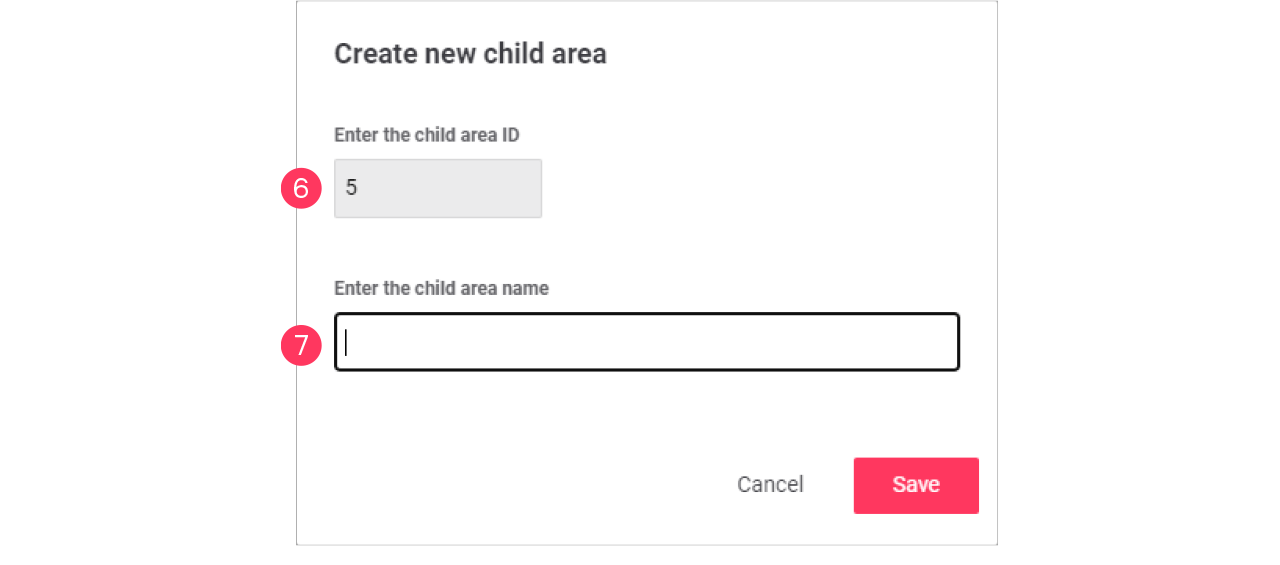
Click Create new child area.
-
Enter the ID number for the child area.
-
Enter the Name of the child area.
Click Save.
Edit child area
-
With the mouse, hover over the Action menu icon (
) of the child area to edit.
Click Edit child area.
-
In the Edit child area menu, change the required settings (ID, Name).
Click Save.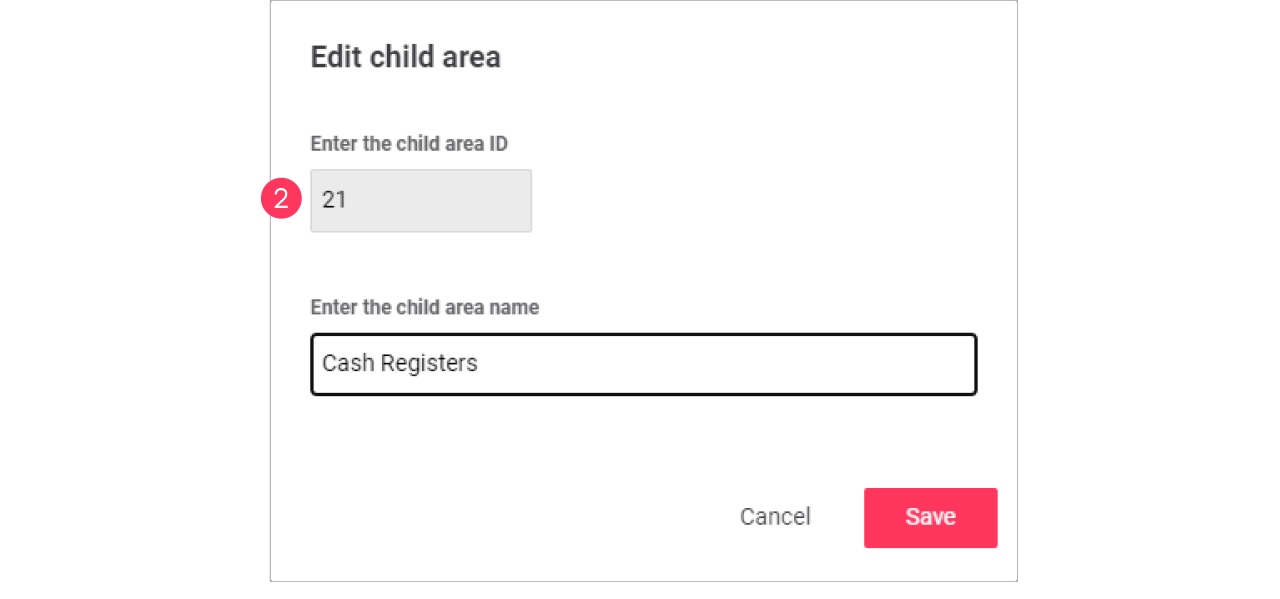
Edit usage of a child area
-
With the mouse, hover over the Action menu icon (
) of the child area to edit.
Click Usage to change which format can use the child area.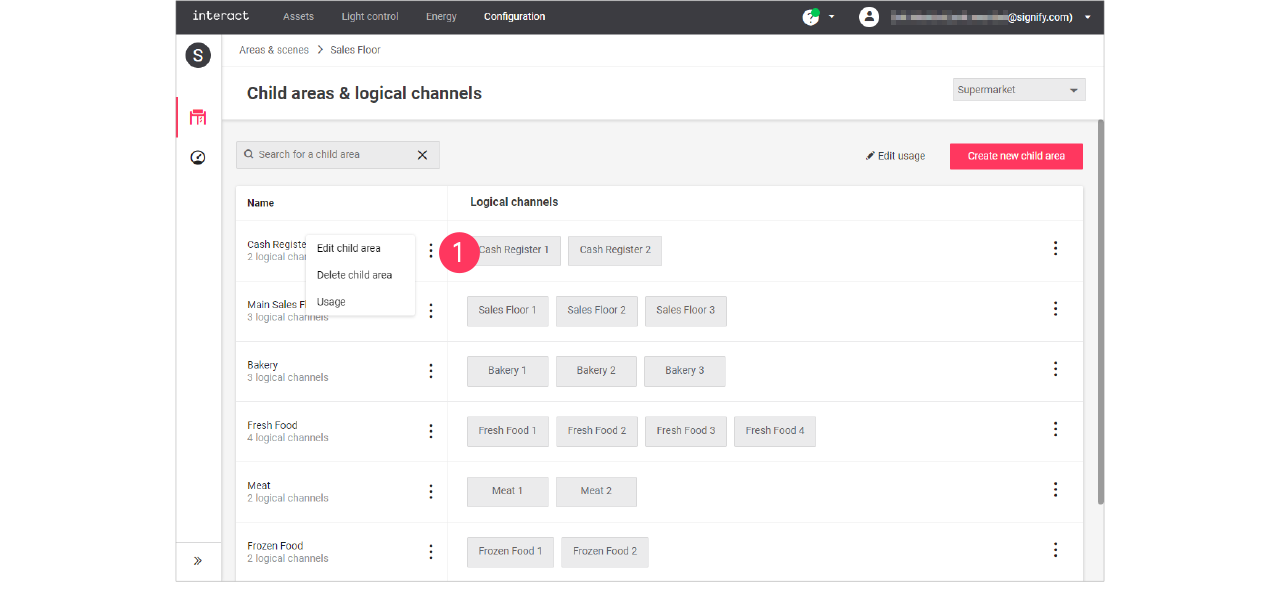
-
In the Usage menu, select the formats that can include the selected child area.
Click Save.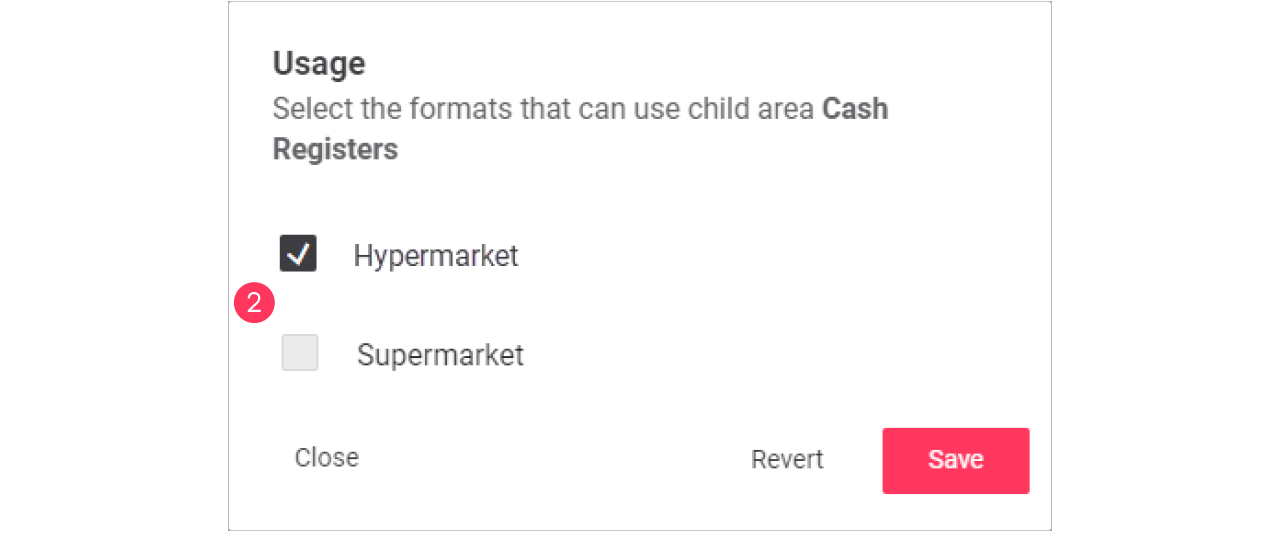
Advanced usage editing
The differences between the formats has also an effect on the scenes that can be used. The average size of a format plays a role in the number of scenes used per area, but also a more luxurious feel for one format would require more scenes. Usage editing gives you the possibility to enable or disable the usage of scenes for a specific format.
-
Start with selecting the Format.
-
Click (
) Edit usage.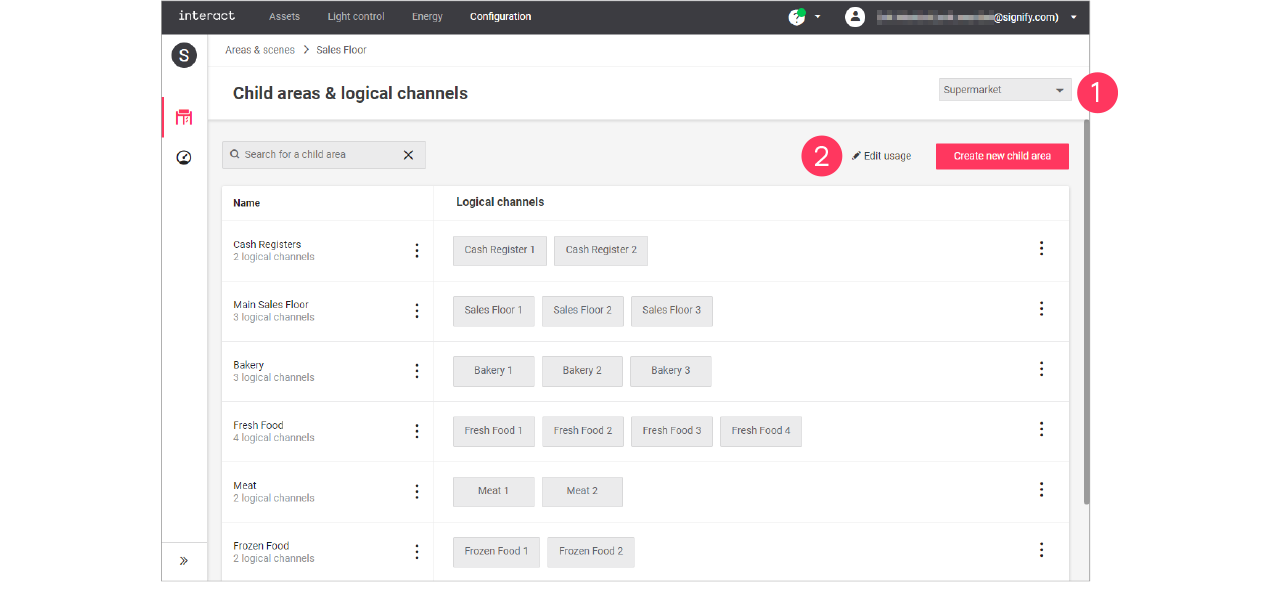
-
Clear the checkmark next to the Name of the child area to change its usage in the format.
-
Click the names of the Logical channels to change its usage in the format.
Click Save.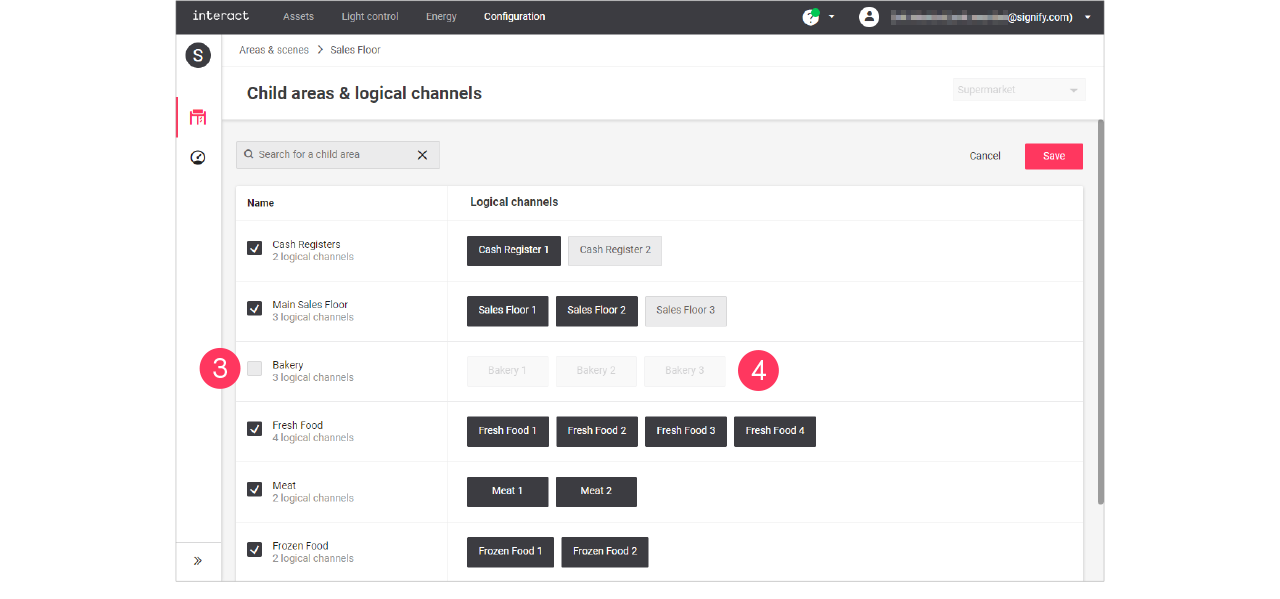
Child areas and/or Logical channels that are greyed out are excluded for usage in the selected format.
Add, edit and reorder logical channels
| Keep in mind that adding or editing logical channels impacts all sites that use the selected format. Therefore, this should be done with caution. |
Add logical channel
-
In the menu, click Configuration.
-
Select Areas & scenes (
). -
Optionally, select the Format.
-
Click an Area to show the list of child areas.
-
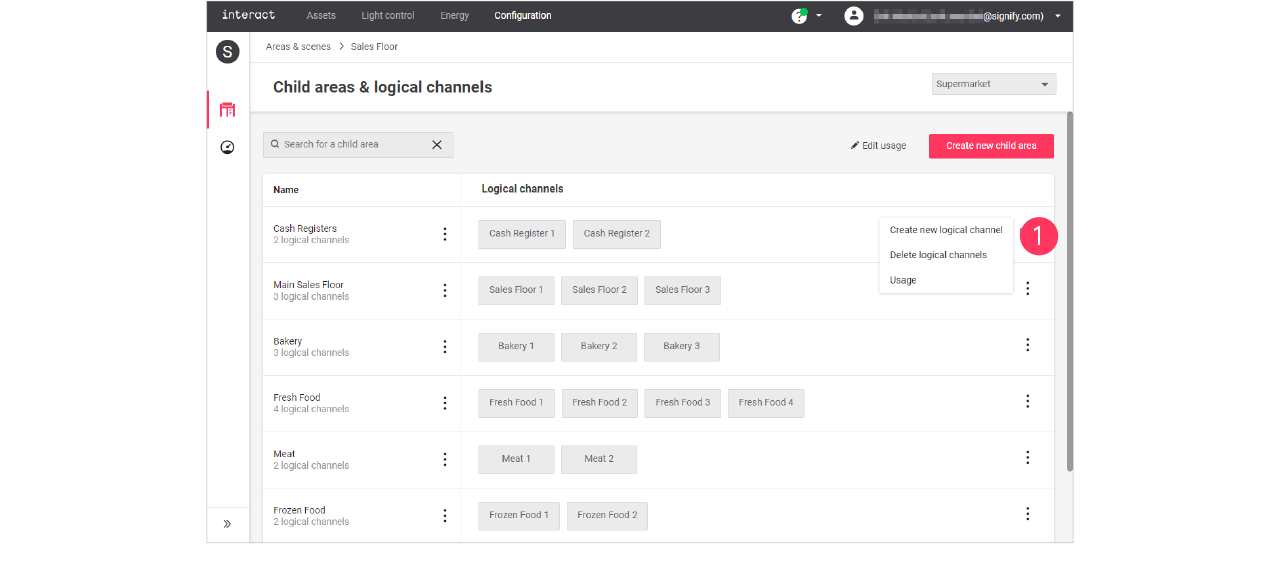
With the mouse, in the Logical channels column next to the child area to add the channel to, hover over the Action menu icon (
).
Click Create new logical channel.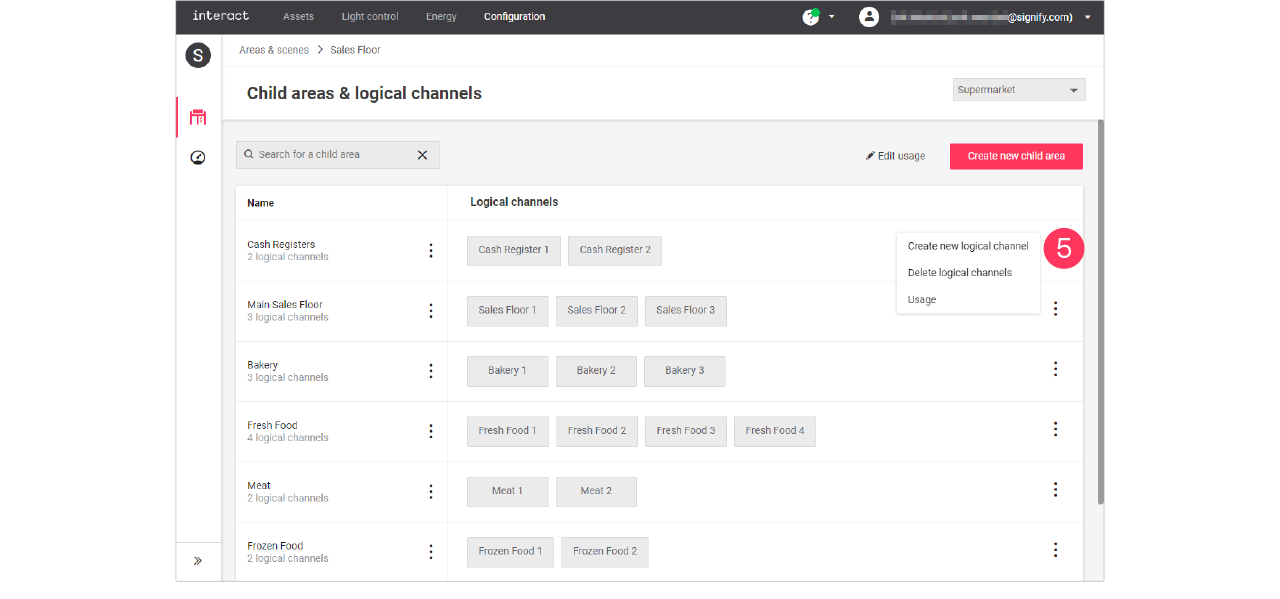
-
Use the dropdown to select the type of logical channel, set by default to Dimming/Switching.
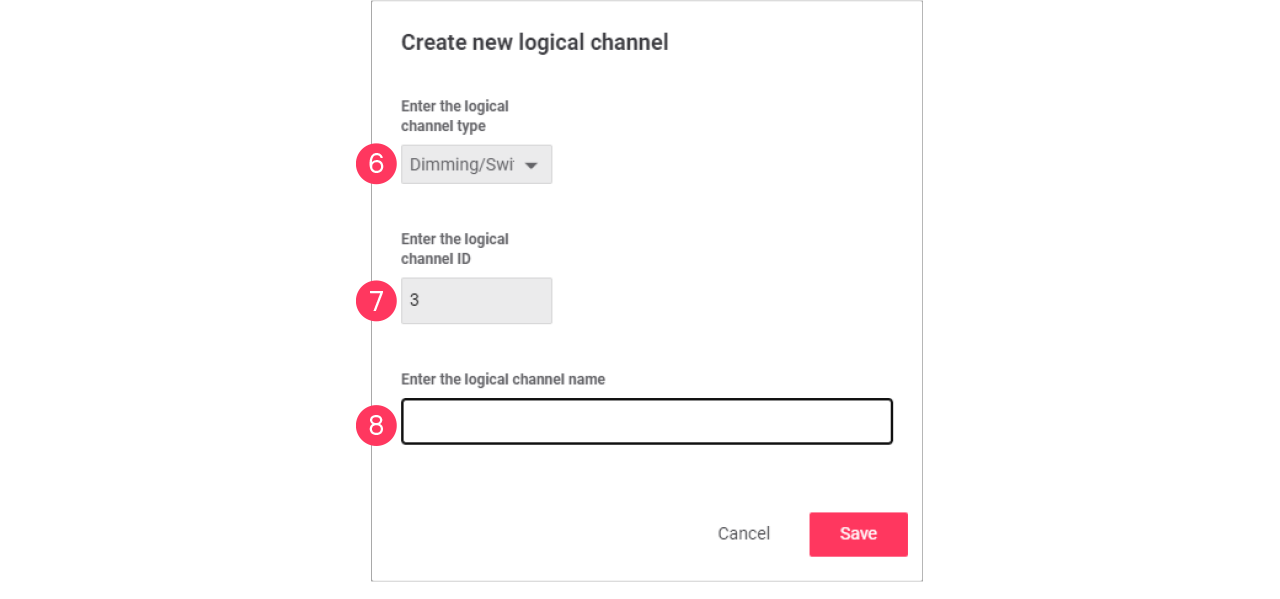
-
Enter the ID number for the channel.
-
Enter the Name of the child area.
Click Save.
| Select the type RGB when the use of the channel is intended for, for example, colored accent lighting. |
Edit a logical channel
-
With the mouse, in the Logical channels column, click the Channel to edit.
-
In the Edit logical channel menu, change the required settings (type, ID, Name).
Click Save.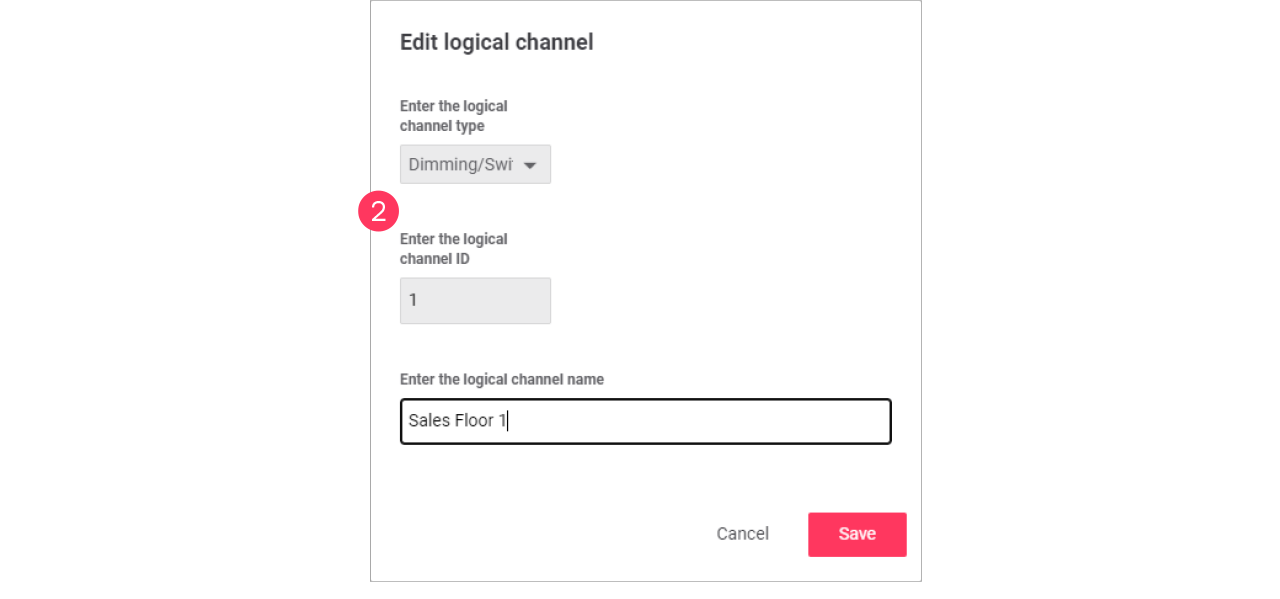
Synchronize time and time zone
Synchronizing the time and time zone with the site location is important for the schedules to run on the local time. This is equally important for the day and night mode to be in sync with the times of sunrise and sunset.
Synchronization with the time zone is configured during commissioning of the gateway using the GPS coordinates of the site. These coordinates are given as part of the intake.
The system checks the local time of the gateway remotely. In case the time on the gateway is out of sync, the customer is given the possibility to trigger synchronization.
-
In the menu, click Light control.
-
Click Sites (
), then click Overview. -
When the local time is out of sync, an orange exclamation mark appears next to the time.
-
Hover over the
 symbol, a popup appears.
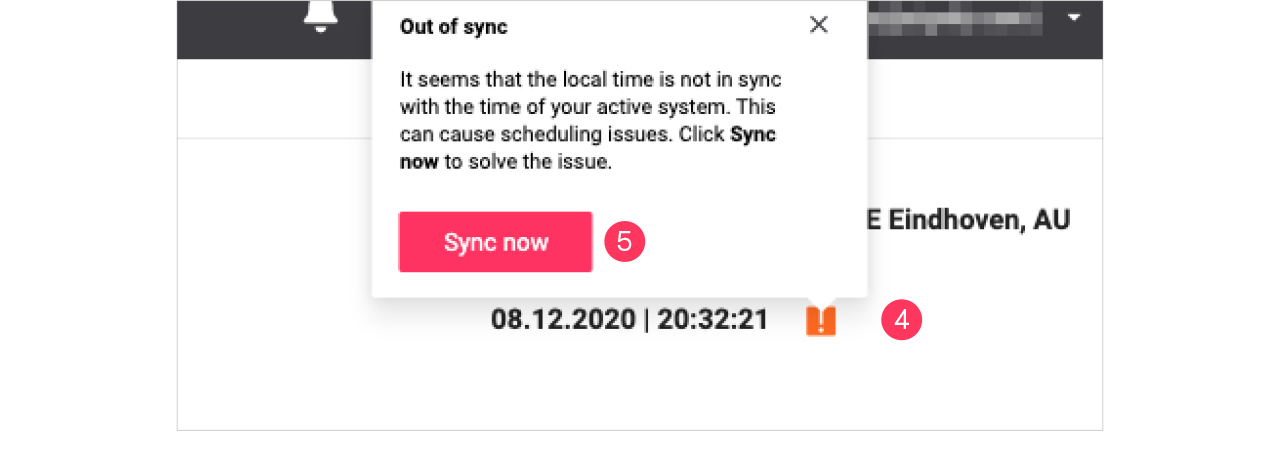
-
Click Sync now to synchronize the time with your system time.