Light control
Introduction to light control
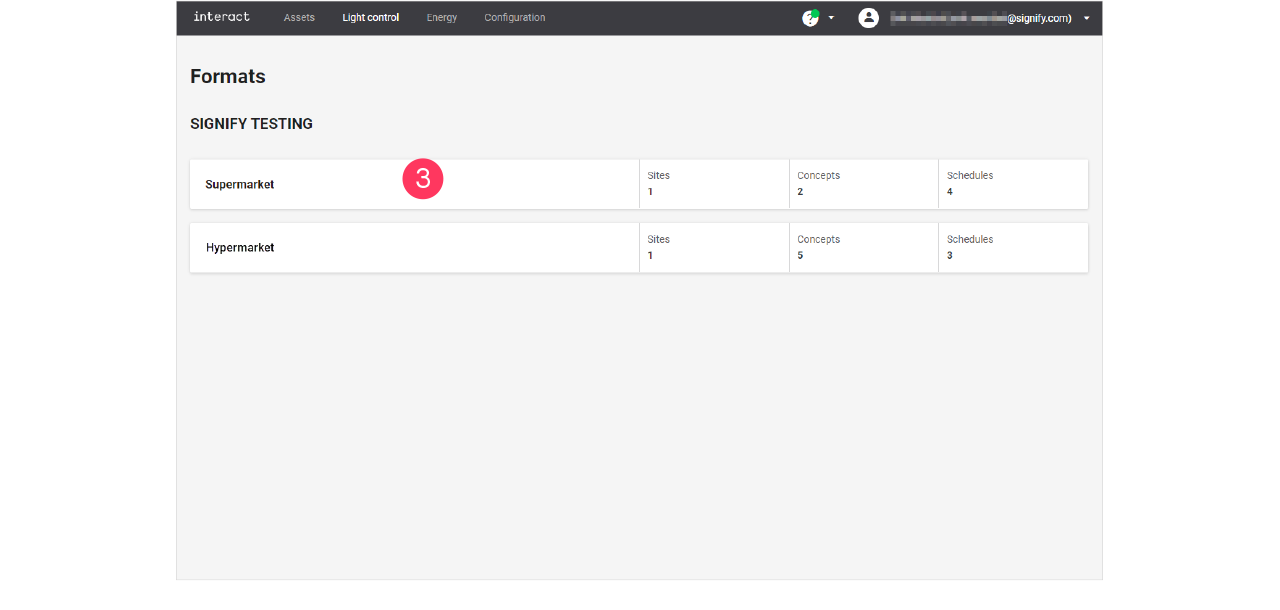
With the Multisite system, the light control is handled for each format separately. A retailer can have multiple formats under several banners. Formats are physical/design characteristics of the site, for example XL, super centers, garden centers, city formats, etcetera.
 Light concepts
With Concepts you define for each scene the actual light settings (dim level and, if applicable, also color) at each logical channel. Once defined, a particular scene can easily be recalled or triggered for an entire area.
You can start a new concept from scratch or clone an already created or deployed concept. When starting from scratch, all light levels for the areas are set to zero (0). Cloning a concept saves time since the light levels are copied from the original concept to a new draft.
 Schedules
To automate the behavior of the lighting system, you can specify Schedules. A schedule defines for each separate area the times that specific scenes are activated over the course of a 24-hour cycle.
You can start a new schedule from scratch or clone an already created or deployed schedule. When starting from scratch, an empty schedule will be created. Cloning a schedule saves time since the scene calls are copied from the original schedule to a new draft.
Concepts
Add and edit concepts
Create new concept
-
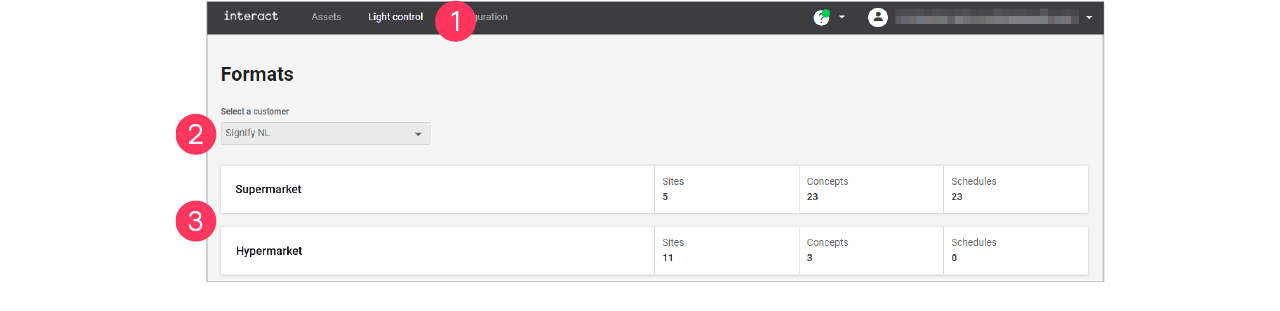
In the menu, click Light control.
-
If applicable, in the dropdown Select a customer, select the customer to show the known formats.
-
Select a format.
-
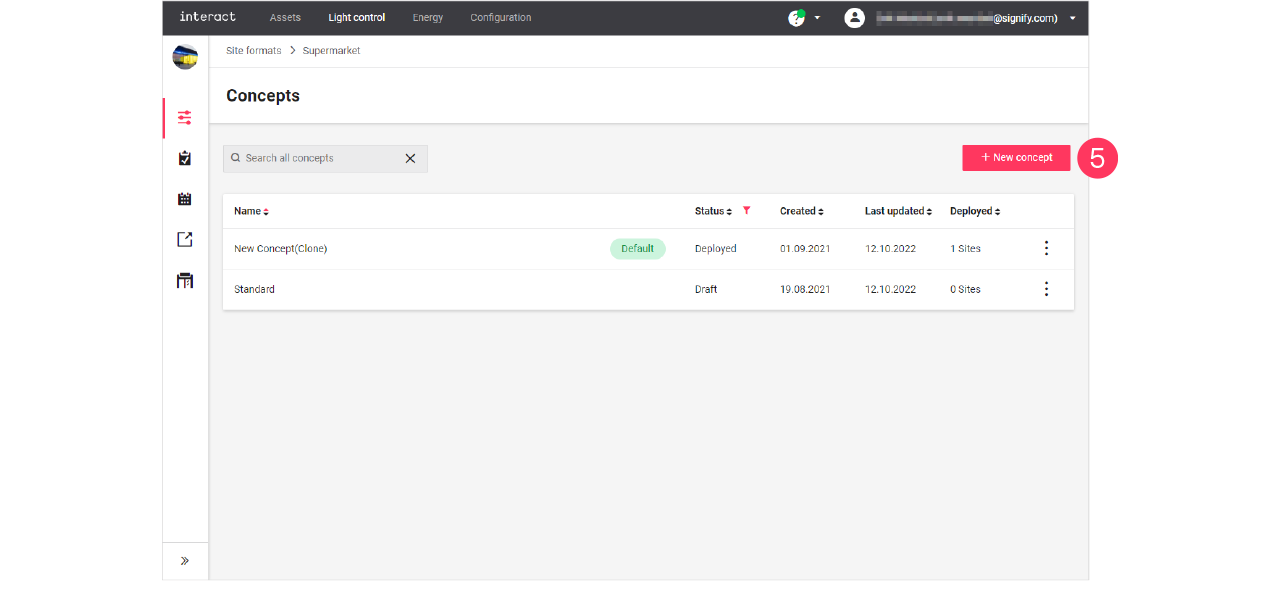
Click Concepts (
 ).
). -
Click + New concept.
-
Enter the Name for the concept.
Click Create. The concept is now available with the status Draft. -
Click the concept and start editing.
Clone existing concept
When you want to reuse an existing concept, for example in case there are only some light levels to change, then you can clone a concept. Cloning is possible for concepts that are in Draft or Deployed status.
-
In the menu, click Light control.
-
If applicable, in the dropdown Select a customer, select the customer to show the known formats.
-
With the mouse, hover over the action menu icon (
 ) of the schedule to edit.
Click Clone.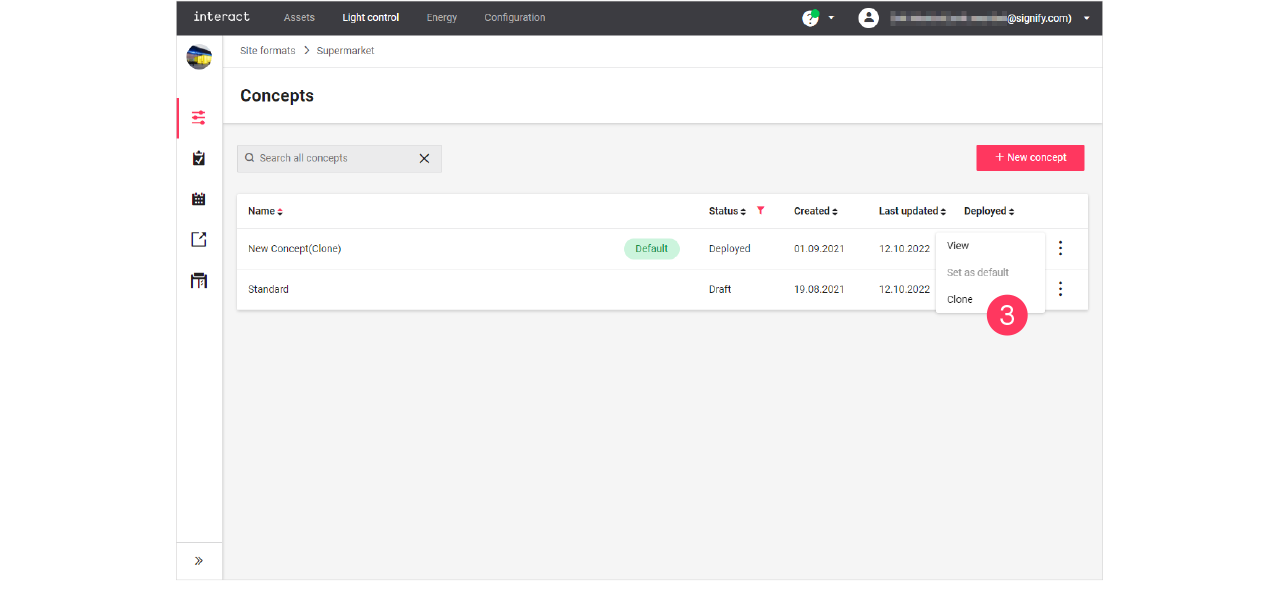
-
Enter the Name for the concept.
Click Create. The concept is now available with the status Draft. -
Click the concept and start editing.
Change light levels
| You can only change the light levels of concepts with the status Draft. |
-
In the menu, click Light control.
-
If applicable, in the dropdown Select a customer, select the customer to show the known formats.
-
Select a format.

-
Click Concepts (
). -
With the mouse, hover over the Action menu icon (
) of the concept to edit. Click Edit.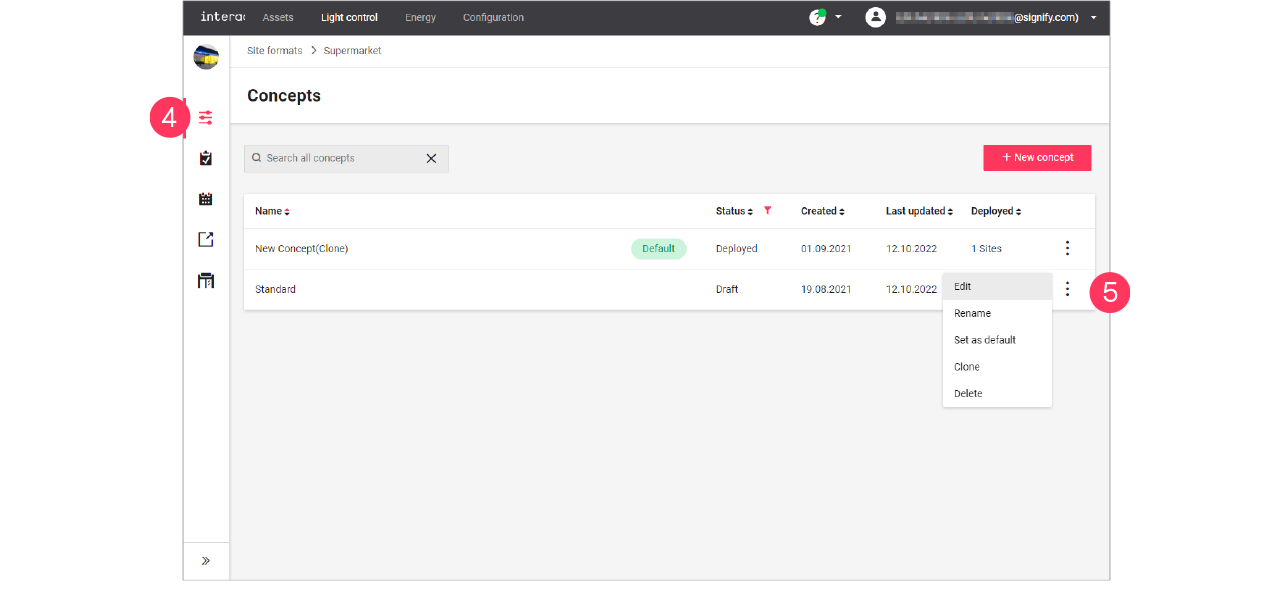
-
Click on the row of an area to start editing;
or: click the name of a scene.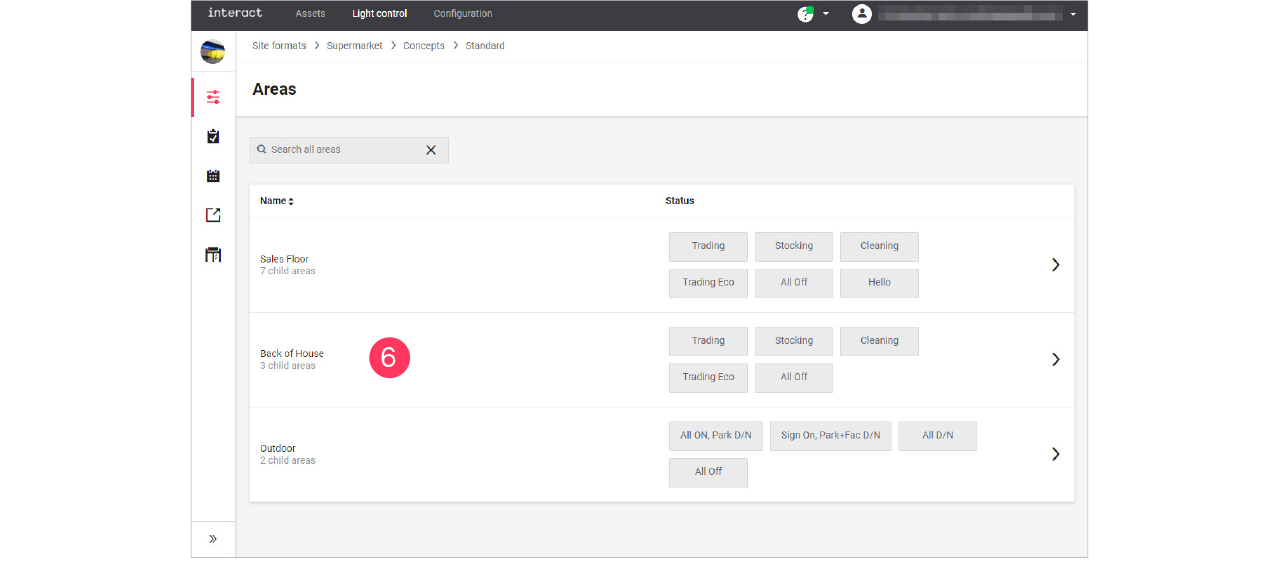
The scene that you edit shows dark. Select another scene to start editing the settings of this scene. -
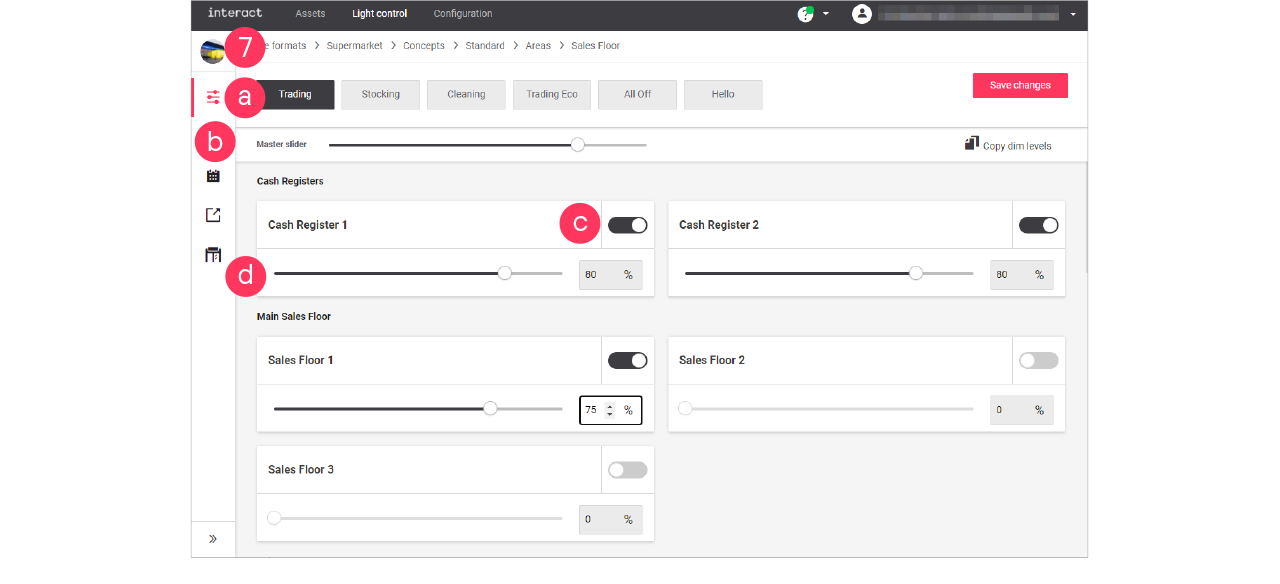
Start editing the light settings for the area:
-
Select a scene to edit its light settings.
-
Use the Master slider to change the relative dim level of all zones that are switched to ON.
-
Switch the zone ON or OFF.
-
Move the dim slider to adjust the light level.
or: Enter the value in the box.
-
-
Click Save changes.
|
Day and night mode
With day and night mode, you can make sure that lights at a site turn on and off according to the schedule, but in relation with sunrise and sunset (astroclock).
After enabling the day and night mode, the logical channel shows two light levels to be set: one for the light levels during daytime, the other for the light levels during the night.
Set day and night mode
When editing the light levels of the area (see section Change light levels):
-
Click the Day/Night toggle button (
 ) to switch on day and night mode for the area.
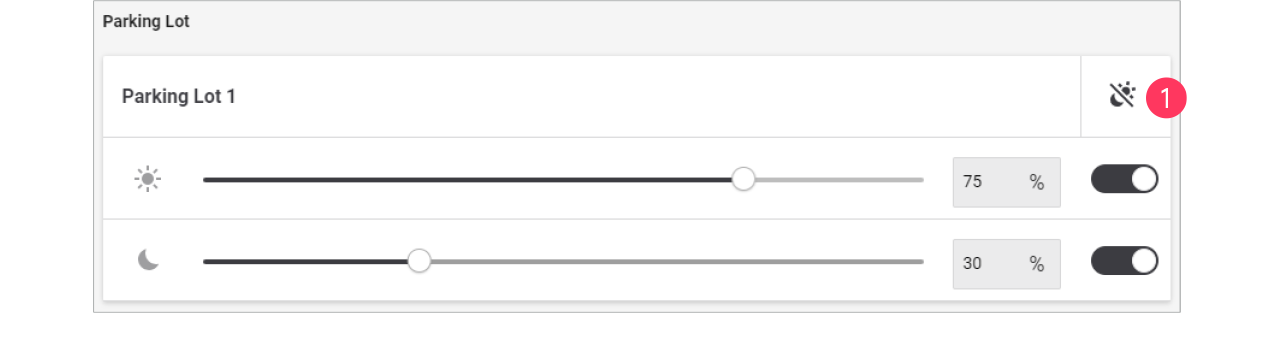
-
Set the light levels to be used during daytime.
-
Set the light levels to be used during the night.
-
Click Save changes.
You can change the offset of the response relative to the sunrise or sunset. See section Settings for more information.
RGB lighting
| With RGB-lighting, you can think of colored accent lighting, or façade lighting. |
When editing the light levels of the area (see section Change light levels):
-
Set the light level of the area.
-
Click the Color picker button (
 ).
).
-
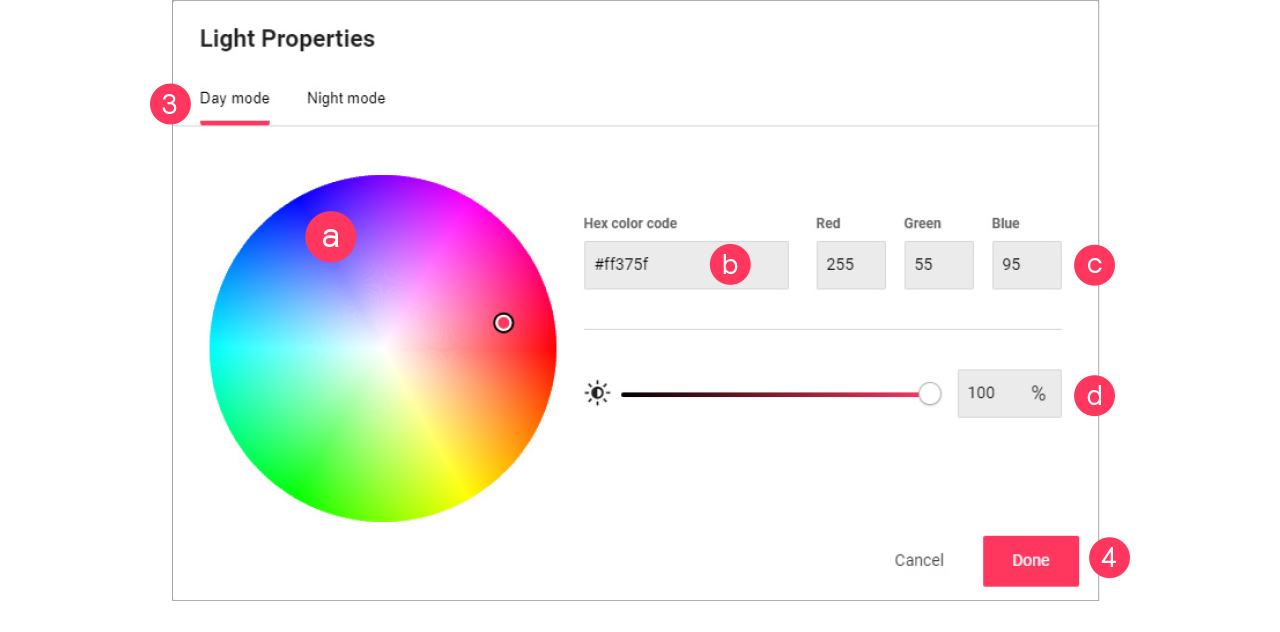
Set the Light properties:
-
Color by selecting it in the color wheel
-
Color by Hex code
-
Color by RGB
-
Light level
-
-
Click Done.
 Live validation
With live validation, you can check the settings you change while you are on site. This helps you to make sure the changes are in line with the expectations.
| It is highly recommended to use live validation only outside of trading hours because onsite the light levels respond to the change of the settings. |
-
In the menu, click Light control.
-
Click Live validation (
 ).
). -
Select the site to enter live validation.
-
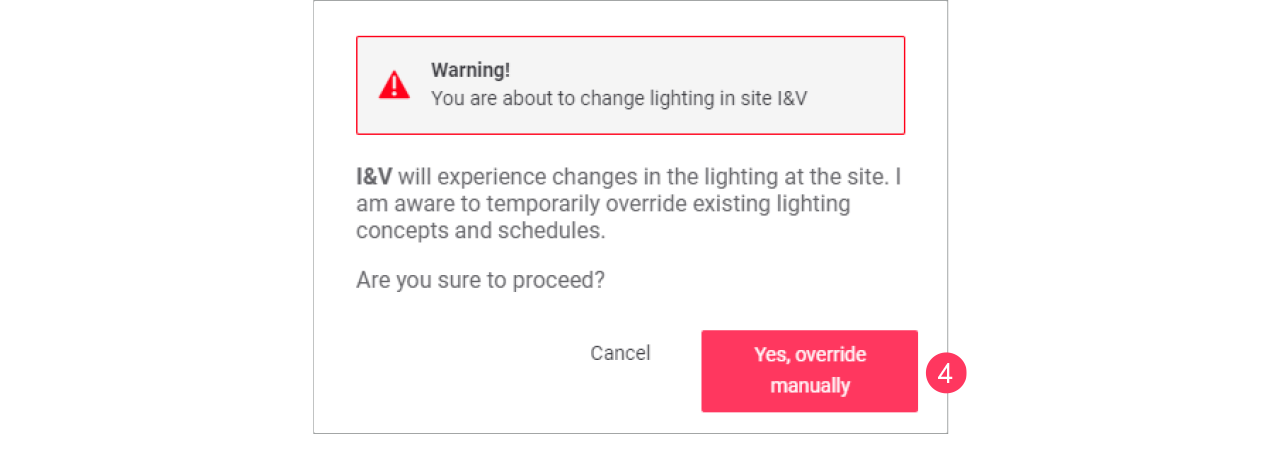
A warning message appears. Click Yes, override manually if you’re absolutely sure.
-
Select the Concept to use for live validation.
-
Click the Name of the area to apply and check.
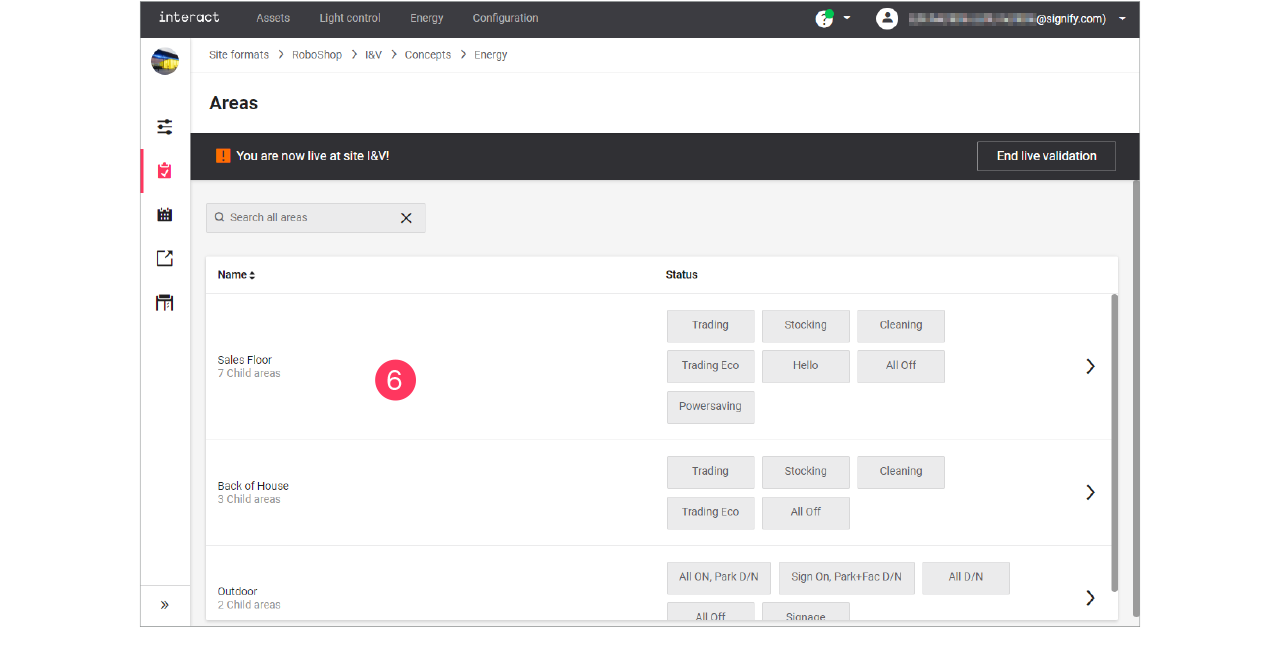
-
When done, click End live validation.
Add and edit schedules
With schedules you can automate the behavior of the lighting depending on a specific event. The event types are:
-
Regular day: a 24-hour schedule that occurs often, for example normal weekdays or weekends.
-
Special day: a 24-hour schedule that occurs only one time. A special event can span multiple days and can be used for opening hours that are applicable for special occasions, for example during a special season.
-
Holiday: one or more recurring days that allow for their own 24-hour schedule, for example (national) holidays (site can also be closed).
| When schedules differ per day or between weekdays and weekends, you need to create specific schedules for these days. |
Add new schedule
Add a schedule
-
In the menu, click Light control.
-
If applicable, in the dropdown Select a customer, select the customer to show the known formats.
-
Select a format.
-
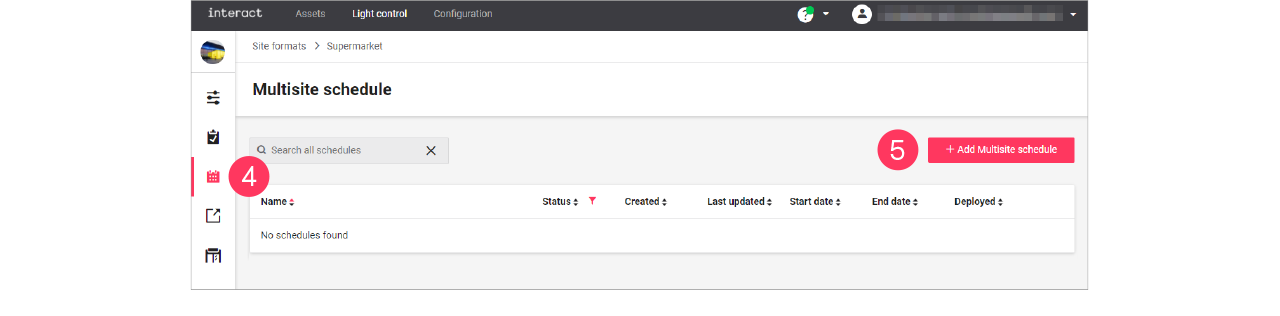
Click Schedules (
 ).
). -
Click + Add Multisite schedule.
-
Enter the Name for the schedule.
Click Save.
-
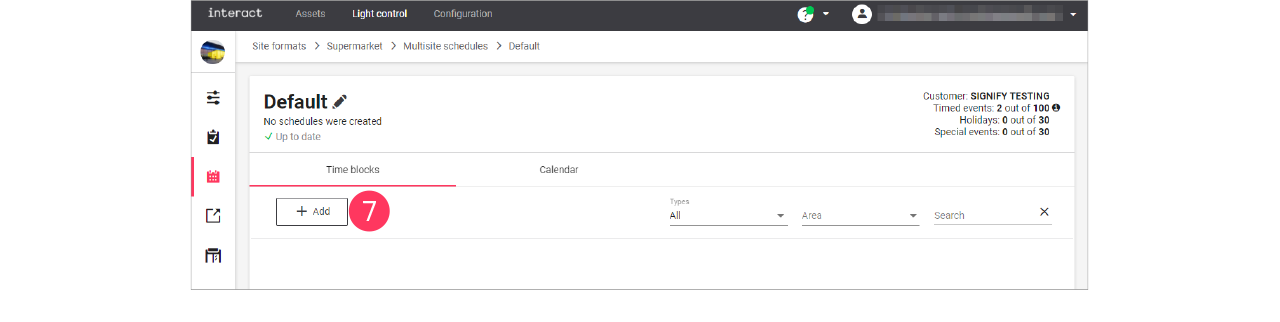
Click + Add to start creating the schedule.
Create the schedule
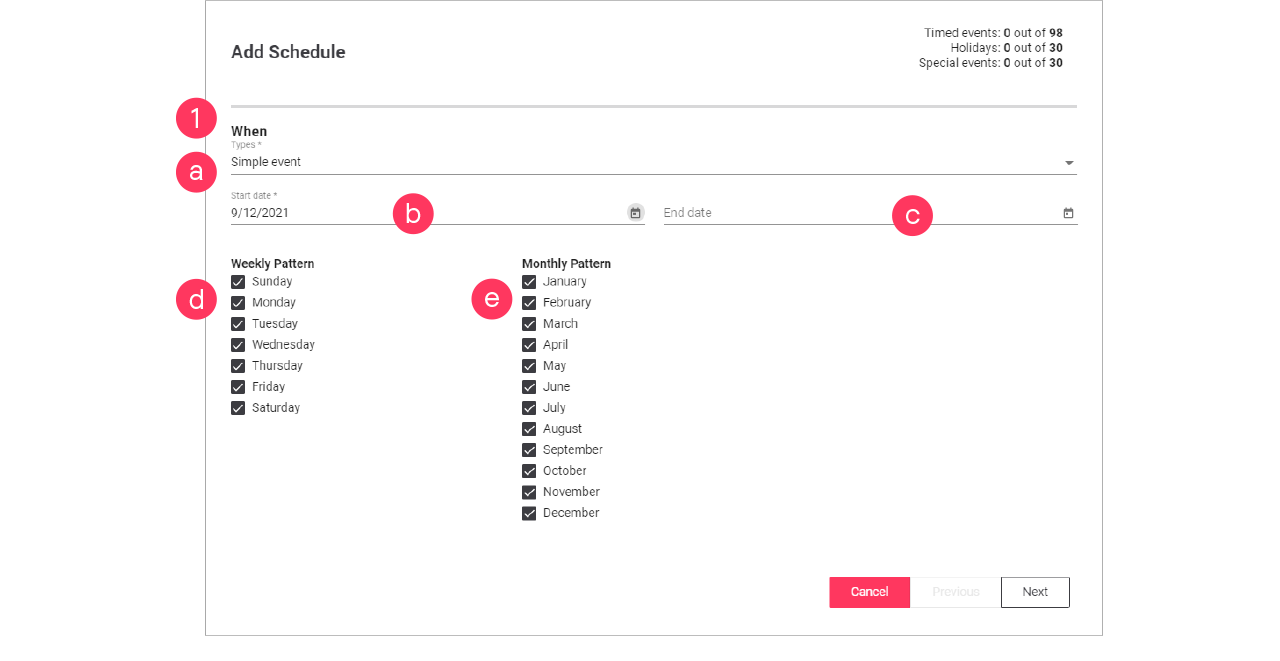
When creating and editing schedules, keep in mind that the wizard follows a structured order:
-
When: start/end date, weekdays, and months
-
Where: area(s) the schedule applies to
-
What: what happens on the defined times
-
On the When page, make the calendar selections:
-
Select the Type of event:
-
Click the calendar (
 ) to select the Start date.
 -
Click the calendar (
) to select the End date (optionally). -
Clear/select the days for the Weekly Pattern.
-
Clear/select the months for the Monthly Pattern.
Click Next.
When creating a Special day, specify an End date in the far future. Select a date using the calendar and change the year manually to, for example, 2099. -
-
On the Where page, select the Areas the schedule applies to.
Click Next.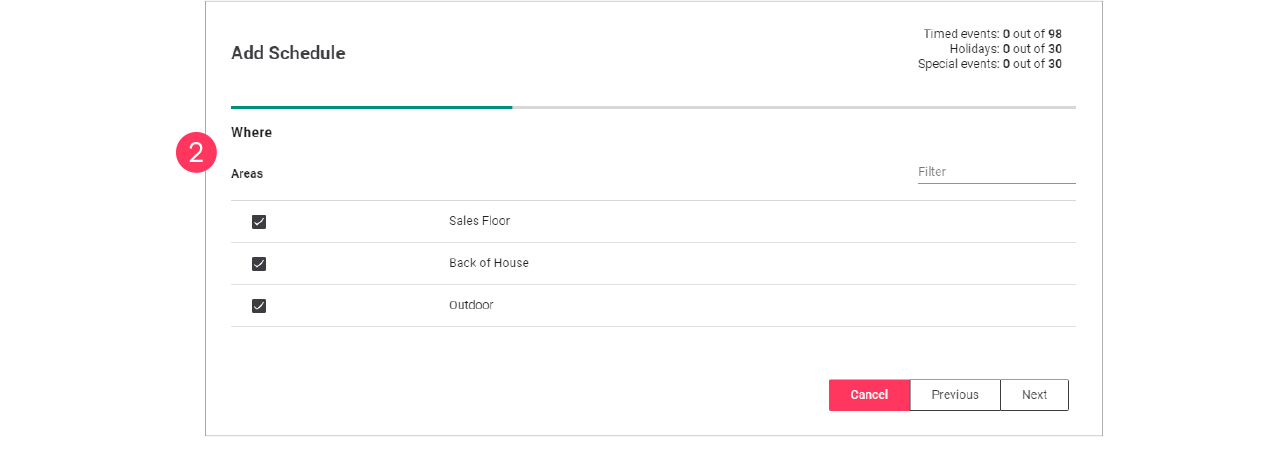
-
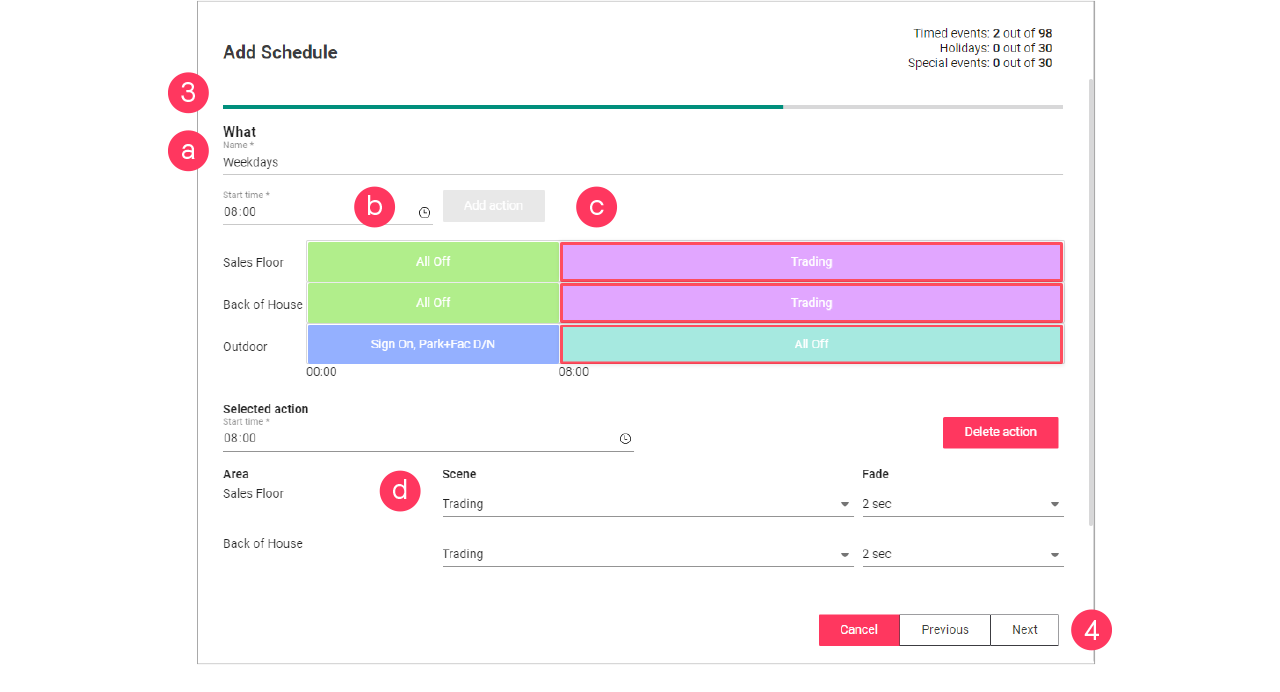
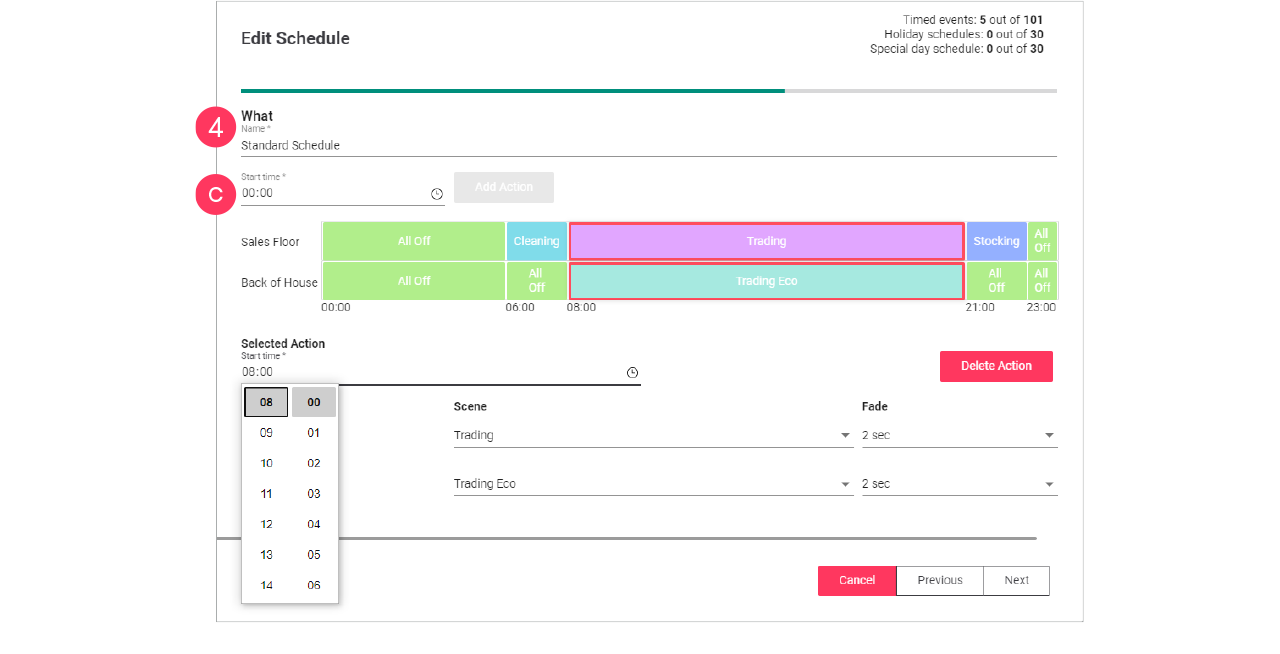
On the What page, make the timer selections:
-
Enter the Name for the schedule.
-
Click the clock (
 ) to define the Start time.
 -
Click Add Action.
-
Select the Scene and Fade.
-
-
Repeat for other timeframes.
Make sure to select the Scene and Fade for all timeframes on the timeline.
Click Next.Always make sure that the timeline covers 24 hours. A timeframe labeled Unknown is not allowed. -
Check the summary. Click Previous to correct the settings.
Or: Click Add to close the wizard and add the schedule to the list.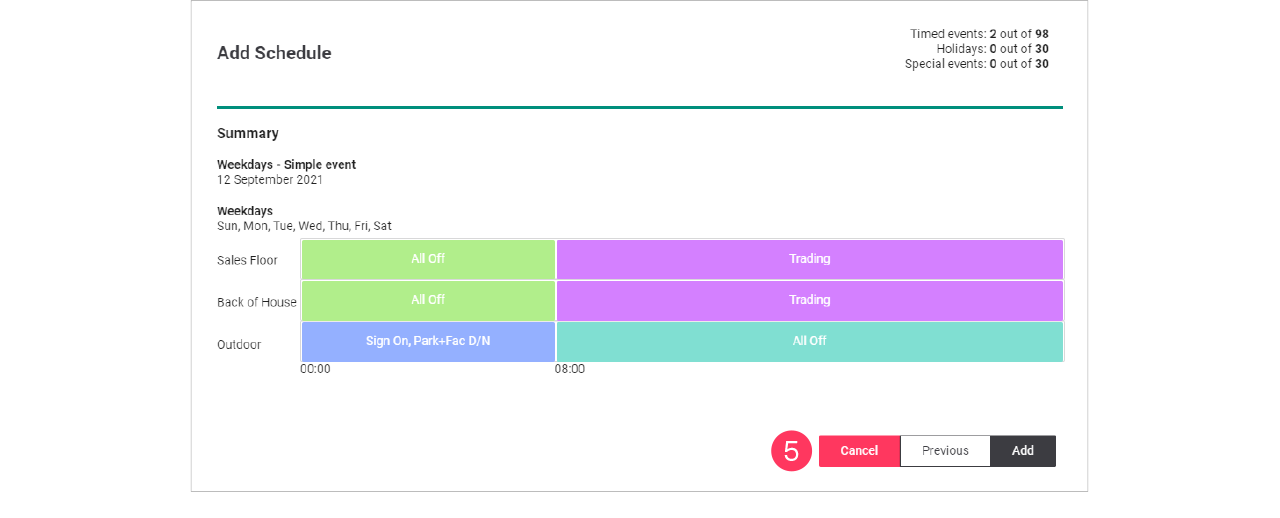
Adjust site opening hours
When the opening hours of a site may differ during the season, for example because of holidays or another event. The simplest way to do this is to clone a schedule and copy an event and change this to the specific needs.
Clone the schedule
-
In the menu, click Light control.
-
If applicable, in the dropdown Select a customer, select the customer to show the known formats.
-
Select a format.
-
Click Schedules (
). -
In the list of Multisite schedules, find one the deployed schedules for the site
The currently running schedule is labeled Default. -
With the mouse, hover over the Action menu icon (
) of the Multisite schedule to clone. Click Clone.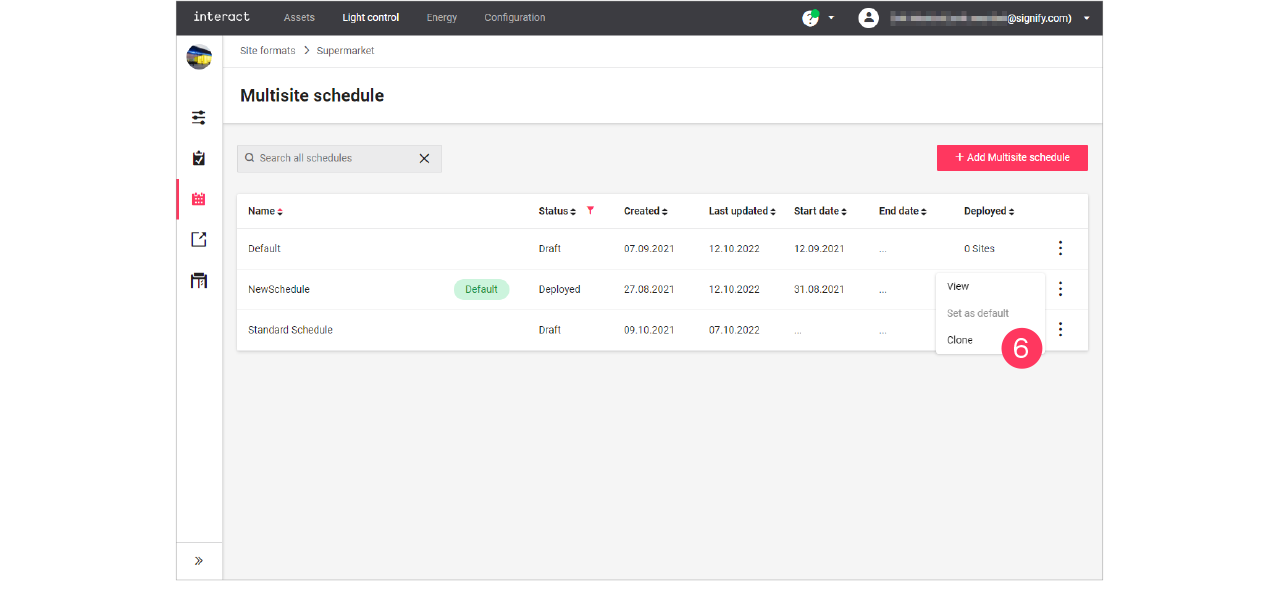
-
Enter the Name of the New Multisite schedule.
Click Clone.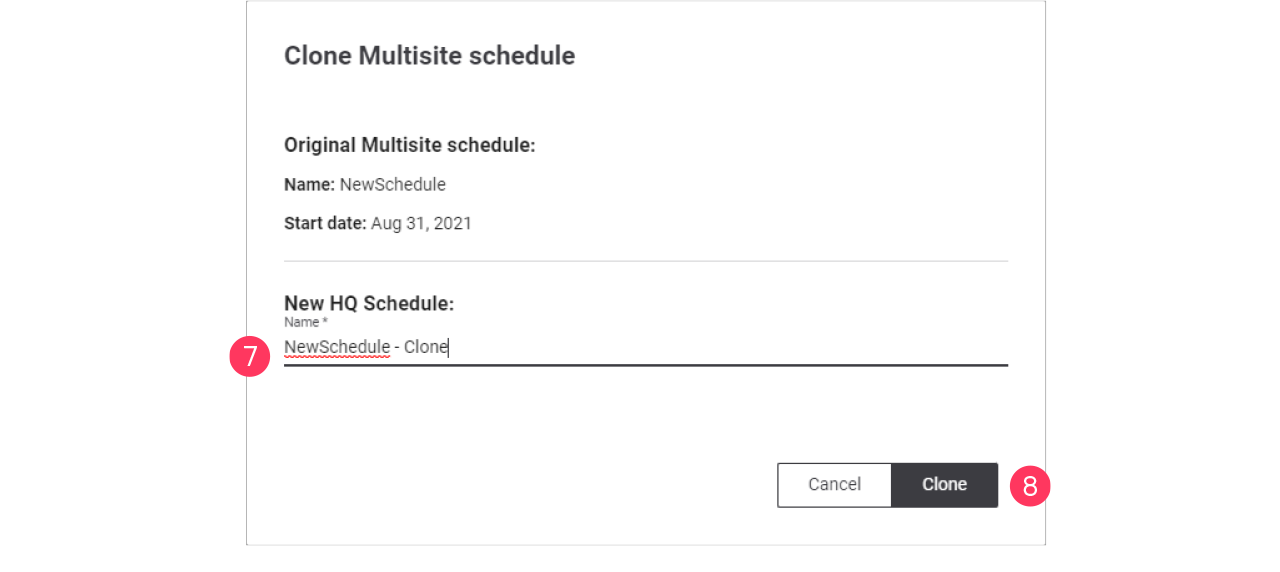
Edit the schedule
-
In the list of Multisite schedules, find the cloned schedule.
-
With the mouse, hover over the Action menu icon (
) of the schedule to edit. Click Edit.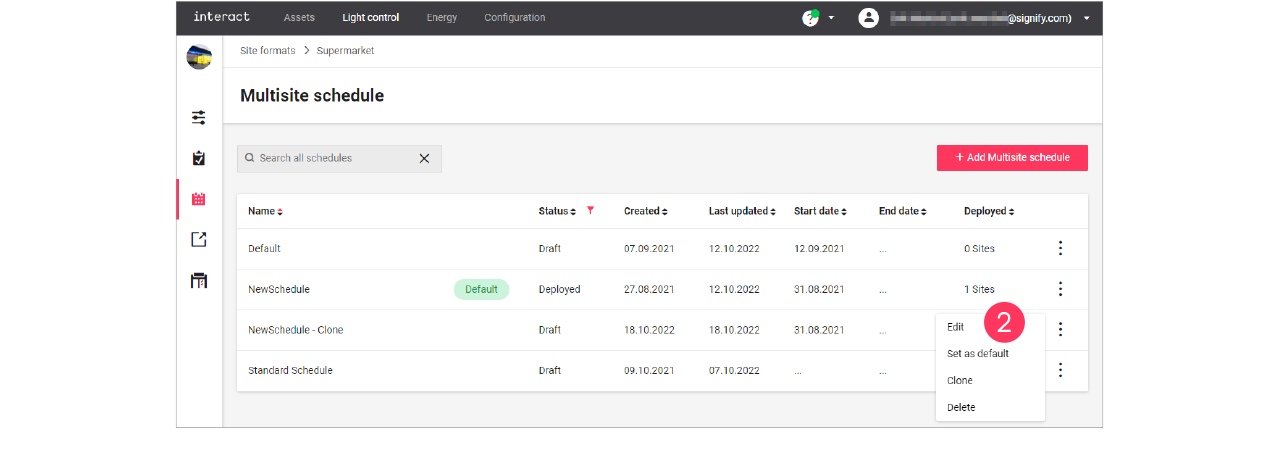
-
With the mouse, hover over the Action menu icon (
) of the event to edit. Click Edit schedule.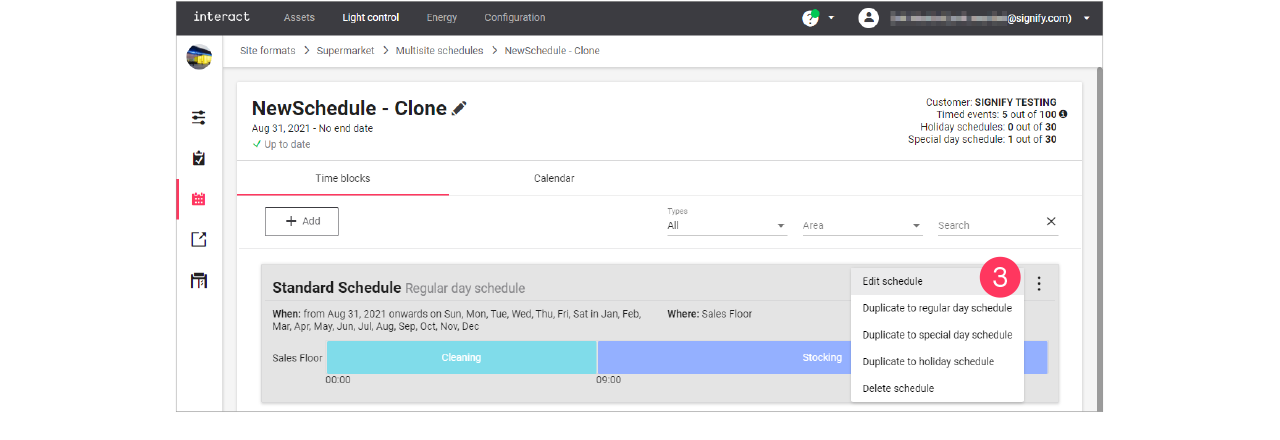
-
Following the wizard, change the settings of the schedule:
-
When page: select the Start date and if applicable the Weekly pattern and the Monthly pattern.
Click Next.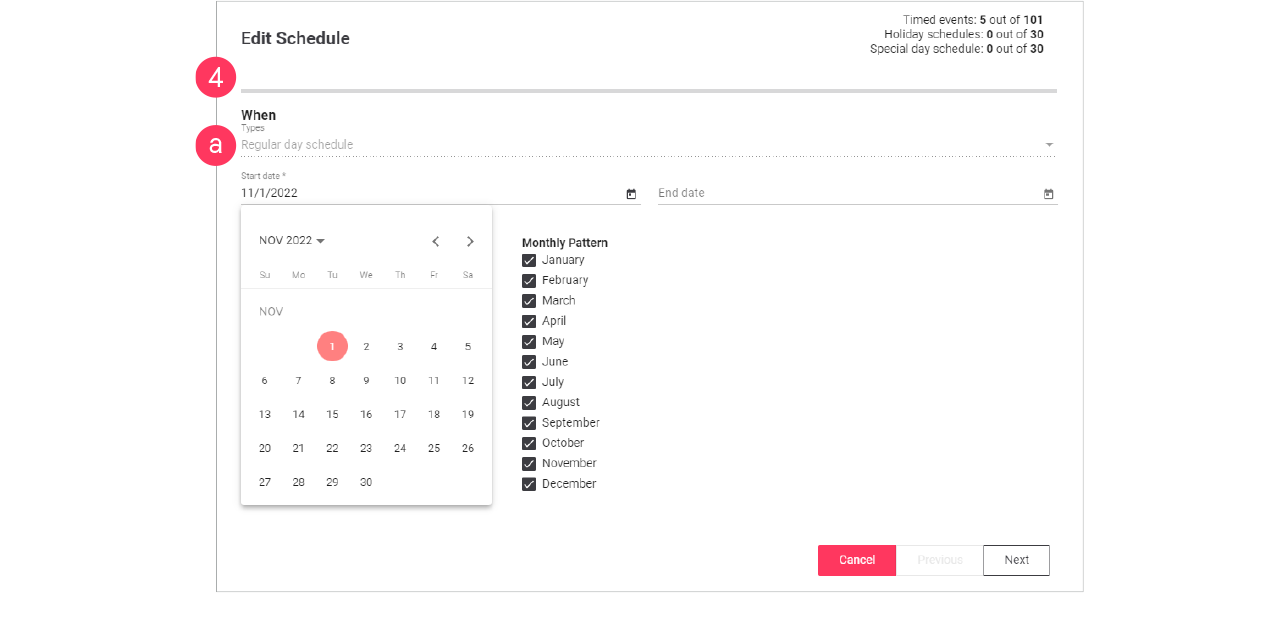
-
Where page: select the areas the schedule applies to. Make sure if a change is required.
Otherwise, click Next. -
What page: change the Start time(s) of the actions in the schedule.
Click Next.
-
-
Check the summary. Click Previous to correct the settings.
Or: Click Update to close the wizard. -
Repeat for the other regular day events in the schedule.
Adjust seasonal opening times
When the opening hours of a site may differ during the season, for example because of holidays or another event. The simplest way to do this is to clone a schedule and copy an event and change this to the specific needs.
Clone the schedule
-
In the menu, click Light control.
-
If applicable, in the dropdown Select a customer, select the customer to show the known formats.
-
Select a format.
-
Click Schedules (
). -
In the list of Multisite schedules, find one the deployed schedules for the site
The currently running schedule is labeled Default. -
With the mouse, hover over the Action menu icon (
) of the Multisite schedule to clone. Click Clone.
-
Enter the Name of the New Multisite schedule.
Click Clone.
Duplicate event
-
In the list of Multisite schedules, find the cloned schedule.
-
With the mouse, hover over the Action menu icon (
) of the schedule to edit. Click Edit.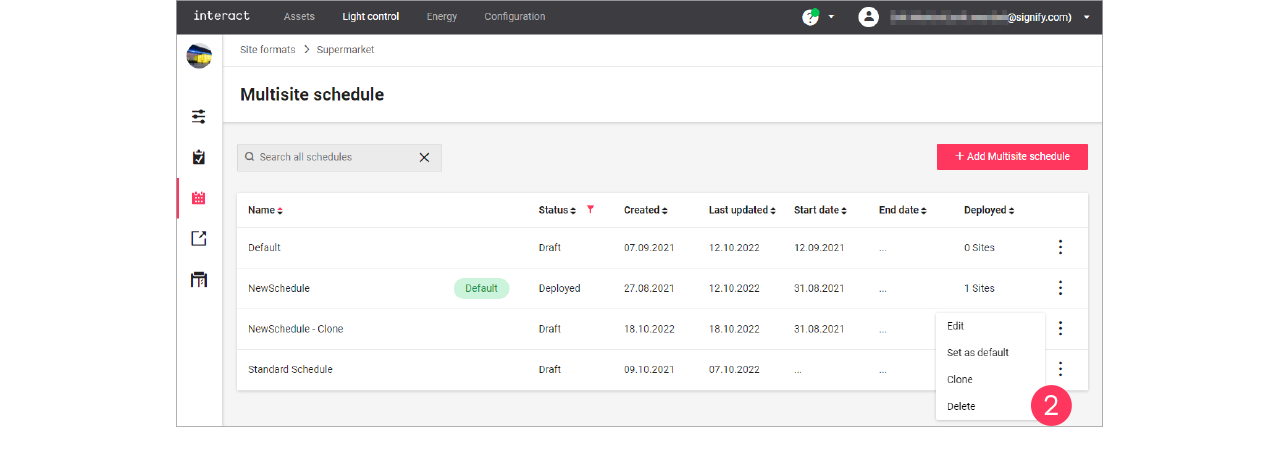
-
With the mouse, hover over the Action menu icon (
) of the event to edit. Click Duplicate to special day schedule.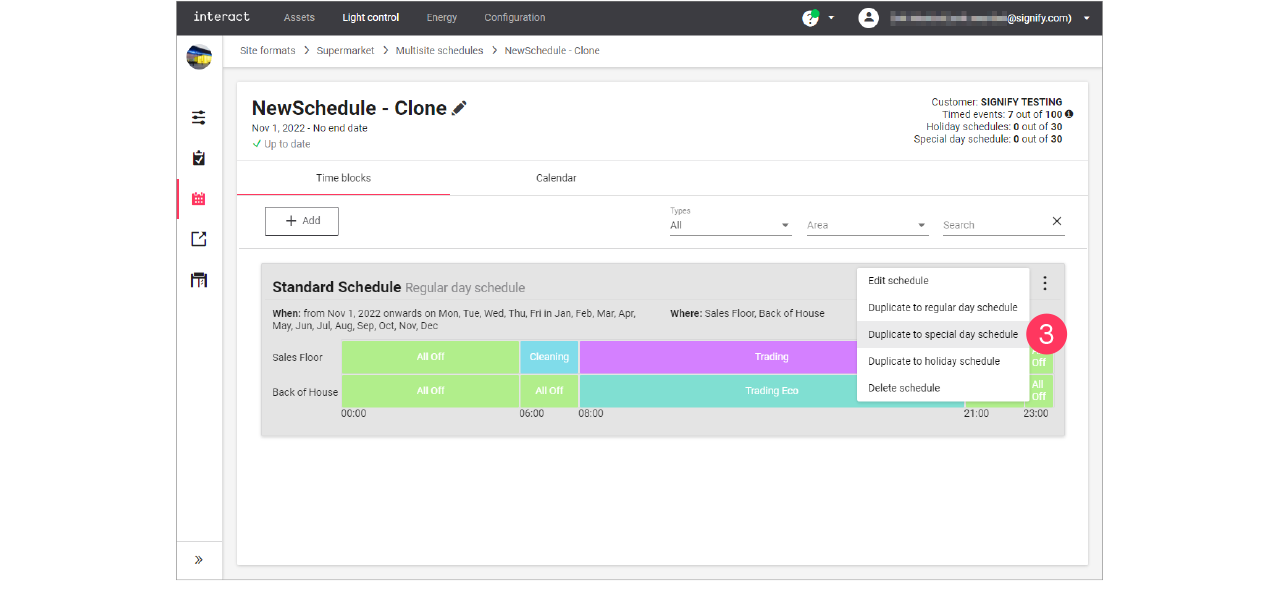
Edit the schedule
-
In the list of events, find the duplicated event.
You can find it by the word (copy) in the name. -
With the mouse, hover over the Action menu icon (
) of the schedule to edit. Click Edit schedule.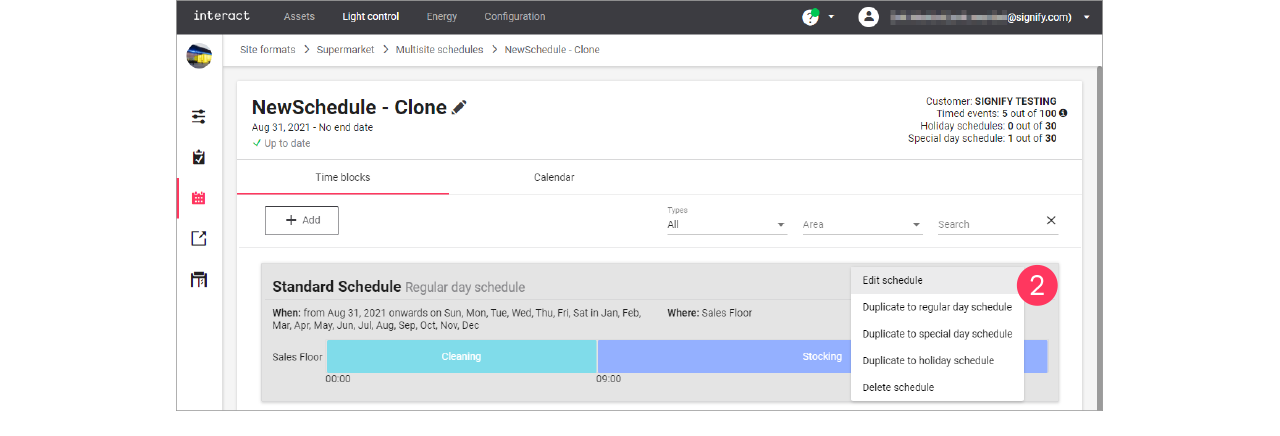
-
When page: make the calendar selections:
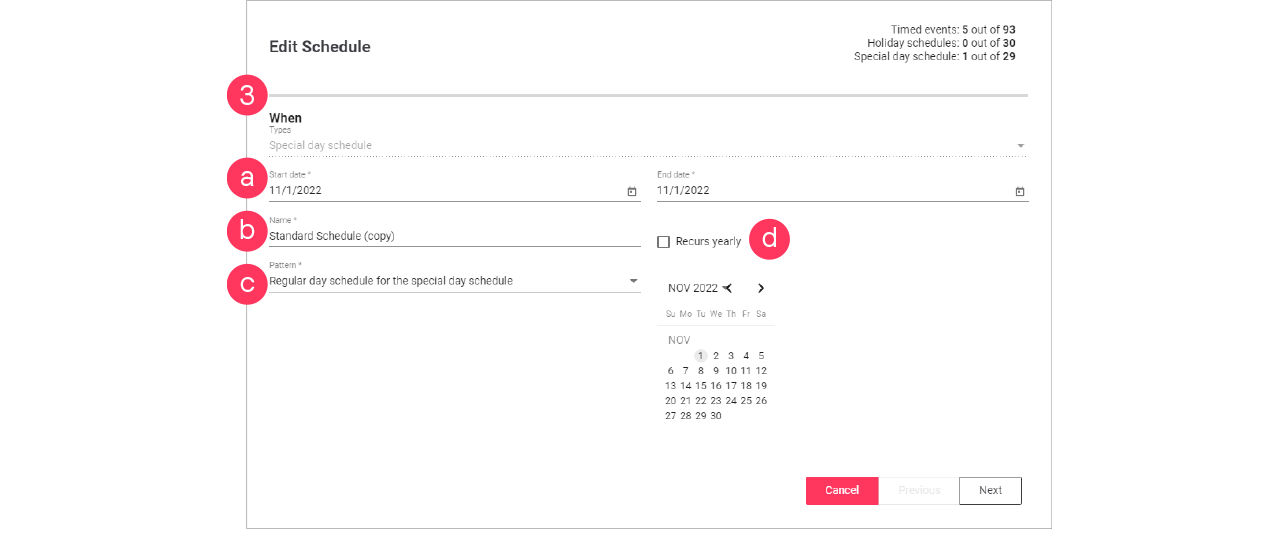
-
Start date and End date
-
Name
-
Pattern (single schedule for all days, or two schedules different for weekdays and weekends)
-
If applicable, select the Recurs yearly checkbox.
Click Next.
-
-
Where page: select the Areas the schedule applies to.
Or: Select Reuse an existing schedule and select an existing schedule for the selected date/pattern.
Click Next. -
What page: change the Name and change the Actions to the desired settings.
Click Next.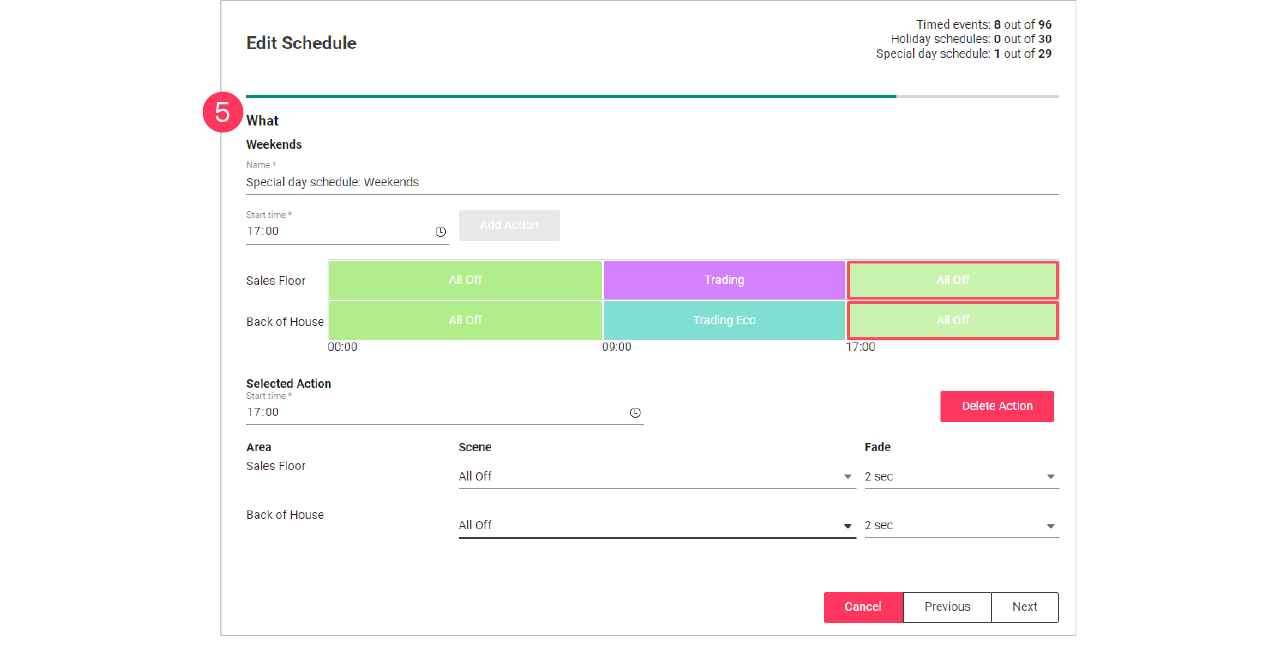
-
In case of two schedules, you now start editing the schedule for the weekend.
-
You can also select Reuse the weekday schedule to copy this schedule to the weekend.
-
-
Click Next.
-
Check the summary. Click Previous to correct the settings.
Or: Click Update to close the wizard.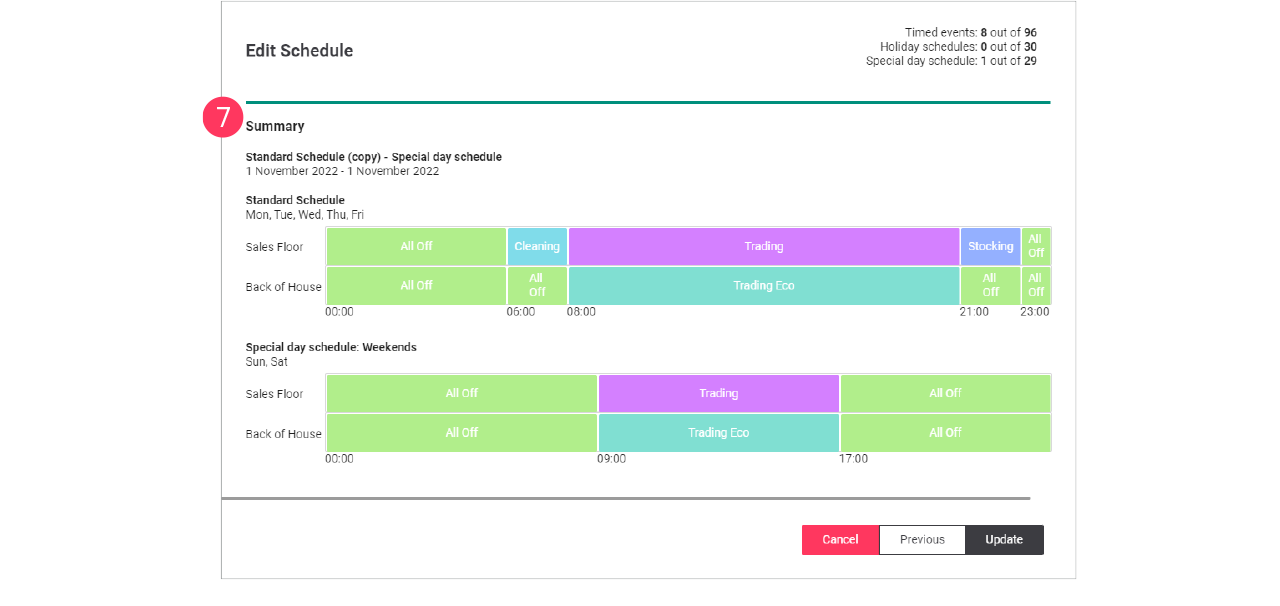
Create holiday schedule
To create a holiday schedule, you can either Add a new schedule, and select the type Holiday schedule, or duplicate an existing schedule using Duplicate to holiday schedule.
| It’s possible to create only one (1) schedule of the type Holiday schedule, but you can add up to 30 days to this schedule. |
When editing the schedule:
-
On the When page, make the calendar selections:

-
Select the date the holiday schedule applies to.
-
If applicable, select the Recurs yearly checkbox.
-
Give the schedule a Name. Click Add.
-
Repeat for other dates the holiday schedule applies to.
Click Next.
-
Use the Recurs yearly checkbox for example for bank holidays that always occur on the same date (New Year’s Day, etcetera).
-
For holidays with shifting dates (Easter, etcetera), don’t select the Recurs yearly checkbox. You need to create these separately every time.
-
Use the Bin icon (
 ) to delete a specific date (for example when it’s the past).
-
-
On the Where page, select the Areas the schedule applies to.
Click Next.
-
On the What page, change the Name and change the Actions to the desired settings.
Click Next.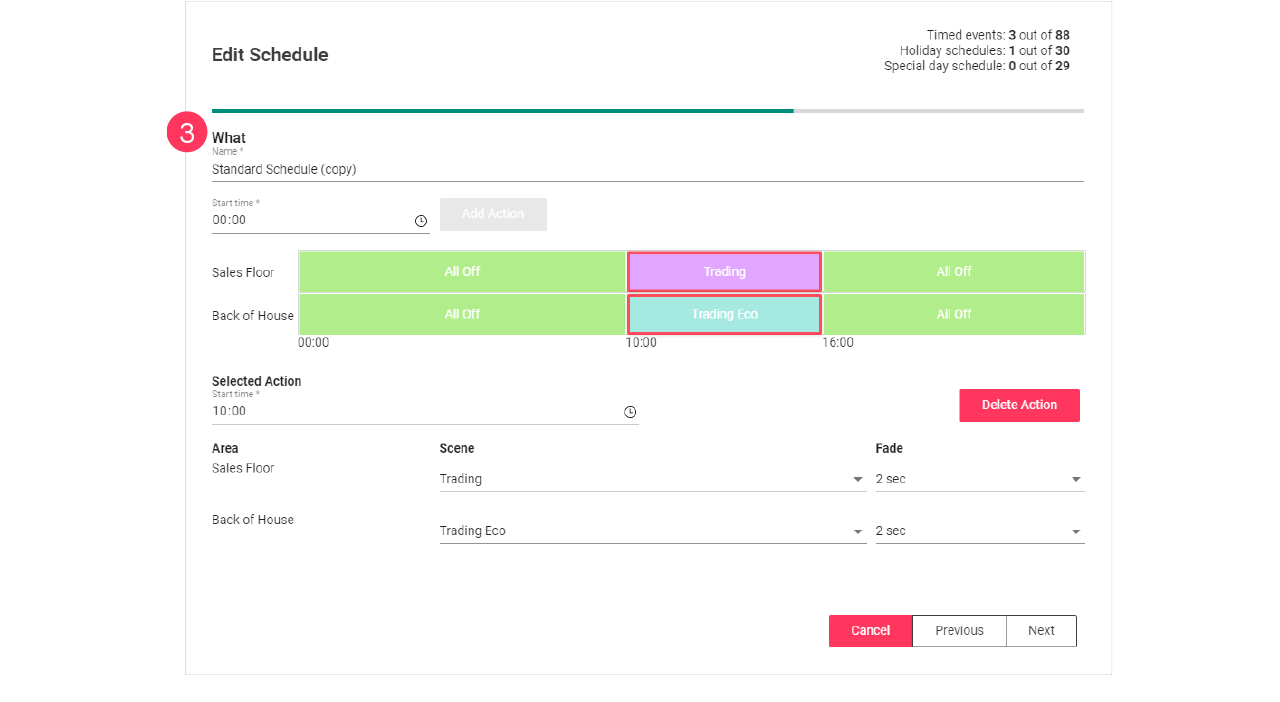
-
Check the summary. Click Previous to correct the settings.
Or Click Add or Update to close the wizard.
 Add and edit deployments
Deployments are used to roll out concepts and schedules to a site or a batch of sites.
Create new concept
-
In the menu, click Light control.
-
If applicable, in the dropdown Select a customer, select the customer to show the known formats.
-
Select a format.
-
Click Concepts (
). -
Click + New concept.
-
Enter the Name for the concept.
Click Create. The concept is now available with the status Draft. -
Click the concept and start editing.
Clone existing concept
When you want to reuse an existing concept, for example in case there are only some light levels to change, then you can clone a concept. Cloning is possible for concepts that are in Draft or Deployed status.
-
In the menu, click Light control.
-
If applicable, in the dropdown Select a customer, select the customer to show the known formats.
-
With the mouse, hover over the action menu icon (
) of the schedule to edit.
Click Clone.
-
Enter the Name for the concept.
Click Create. The concept is now available with the status Draft. -
Click the concept and start editing.
Deploy a concept and schedule
Add concept to the deployment
-
In the menu, click Light control.
-
If applicable, in the dropdown Select a customer, select the customer to show the known formats.
-
Select a format.
-
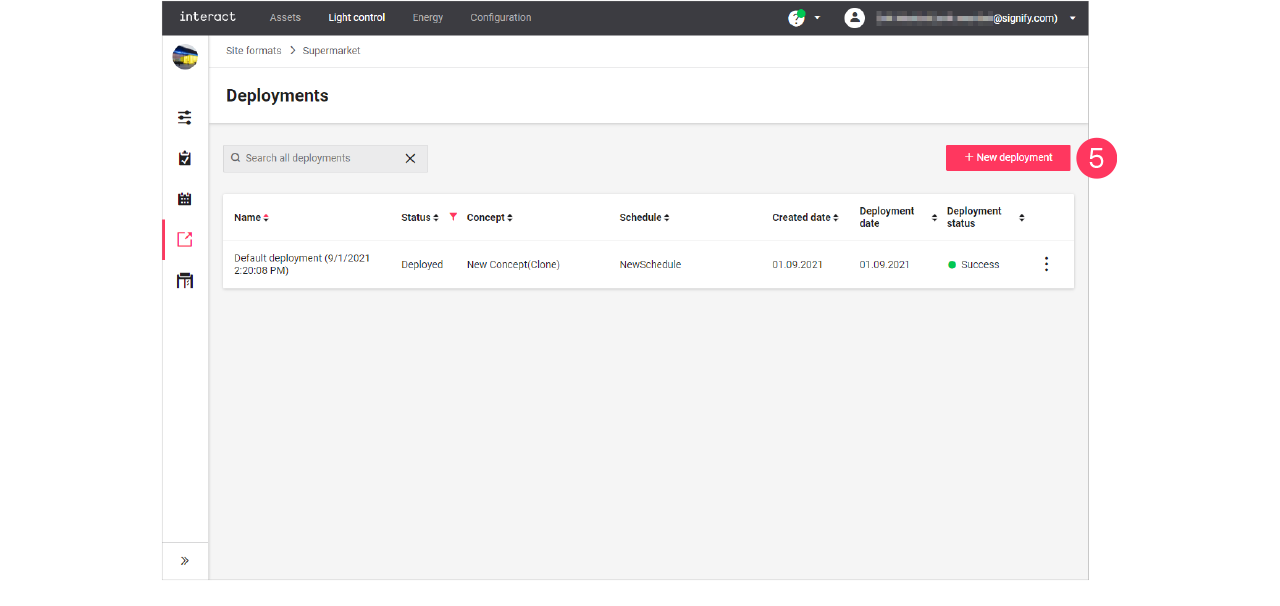
Click Deployments (
). -
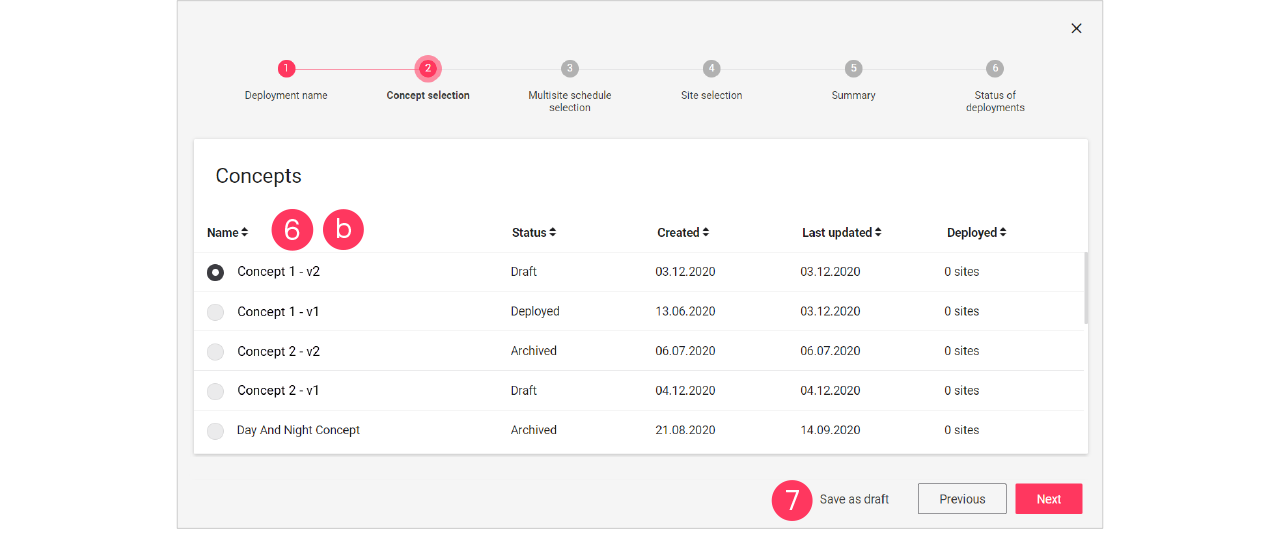
Click + New deployment.
-
Follow the steps in the wizard, click Next for the next step:
-
Enter the Name for the deployment.
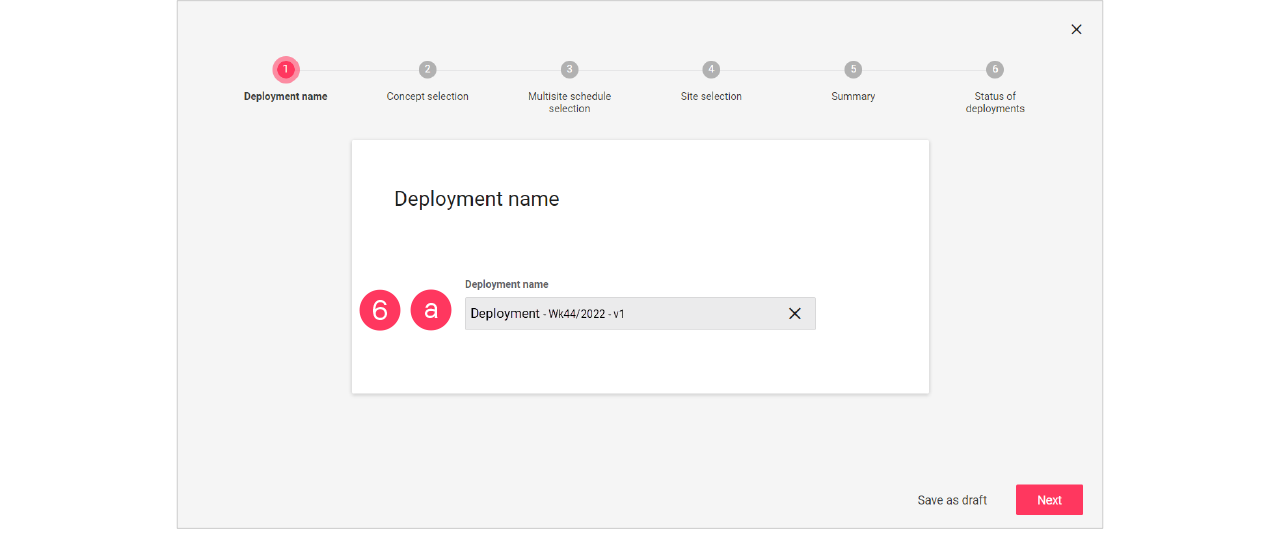
-
Select the Concept.
-
-
Click Save as draft to save the deployment for later use.
Add schedule and site to the deployment
-
In the menu, click Light control.
-
If applicable, in the dropdown Select a customer, select the customer to show the known formats.
-
Select a format.
-
Click Deployments (
). -
Click a deployment labeled with Draft to start editing.
-
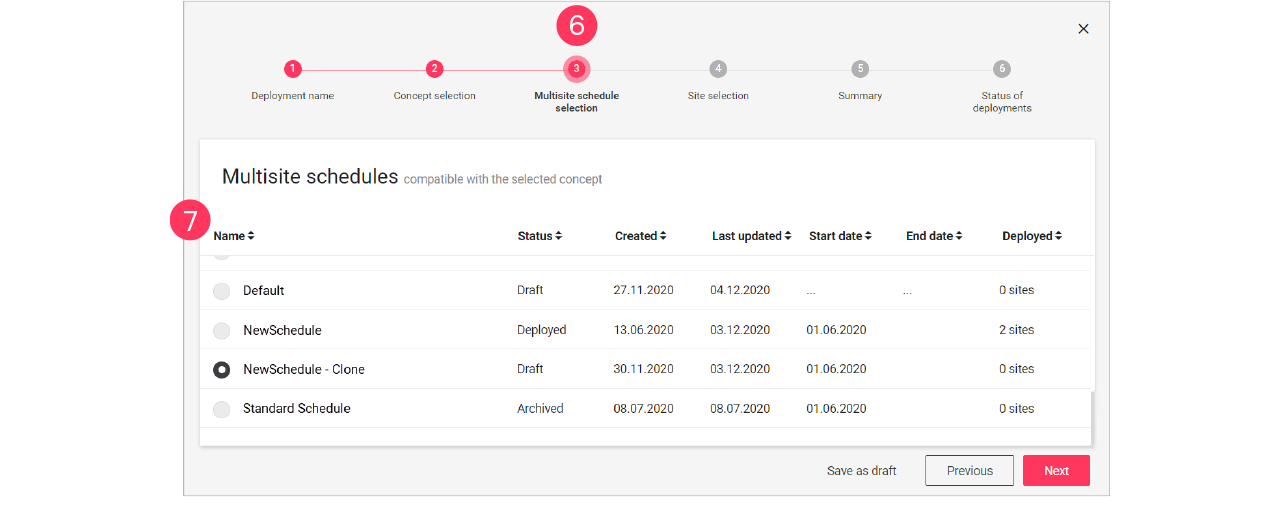
Click Next until you reach the step Multisite schedule selection.
-
Select the Schedule that must be applied in the deployment.
Click Next. -
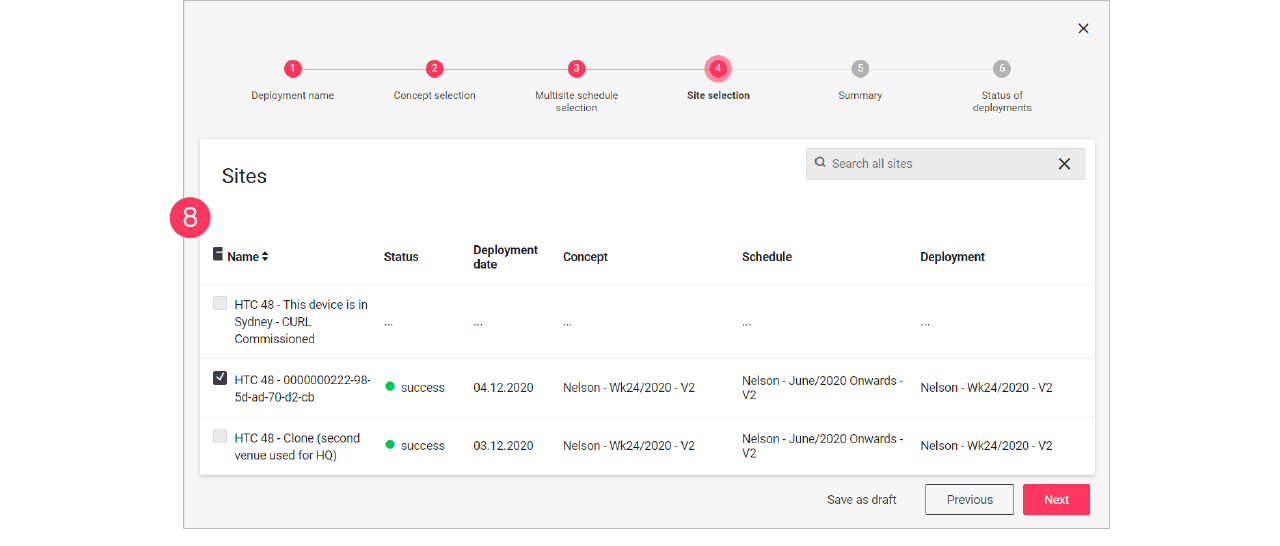
Select the Site(s) that must receive the deployment.
-
Click Save as draft to save the deployment for later use.
Finalize the deployment
-
In the menu, click Light control.
-
If applicable, in the dropdown Select a customer, select the customer to show the known formats.
-
Select a format.
-
Click Deployments (
). -
Click a deployment labeled with Draft to start editing.
-
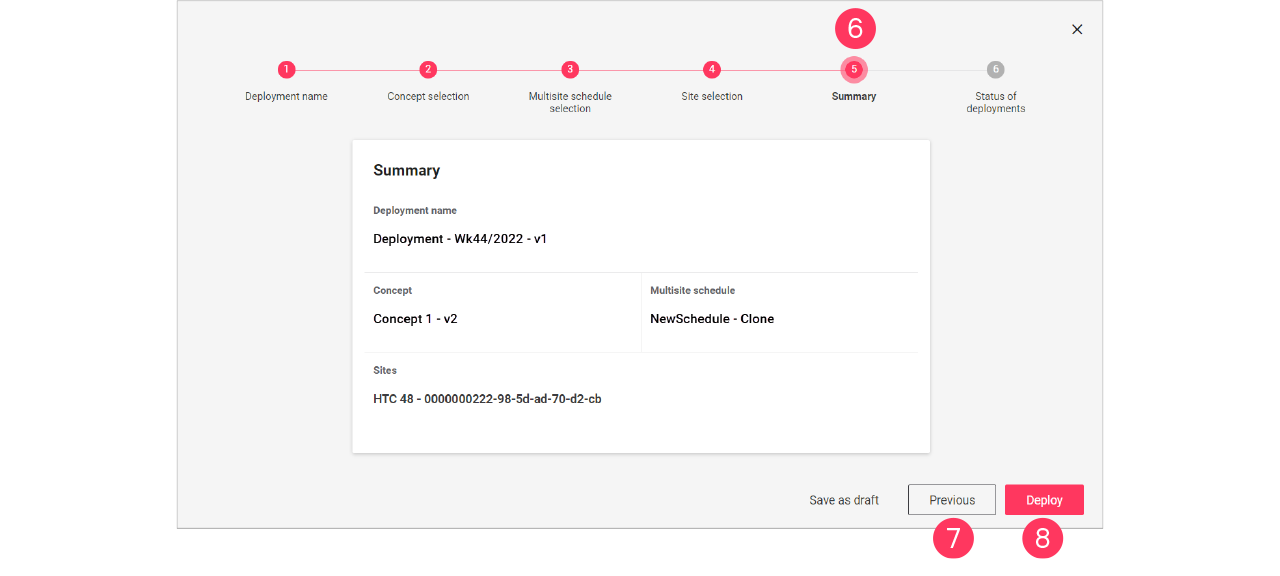
Click Next until you reach the step Summary.
-
Check if the concept, schedule, and sites chosen are correct. Click Previous to go back to correct.
Or: Click Deploy to start the deployment.
 Site view
The site view gives you an overview of the current status of the site you are viewing. Also, some generic site settings can be made on this page. The site view consists of the following sections:
-
Overview
-
Scenes
-
Setting
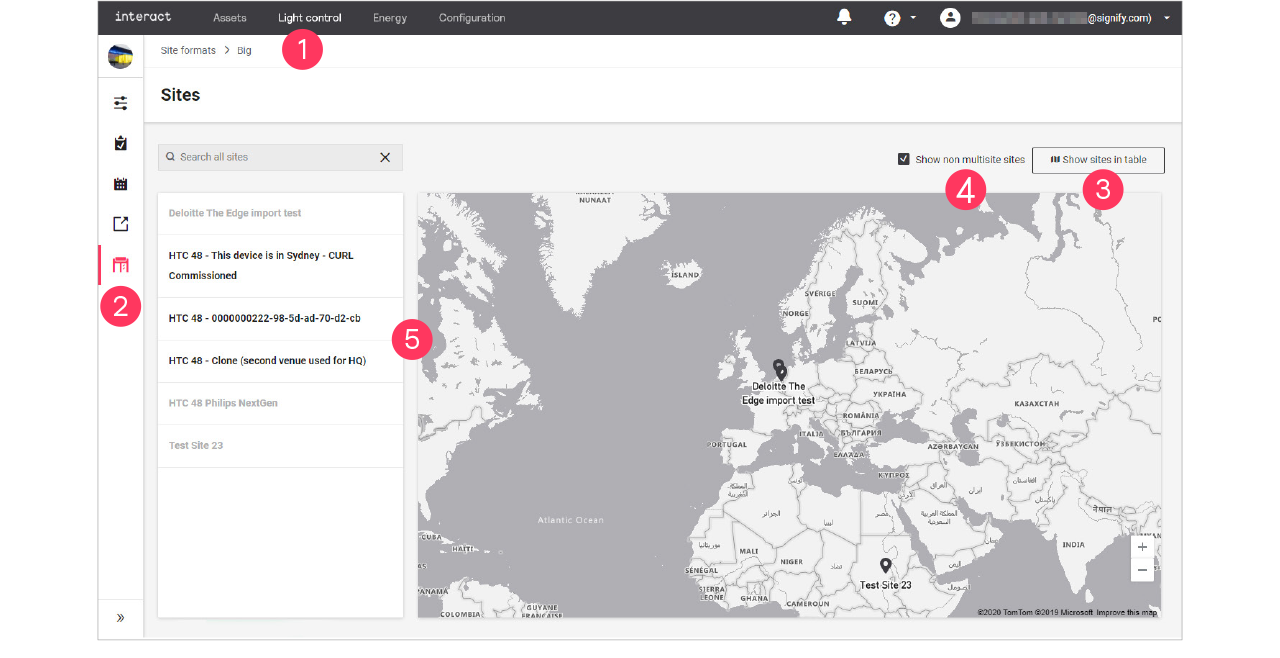
To enter the Site view:
-
In the menu, click Light control.
-
Click Sites (
 ).
). -
Click
 Show sites on map or Show sites in table to toggle the view.
 -
Optionally, selecting the Show non multisite sites checkbox to show all sites.
-
Select the site you want to view or edit.
| Non multisite sites are not selectable. |
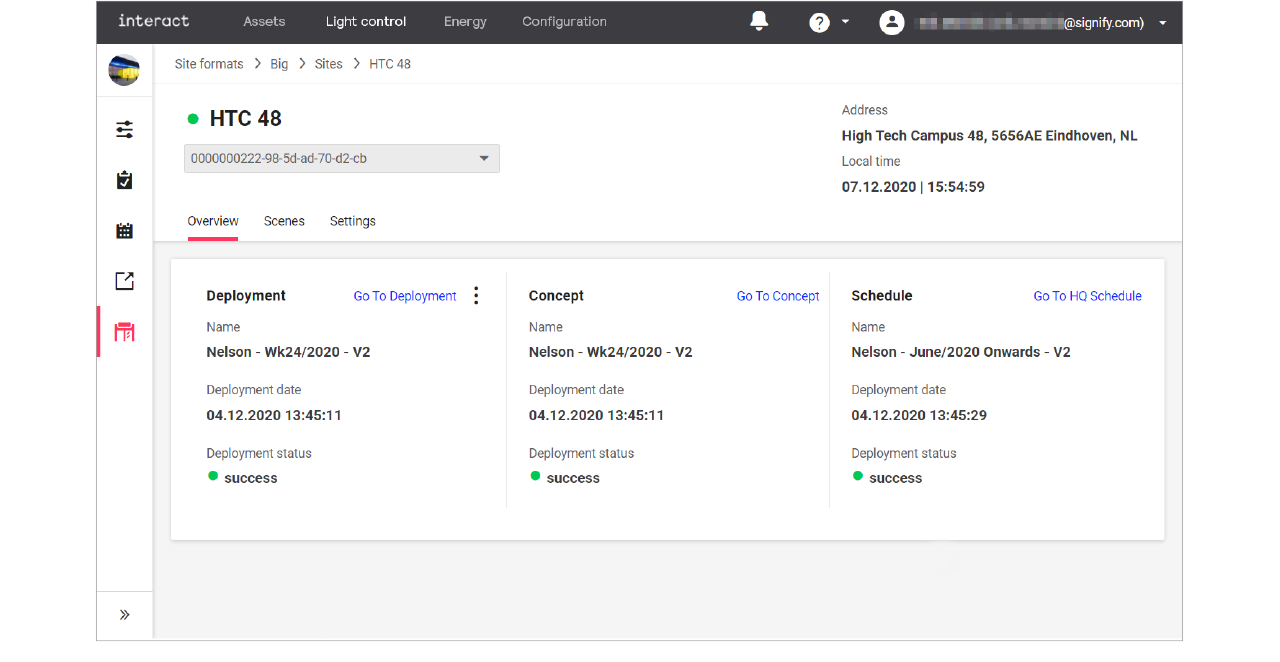
Overview
-
In the Sites view, click Overview.
-
For the chosen site you see an overview of the currently active Deployment, Concept and Schedule.
-
Click:
-
Go To Deployment to see the details of the deployment;
-
Go To Concept to see the details of the concept;
-
Go To HQ Schedule to see the details of the schedule.
-
-
With the mouse, hover over the action menu icon (
) in the Deployment section.
-
Click:
-
View logs to open an overview of the logs for the deployment.
-
Redeploy to start the deployment again.
-
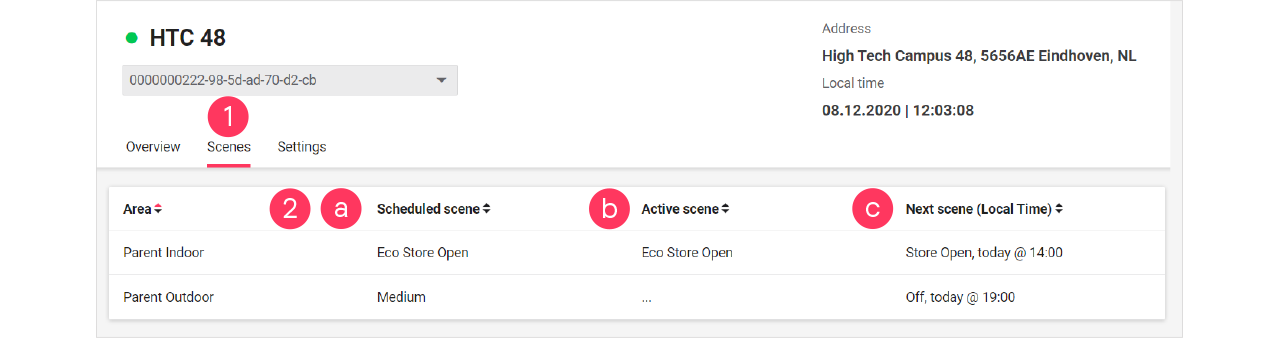
Scenes
-
In the Sites view, click Scenes.
-
For the chosen site you see per area an overview of:
-
the currently scheduled scene
-
the active scene (which may be different from the scheduled scene in case of local manual override)
-
the upcoming scene, including the time this scene activates.
-
Settings
The Settings section is used to set generic settings that are applicable for the selected site.
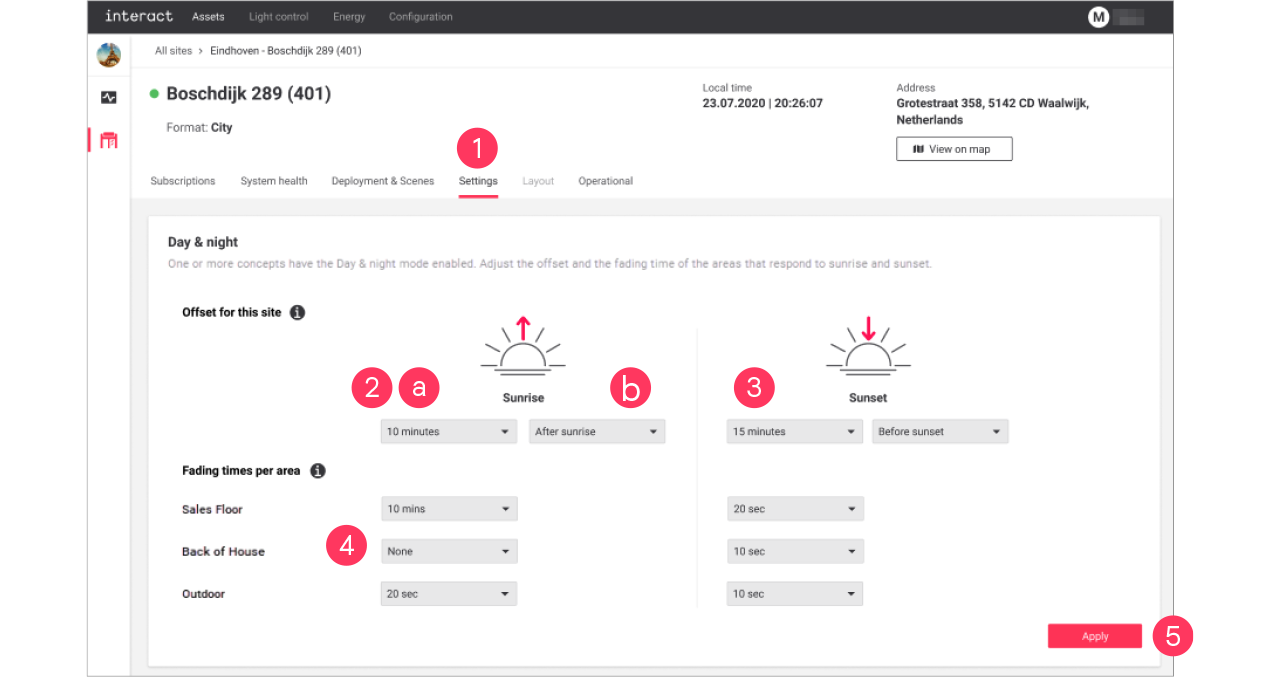
Set day and night offset
With day and night offset, you can set the moment of the switching action of the lights to before or after sunrise or sunset. When also setting the fading times per area, you define the time it takes for the lights to dim up or down to the set level at sunrise or sunset, taking the offset into account.
-
In the Sites view, click Settings.
-
In the dropdowns for Sunrise:
-
Select the offset time (by default: No offset)
-
Select if the offset should apply Before or After sunrise.
-
-
Repeat both steps for Sunset.
-
Set the Fading times per area that should apply at sunrise or sunset.
-
Click Apply.
Set total floor area
With Total floor area, you can customize the size of the floor area of the selected site. Setting this parameter correctly allows for comparing the energy consumed and saved data per m2 in the energy Site list.
-
In the Sites view, click Settings.
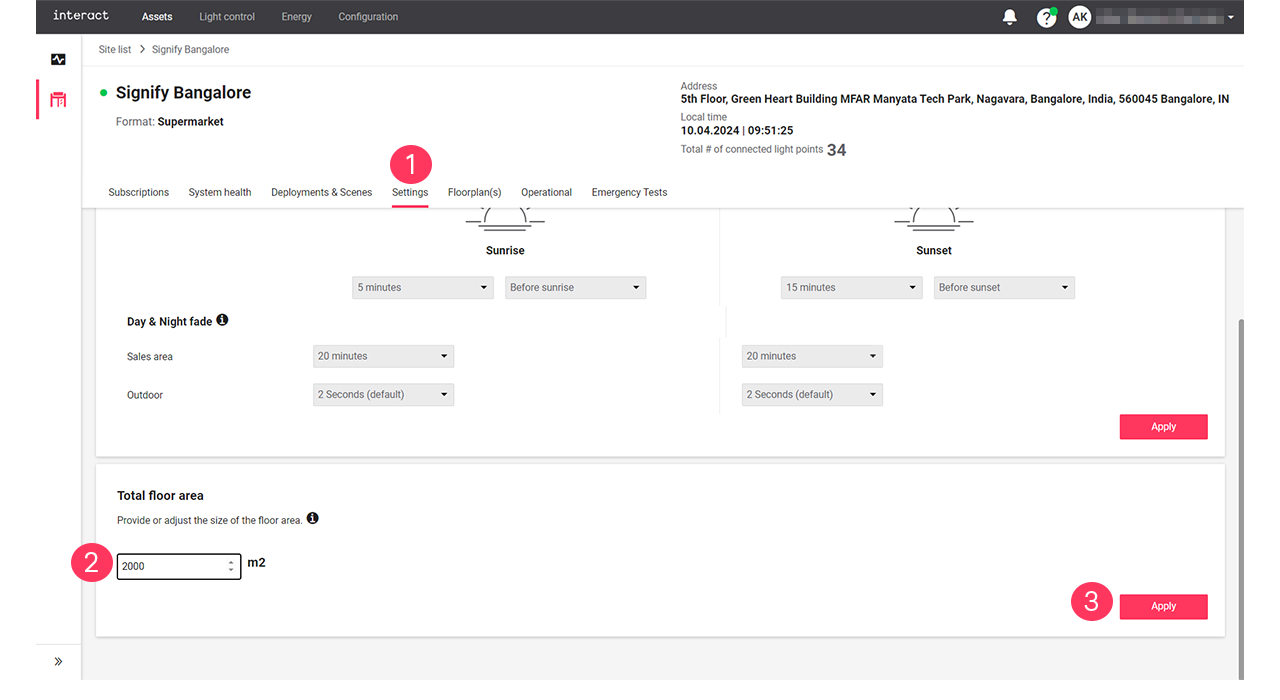
-
Check if the Total floor area value is correct. Enter the correct size of the floor area in m2.
-
Click Apply.
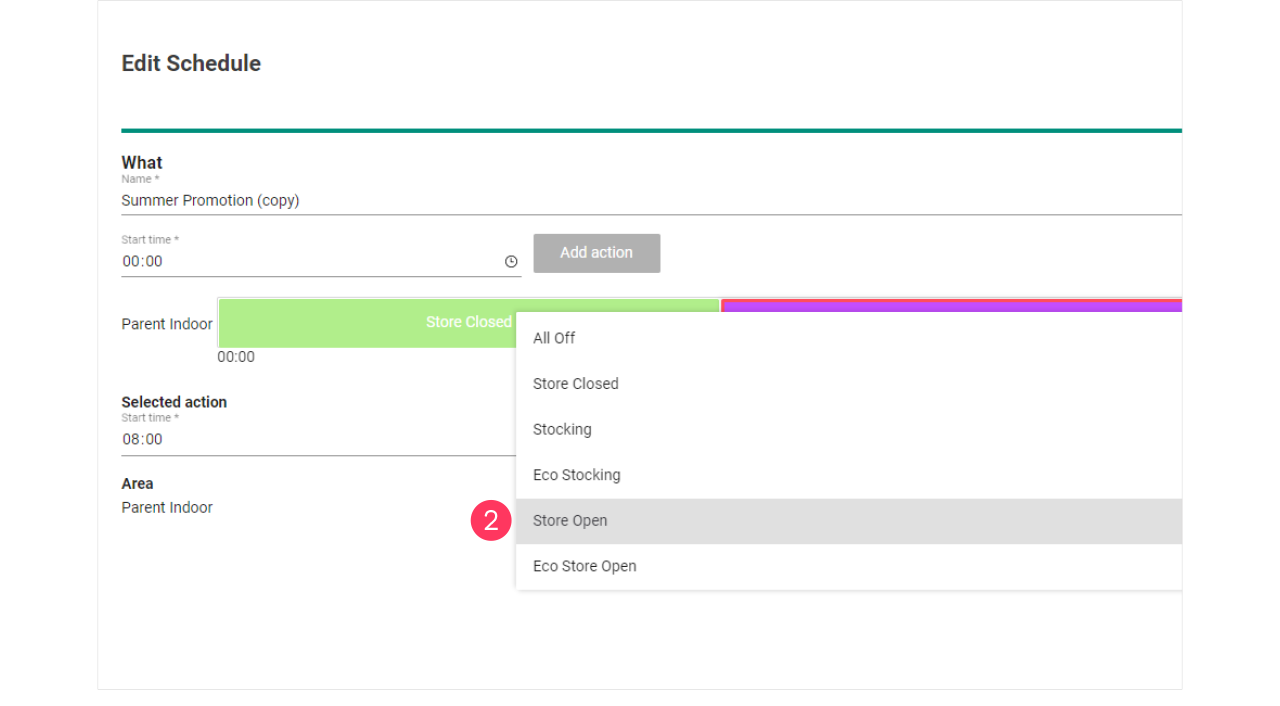
Eco-mode
With the Eco-mode, it is possible to reduce energy consumption during peak hours.
The steps to follow to enable the eco mode are:
-
Create Scenes per area with adjusted light levels to match the required energy savings. See section Eco-scenes and Add, edit and reorder scenes for more information.
-
Clone the current running Schedule giving it a clear name and edit the schedule to change the Scenes, for example Store Open to Eco Store Open. See section Add and edit schedules for more information.
-
Clone the current used Concept and limit per area the light levels to achieve the desired energy saving. See section Change light levels for more information.
-
Deploy the Concept with the new Schedule to the applicable site(s). See section Add and edit deployments for more information.
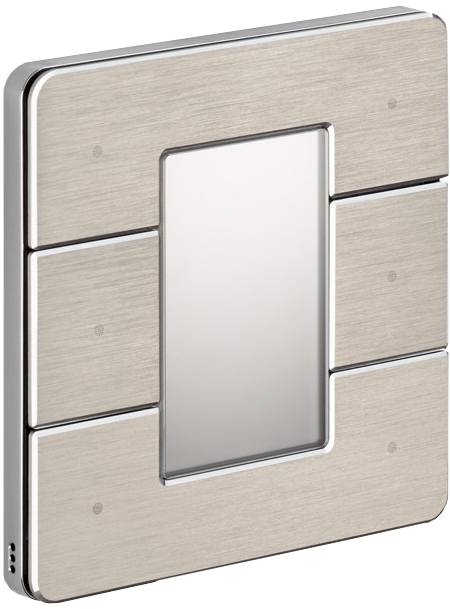
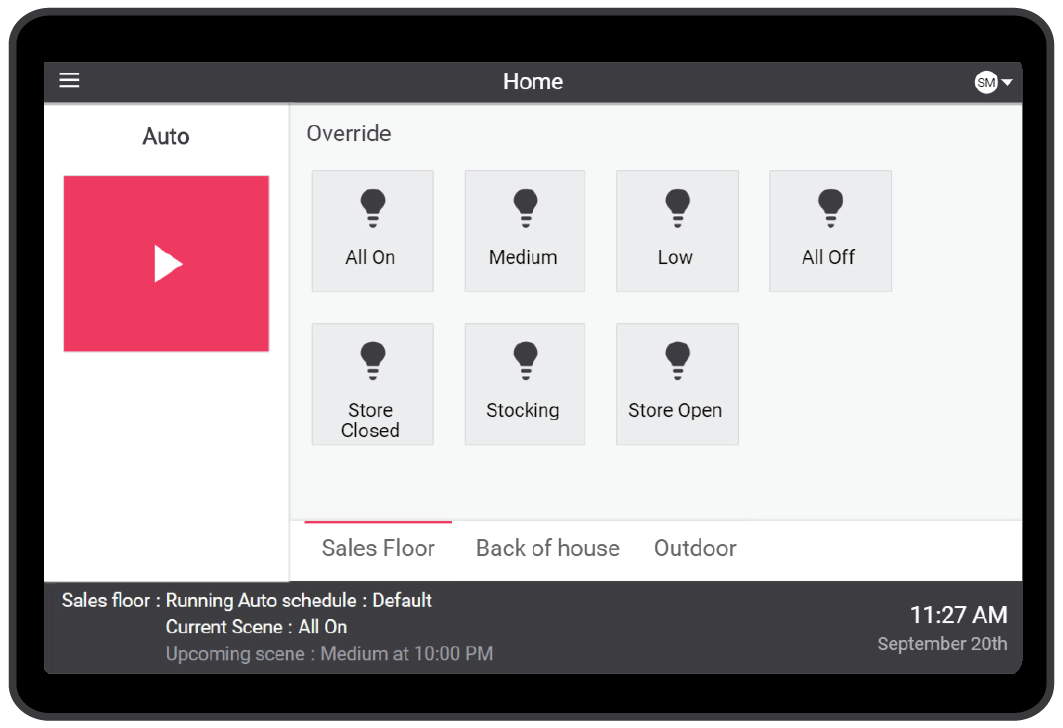
Local manual override
For personnel that doesn’t have access to the dashboard, there are user interfaces available that can be used to override the automatic schedules manually. In general, the system resumes the automatic schedule after two hours of operation in the local manual override.
User interfaces that can be used for local manual override are:
-
Wall switches (with dry contact)
-
Antumbra Button and Display
-
PDTS touch screen
These interfaces can be installed at the appropriate locations on request.