Multisite System Manager Dashboard
The Multisite System Manager Dashboard is a browser-based monitoring and control interface. It provides an intuitive overview with real-time feedback of the connected sites. The dasboard brings all data tailored to the user, depending on the roles and tasks of the person logged in.
| Access to the system is limited to authorized users only. To request user access please contact your local Signify support team. |
Prerequisites
To be able to access the Multisite System Manager dashboard, the following prerequisites must be in place:
-
Correct access rights as user
-
Valid subscription for the site(s)
-
Site(s) are operational and connected
Symbols
The dashboard user interface (UI) uses intuitive symbols and colors. The overview shows an overview of the colors and symbols used.
| Symbol | Definition | |
|---|---|---|
|
|
Critical issue |
|
|
Minor issue |
|
Status OK |
|
|
In progress |
|
|
|
Filter |
|
|
Sort |
|
Action menu |
|
|
Rotating wheel |
|
|
|
Notification |
|
|
Additional information dropdown |
|
User profile, language selection |
|
|
|
Expand/collapse the side menu |
Information
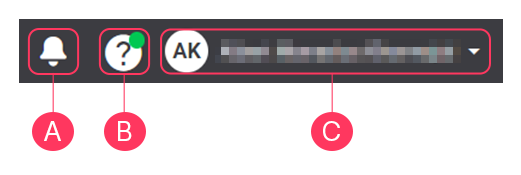
The Information section provides additional information about several items:
-
Click
 to open the Notifications, showing information about upcoming maintenance.
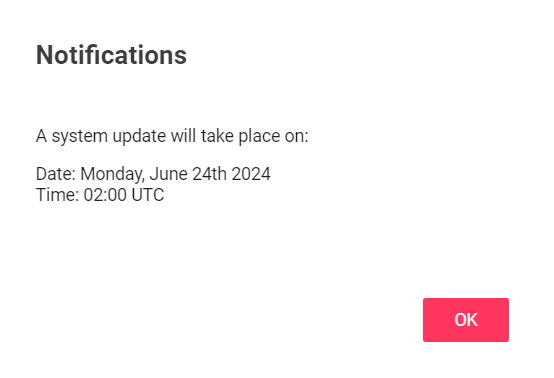
The orange dot shows the number of messages available. -
Hover over
 to see the dropdown with additional information.
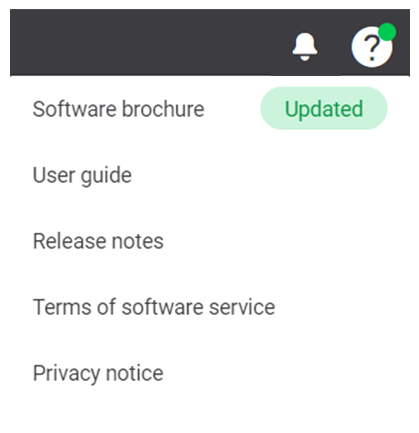
A green dot shows in the icon when items are updated. The dropdown menu also shows the updated item(s). -
At
 , you see the username of the user that is currently logged in. Hover over the icon or the name to see the dropdown.
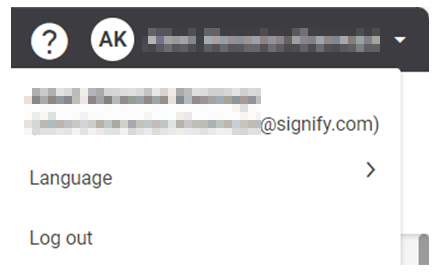
In this dropdown, it’s possible to change the interface language or logout from the dashboard. The following languages are available:
-
English
-
Dutch
-
German
-
French
-
Polish
-
Spanish
-
Russian
-
Danish
-
Italian
-
Portuguese
-
Japanese
-
Menus
The dashboard shows the required data logically grouped per selected filter on customer and site level:
-
Format
-
Site
-
Contracts
-
Licenses
The tasks are adjusted to the person logged in, preventing people making accidental changes to the settings.

The menus of the interface give you access to the following sections:
-
Assets
The Assets tab shows a traffic light overview of the actual information for all your sites, including system health status, emergency light testing, status of licenses and deployments etcetera. It is possible to switch between a dashboard and list view.
-
Light control
In the Light control tab, you can manage the concepts, schedules, deployments, and sites. The live validation options give you the possibility to view your settings onsite.
-
Energy
The glanceable dashboard of the Energy tab shows all kind of energy data, like historical energy consumption trends, site comparison and energy savings breakdowns.
-
Configuration
The Configuration tab shows per format the overview of the areas and the applicable scenes.
Users
The sections below provide an overview of the users that have interaction with the Multisite System Manager dashboard. See User roles and responsibilities for more information.
Facility manager
The role of the facility manager is also known as energy manager. People in this role are responsible for:
-
Supplier management of building contractors; store realization and renovations including on-time store opening
-
Ensures proper management and maintenance of sites, coordinating maintenance and adjustments to onsite equipment, installations, infrastructure, and installations
-
Creates and maintains conditions so that all employees can perform their work properly and efficiently, keeping the budgetary responsibilities in mind
-
Organization of Emergency Response Officers (EROs), member of the Occupational Safety and Health (OSH) committee, prevention officer within the organization
-
Energy management
-
Process optimization and monitoring security
The facility manager uses Multisite System Manager to:
-
Scene & schedule management
-
Viewing of current status only
-
Emergency cases
-
Etcetera
-
-
Energy monitoring
-
Notional energy
-
Metered energy
-
-
Lighting management
-
Centralized name conventions
-
Etcetera
-
Formula manager
The role of formula manager is also known as format or concept manager. People in this role are responsible for:
-
Updating brand formats
-
Development of new store formats, mostly in a central team
-
Concept development, design and lay-out
-
Guide the design agency by inspiring and presenting concept ideas
-
Develop and present vision of format.
-
Conduct analysis and research and develop unit strategy per format (content - shape - presentation of theme’s - communication)
-
Realize formats and implement updates/new formats in stores
-
Roll-out of updates and changes to format
Each format may have its own formula manager.
The formula manager uses Multisite System Manager to:
-
Scene & schedule management
-
Remote adjustments
-
Deployment of formula
-
Access to (groups of) stores in the formula
-
Etcetera
Store manager
People in this role are responsible for:
-
Store management and operations, supply, sales, customer service, staff management
-
Improving sales, productivity, and profit
-
Maximizing the store processes to spend as much time as possible on the shop floor
-
Analyze sales figures and respond to them to improve sales
-
Coaching and training the team to improve performance
-
Making staff rosters, payroll and responsible for the recruitment process
-
Collaborate with the District Manager and Back Office partners.
The store manager has access to:
-
Local temporally manual override via wall button switch or wall panel.
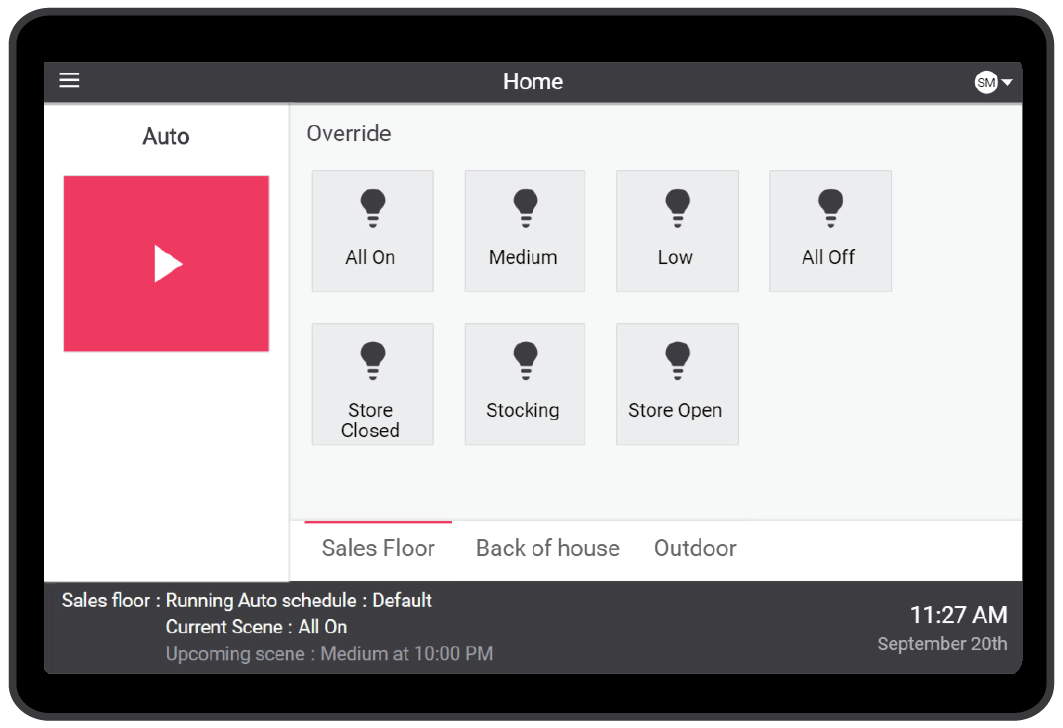
Store staff
For any other employee in the store, like cashiers, stocking personnel etcetera, a wall button switch or wall panel is available. With this switch or panel, the local manual override can be activated. This function bypasses the automatic schedules of the system. After two hours or at the next scheduled event, the system switches back to automatic operation.
Assets
The Assets menu gives an overview of all your sites in a single dashboard. This dashboard shows you the most relevant information about your sites, including:
-
System health status
-
Status of deployments
-
Status of subscriptions
-
Overview of sites that are operational or in deployment
On the dashboard, it’s easy to toggle between list view and detailed site view, and search and filter functions help finding the information for the site(s) you are looking for.
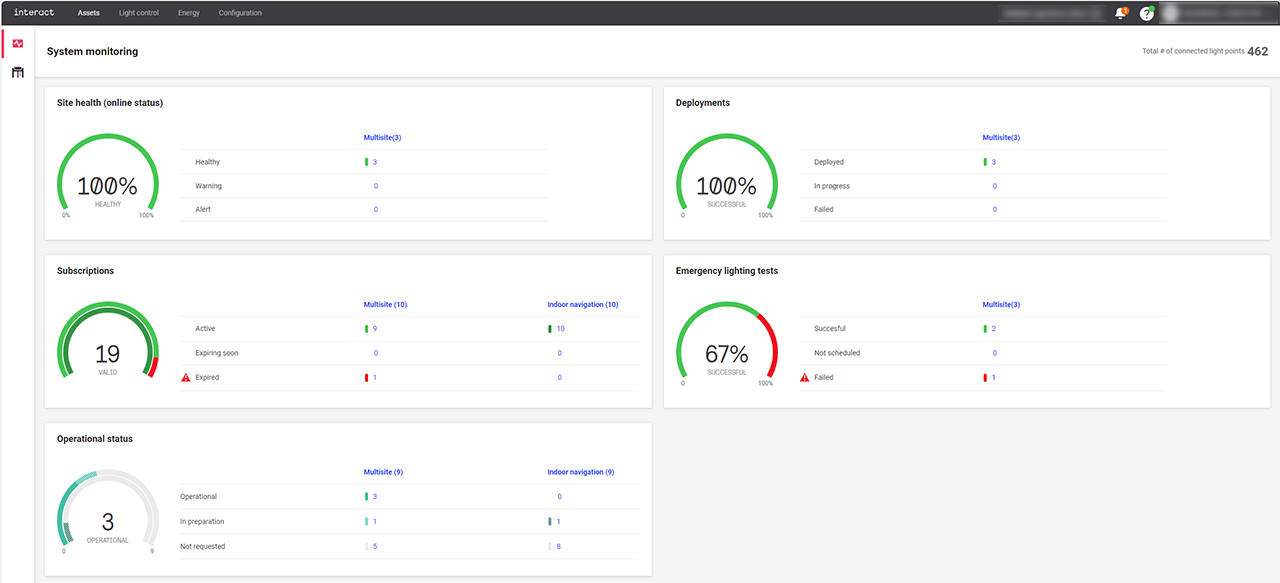
System monitoring and site list
System monitoring provides you an overview of the status of all your connected sites, either Multisite or Indoor Navigation. This section explains only the Multisite functions.
-
In the menu, click Assets. The Dashboard (
 ) shows consisting of the following performance indicators:
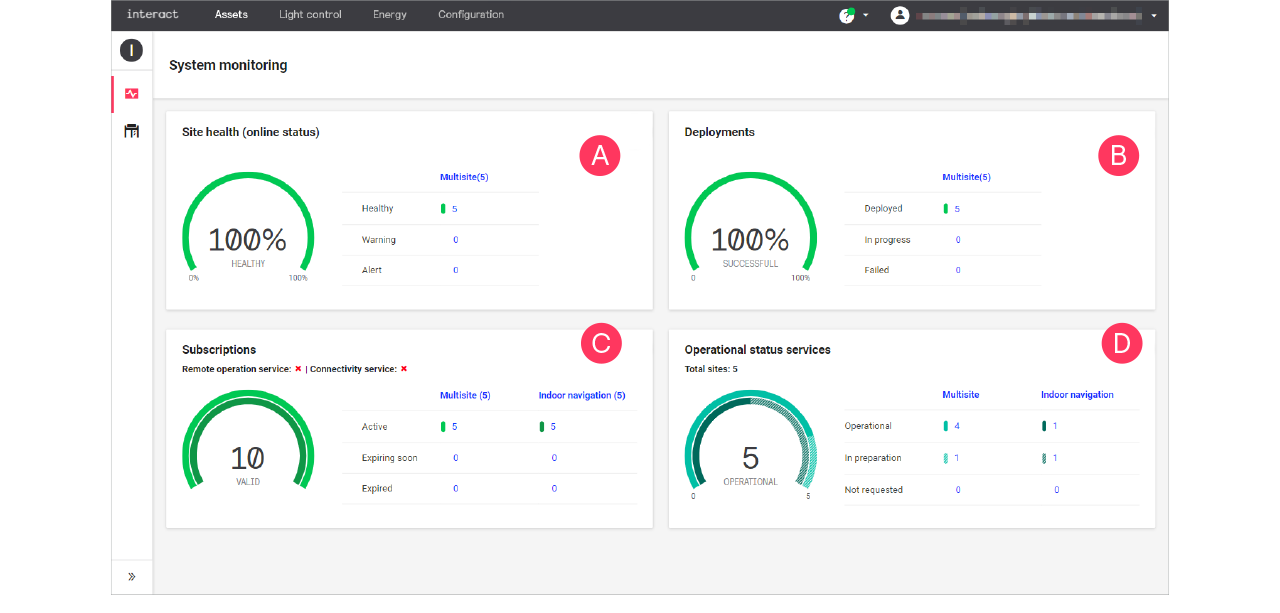
-
Site health: online status of each site:
-
Healthy: no issues
-
Warning: site experiences minor issues, requires attention
-
Alert: site experiences critical issues, requires immediate attention
-
-
Deployments: deployment status of each site:
-
Deployed: OK
-
In progress: a deployment is running
-
Failed: the deployment was not successful, requires attention
-
-
Subscriptions: overview of the subscriptions of each site:
-
Active: OK
-
Expiring soon: licenses are approaching their date of expiry, extend the licenses to avoid losing access in the data
-
Expired: there are expired licenses, renew to get access to the data
-
-
Operational status
-
Operational: site operational and handed over to the customer
-
In preparation: open workorders in place for design, installation, and commissioning
-
Not requested: site created, no open workorders
-
-
-
Click the Site list (
 ) or Multisite indicating the column in any of the performance indicators to access the detailed list of sites.
-
Use the sorting (
 ) and filter (
 ) tools to define and limit the sites shown in the Site list.
 -
Click Dashboard (
 ) to revert to the initial dashboard screen.
Detailed site view
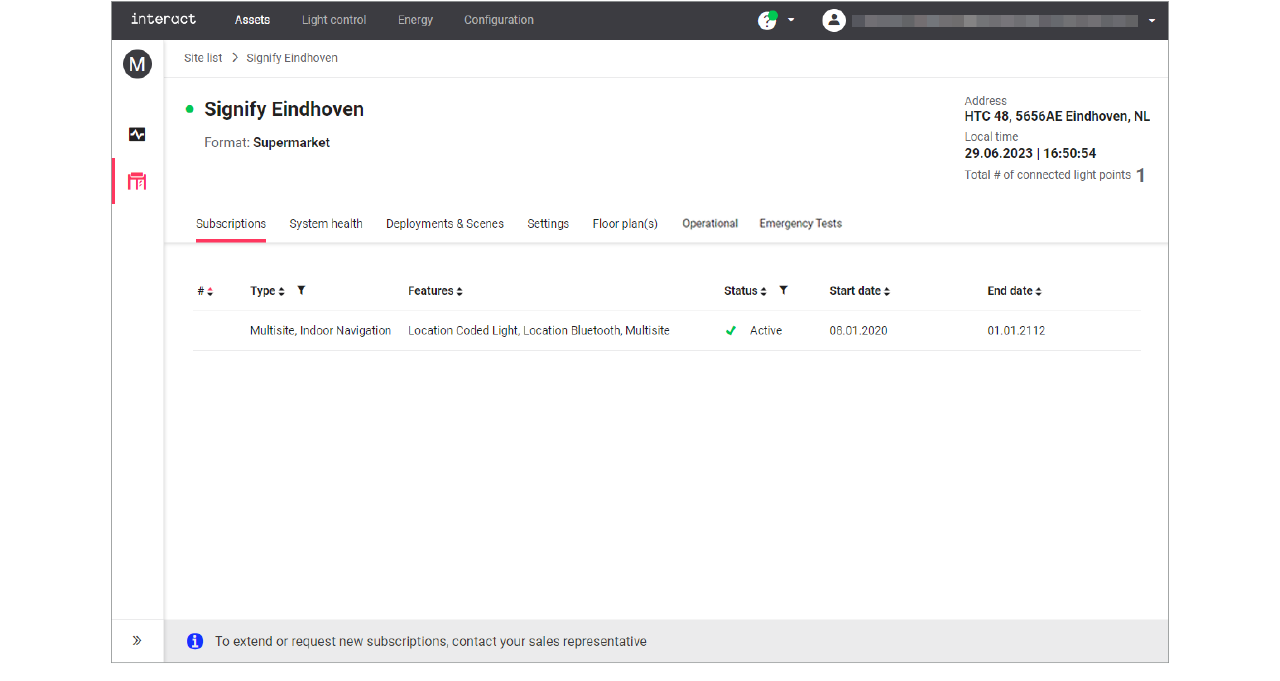
In the Site list, click on the row of a specific site to access the details of that site.
-
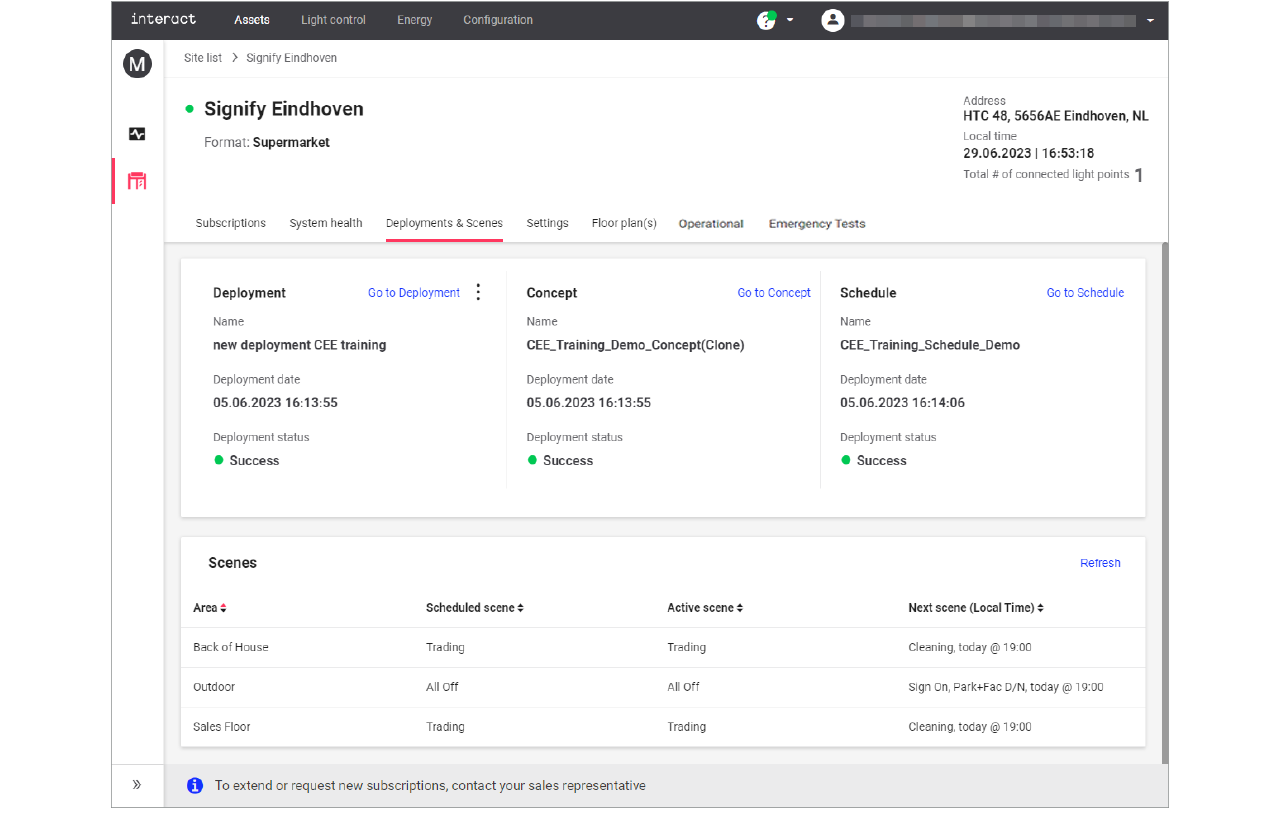
Subscriptions: shows the licenses linked to the site and their status. To extend, or request new subscriptions, contact your sales representative.
-
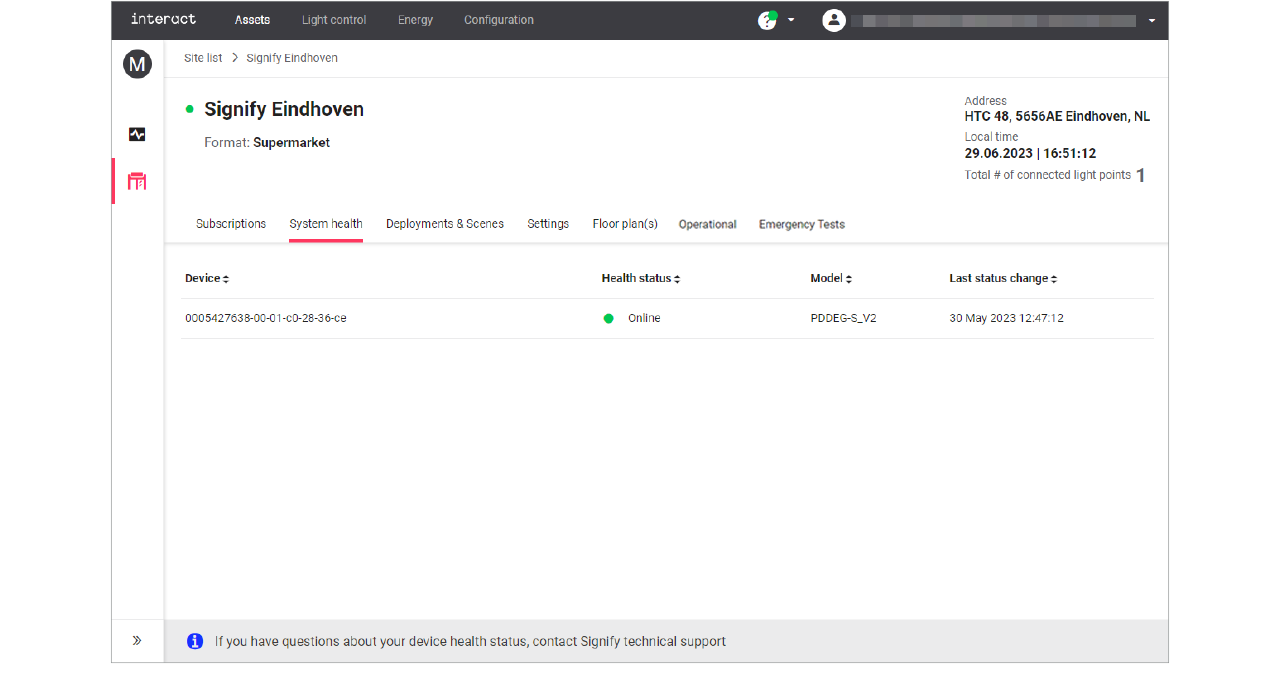
System health: shows if the gateway of the site is online or any other status. In case you have questions about the health status, contact Signify technical support.
-
Deployments & Scenes: shows the current deployment, concept, and schedule as well as details of the currently running scene; see sections Overview and Scenes for more information.
-
Settings: used to set generic settings that are applicable for the selected site, see section Settings for more information.
Light control
Introduction to light control
With the Multisite system, the light control is handled for each format separately. A retailer can have multiple formats under several banners. Formats are physical/design characteristics of the site, for example XL, super centers, garden centers, city formats, etcetera.
 Light concepts
With Concepts you define for each scene the actual light settings (dim level and, if applicable, also color) at each logical channel. Once defined, a particular scene can easily be recalled or triggered for an entire area.
You can start a new concept from scratch or clone an already created or deployed concept. When starting from scratch, all light levels for the areas are set to zero (0). Cloning a concept saves time since the light levels are copied from the original concept to a new draft.
 Schedules
To automate the behavior of the lighting system, you can specify Schedules. A schedule defines for each separate area the times that specific scenes are activated over the course of a 24-hour cycle.
You can start a new schedule from scratch or clone an already created or deployed schedule. When starting from scratch, an empty schedule will be created. Cloning a schedule saves time since the scene calls are copied from the original schedule to a new draft.
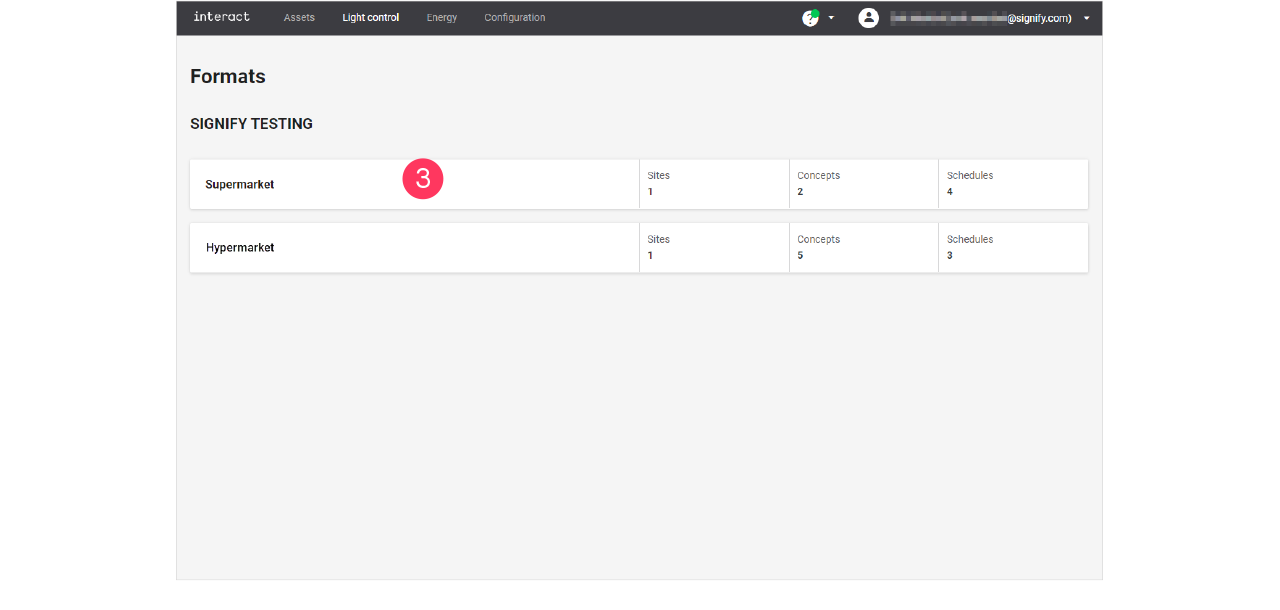
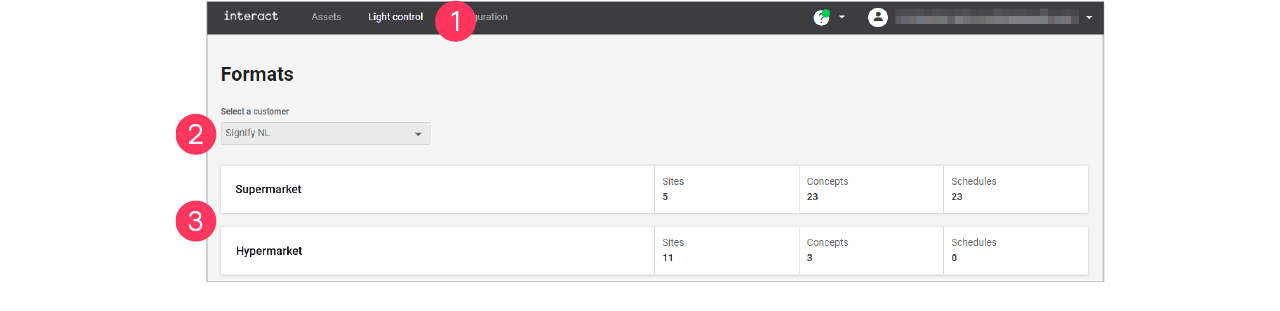
Concepts
Add and edit concepts
Create new concept
-
In the menu, click Light control.
-
If applicable, in the dropdown Select a customer, select the customer to show the known formats.
-
Select a format.
-
Click Concepts (
 ).
). -
Click + New concept.
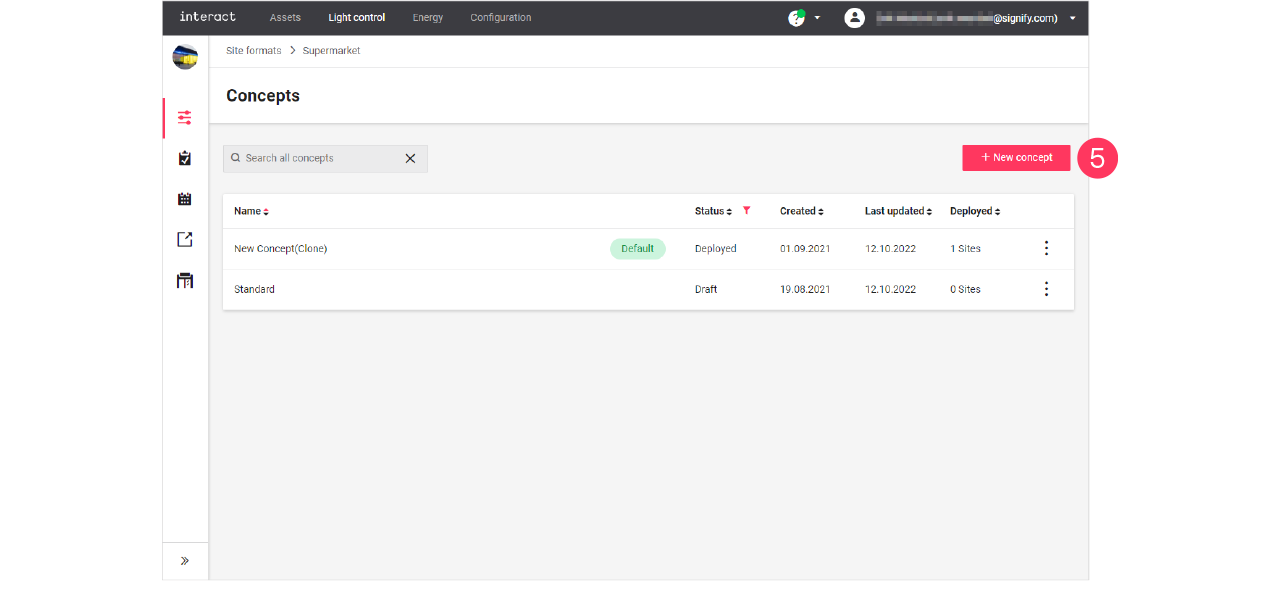
-
Enter the Name for the concept.
Click Create. The concept is now available with the status Draft. -
Click the concept and start editing.
Clone existing concept
When you want to reuse an existing concept, for example in case there are only some light levels to change, then you can clone a concept. Cloning is possible for concepts that are in Draft or Deployed status.
-
In the menu, click Light control.
-
If applicable, in the dropdown Select a customer, select the customer to show the known formats.
-
With the mouse, hover over the action menu icon (
 ) of the schedule to edit.
Click Clone.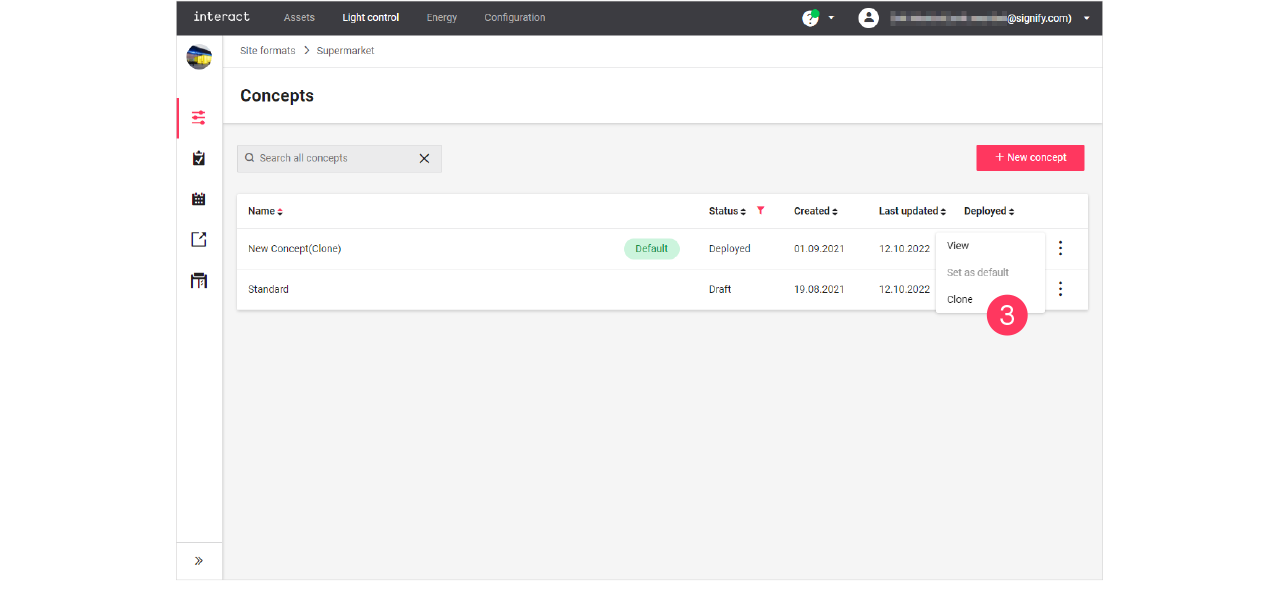
-
Enter the Name for the concept.
Click Create. The concept is now available with the status Draft. -
Click the concept and start editing.
Change light levels
| You can only change the light levels of concepts with the status Draft. |
-
In the menu, click Light control.
-
If applicable, in the dropdown Select a customer, select the customer to show the known formats.
-
Select a format.

-
Click Concepts (
). -
With the mouse, hover over the Action menu icon (
) of the concept to edit. Click Edit.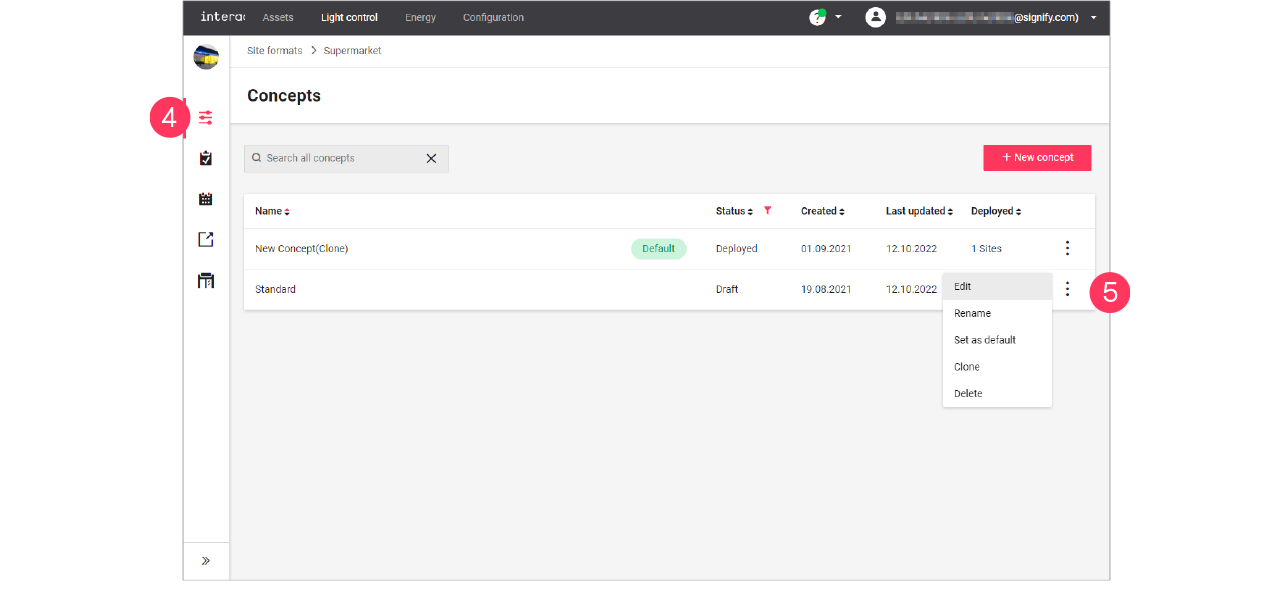
-
Click on the row of an area to start editing;
or: click the name of a scene.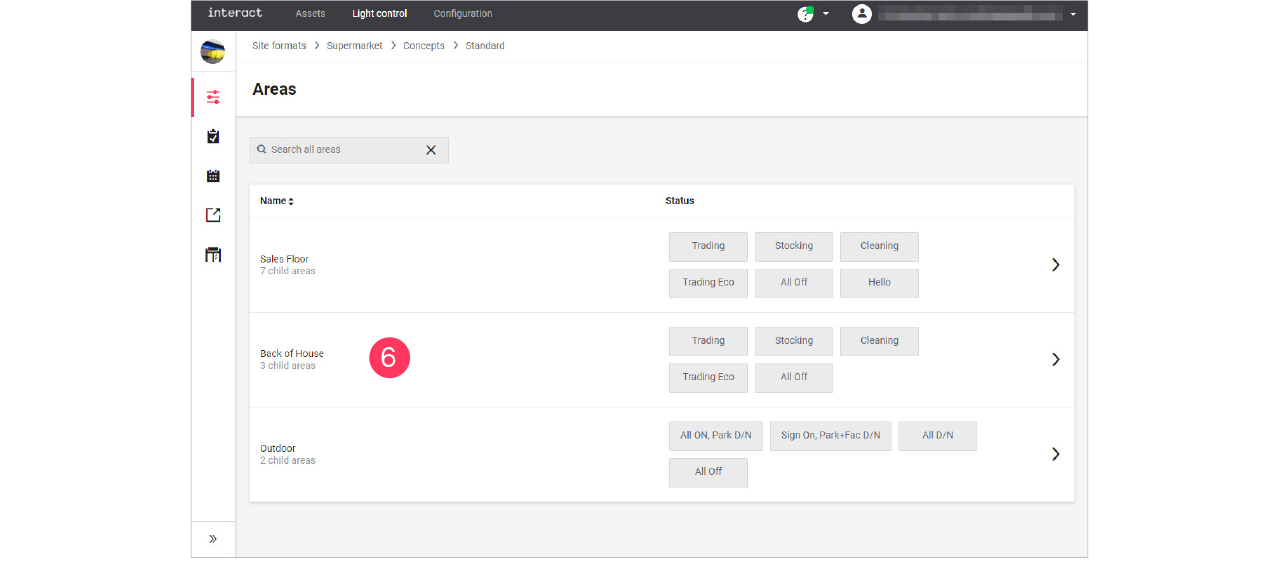
The scene that you edit shows dark. Select another scene to start editing the settings of this scene. -
Start editing the light settings for the area:
-
Select a scene to edit its light settings.
-
Use the Master slider to change the relative dim level of all zones that are switched to ON.
-
Switch the zone ON or OFF.
-
Move the dim slider to adjust the light level.
or: Enter the value in the box.
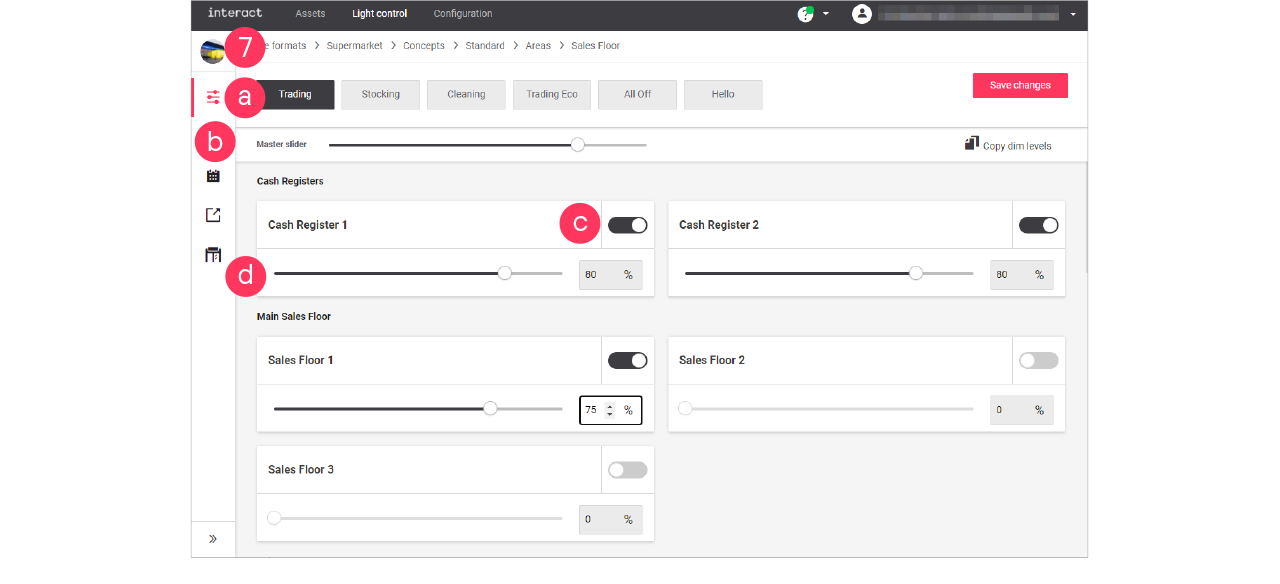
-
-
Click Save changes.
|
Day and night mode
With day and night mode, you can make sure that lights at a site turn on and off according to the schedule, but in relation with sunrise and sunset (astroclock).
After enabling the day and night mode, the logical channel shows two light levels to be set: one for the light levels during daytime, the other for the light levels during the night.
Set day and night mode
When editing the light levels of the area (see section Change light levels):
-
Click the Day/Night toggle button (
 ) to switch on day and night mode for the area.
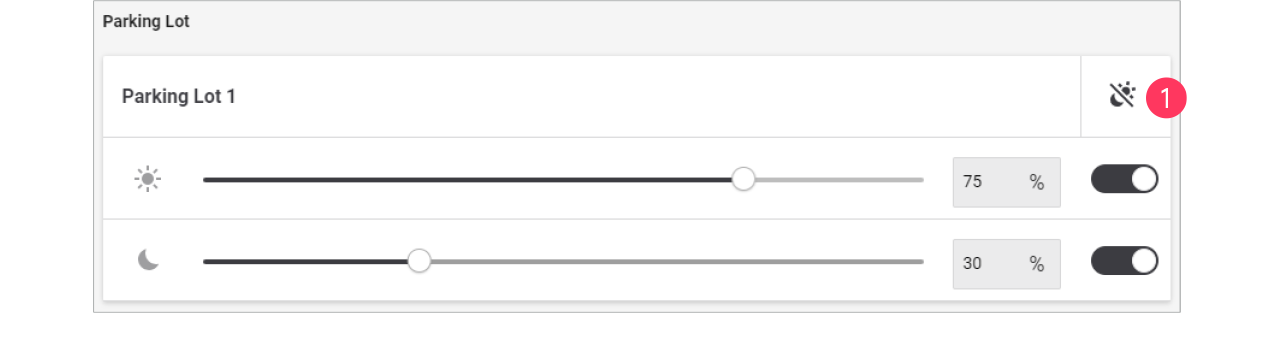
-
Set the light levels to be used during daytime.
-
Set the light levels to be used during the night.
-
Click Save changes.
You can change the offset of the response relative to the sunrise or sunset. See section Settings for more information.
RGB lighting
| With RGB-lighting, you can think of colored accent lighting, or façade lighting. |
When editing the light levels of the area (see section Change light levels):
-
Set the light level of the area.
-
Click the Color picker button (
 ).
).
-
Set the Light properties:
-
Color by selecting it in the color wheel
-
Color by Hex code
-
Color by RGB
-
Light level
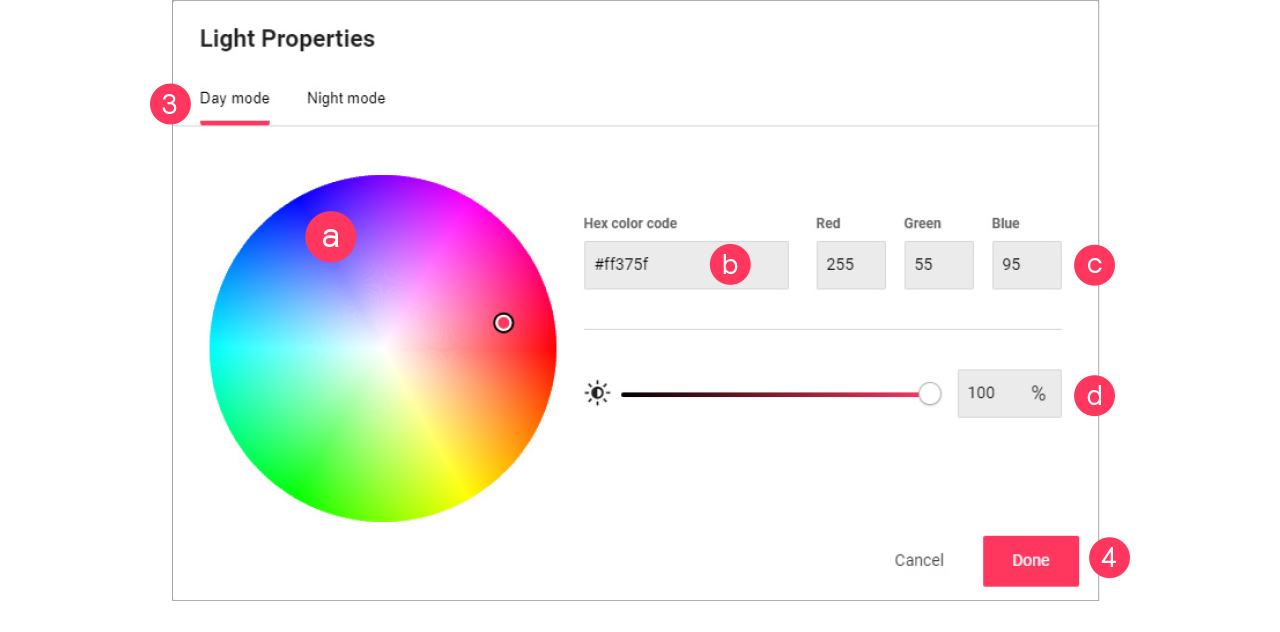
-
-
Click Done.
 Live validation
With live validation, you can check the settings you change while you are on site. This helps you to make sure the changes are in line with the expectations.
| It is highly recommended to use live validation only outside of trading hours because onsite the light levels respond to the change of the settings. |
-
In the menu, click Light control.
-
Click Live validation (
 ).
). -
Select the site to enter live validation.
-
A warning message appears. Click Yes, override manually if you’re absolutely sure.
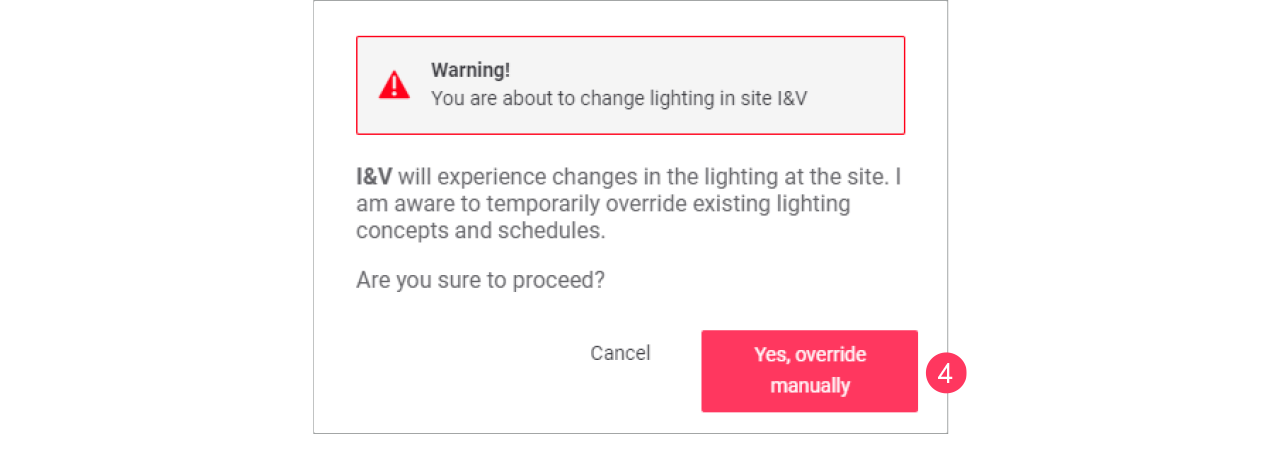
-
Select the Concept to use for live validation.
-
Click the Name of the area to apply and check.
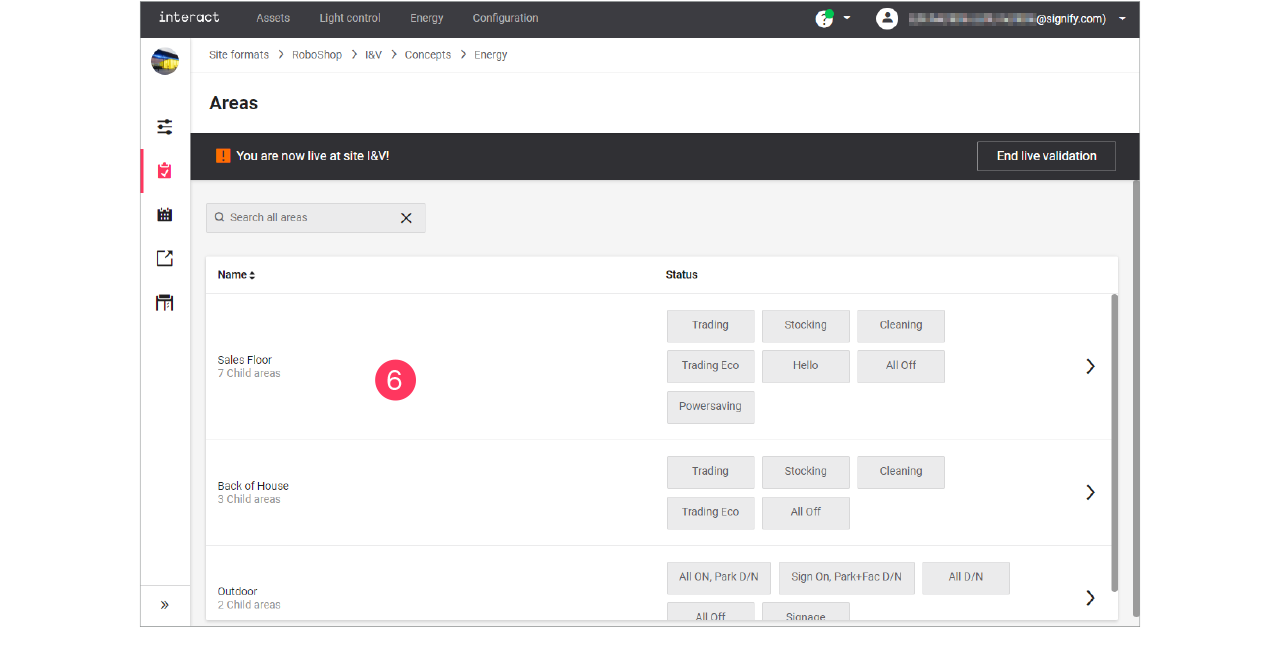
-
When done, click End live validation.
Add and edit schedules
With schedules you can automate the behavior of the lighting depending on a specific event. The event types are:
-
Regular day: a 24-hour schedule that occurs often, for example normal weekdays or weekends.
-
Special day: a 24-hour schedule that occurs only one time. A special event can span multiple days and can be used for opening hours that are applicable for special occasions, for example during a special season.
-
Holiday: one or more recurring days that allow for their own 24-hour schedule, for example (national) holidays (site can also be closed).
| When schedules differ per day or between weekdays and weekends, you need to create specific schedules for these days. |
Add new schedule
Add a schedule
-
In the menu, click Light control.
-
If applicable, in the dropdown Select a customer, select the customer to show the known formats.
-
Select a format.
-
Click Schedules (
 ).
). -
Click + Add Multisite schedule.
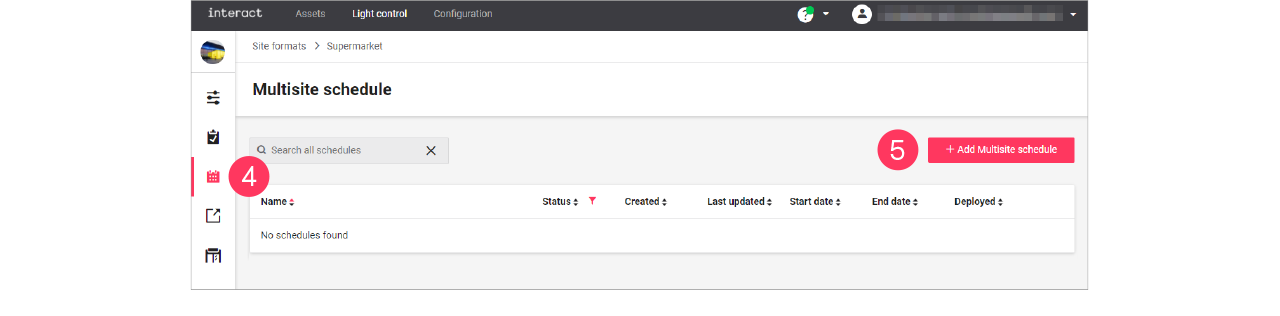
-
Enter the Name for the schedule.
Click Save.
-
Click + Add to start creating the schedule.
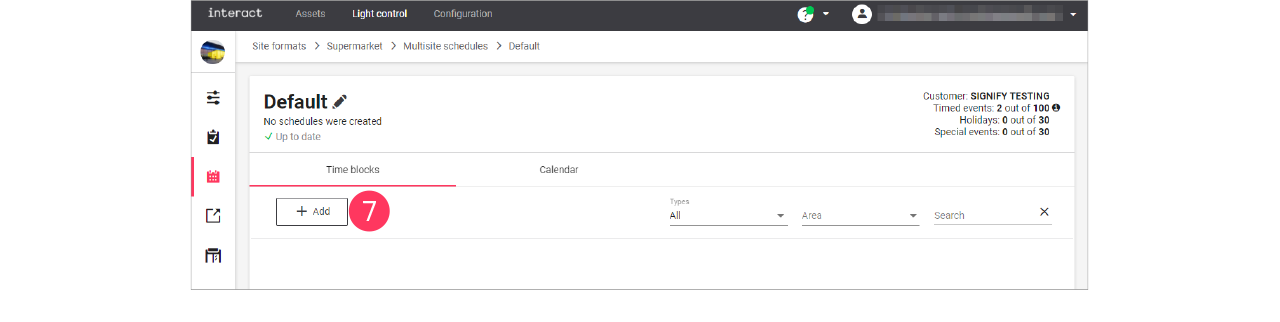
Create the schedule
When creating and editing schedules, keep in mind that the wizard follows a structured order:
-
When: start/end date, weekdays, and months
-
Where: area(s) the schedule applies to
-
What: what happens on the defined times
-
On the When page, make the calendar selections:
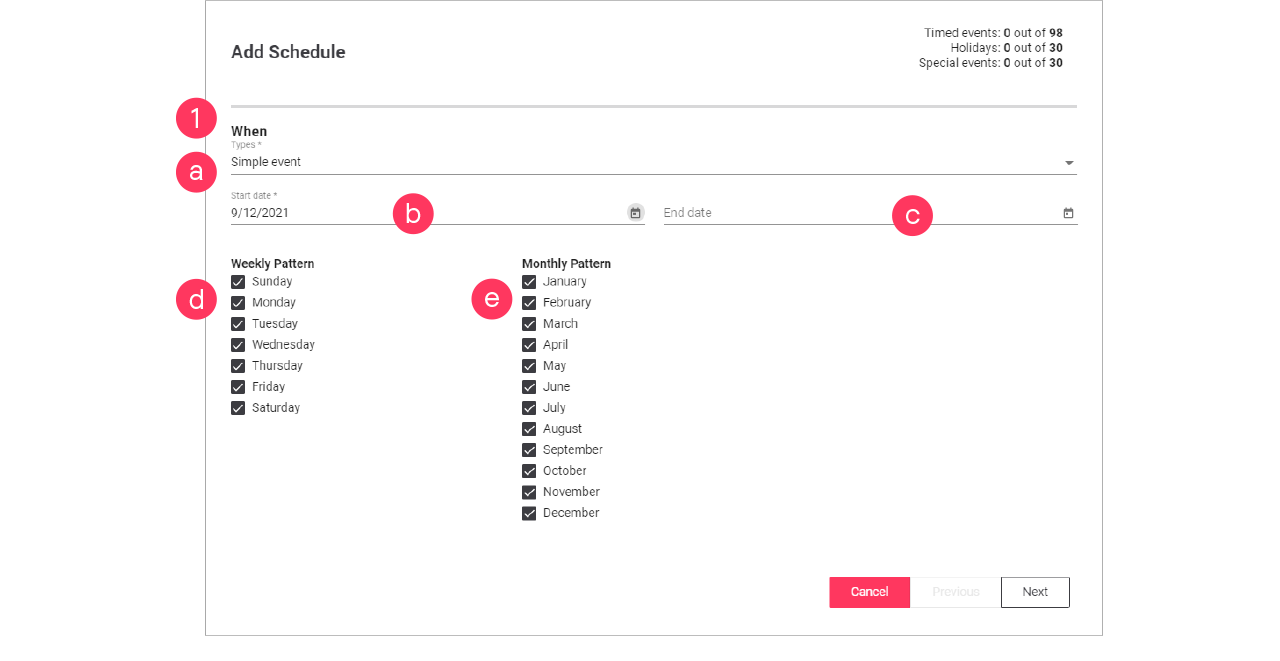
-
Select the Type of event:
-
Click the calendar (
 ) to select the Start date.
 -
Click the calendar (
) to select the End date (optionally). -
Clear/select the days for the Weekly Pattern.
-
Clear/select the months for the Monthly Pattern.
Click Next.
When creating a Special day, specify an End date in the far future. Select a date using the calendar and change the year manually to, for example, 2099. -
-
On the Where page, select the Areas the schedule applies to.
Click Next.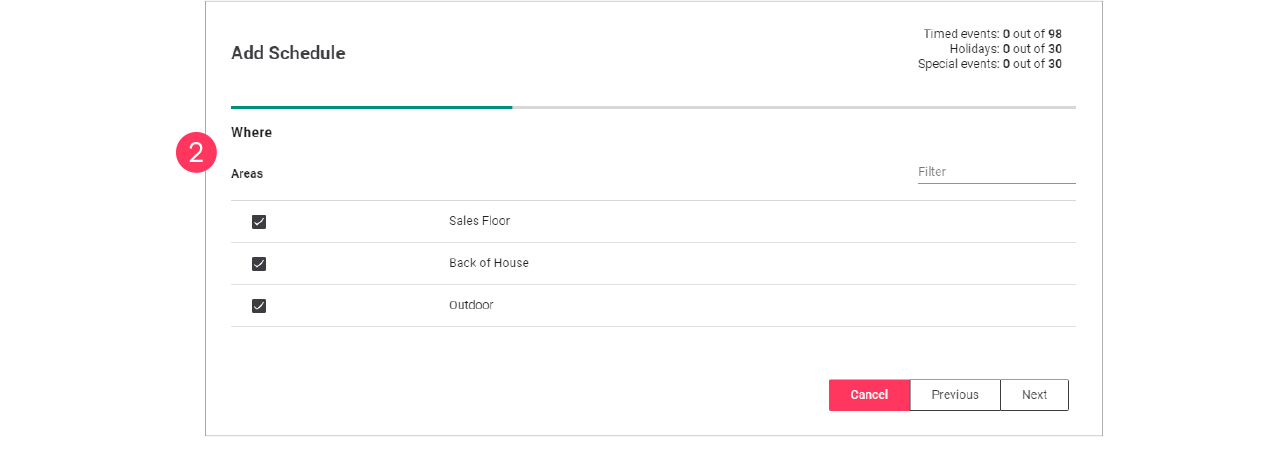
-
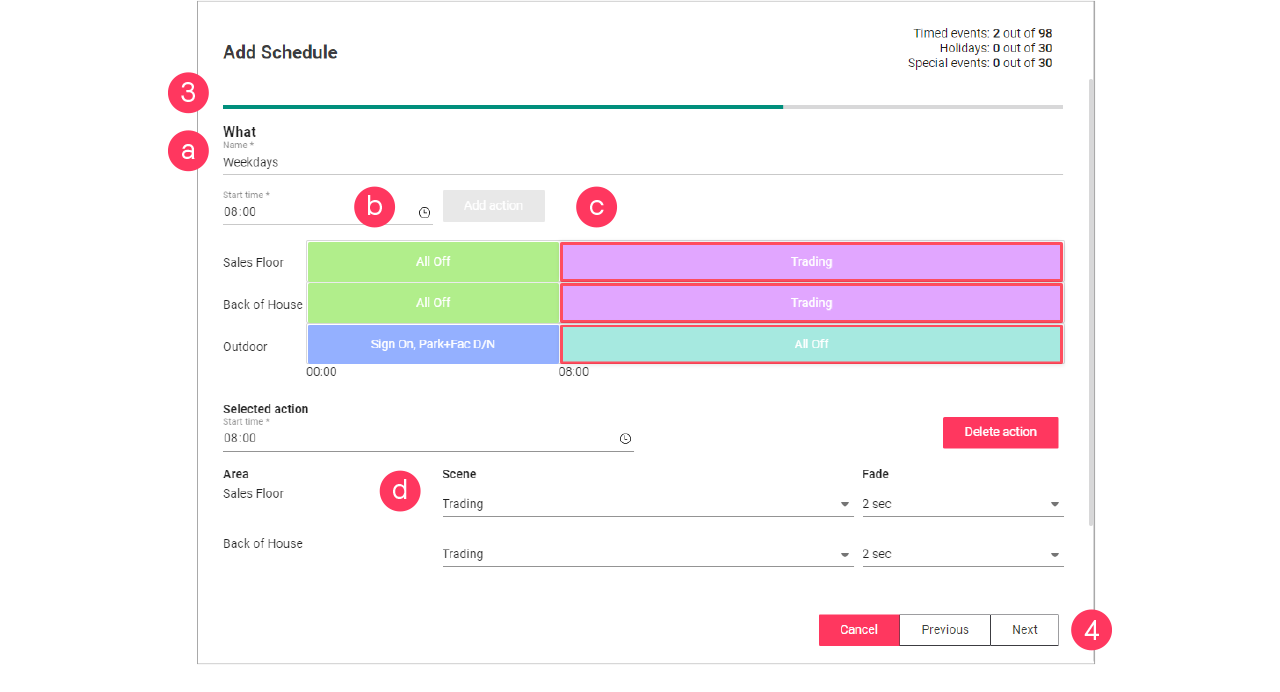
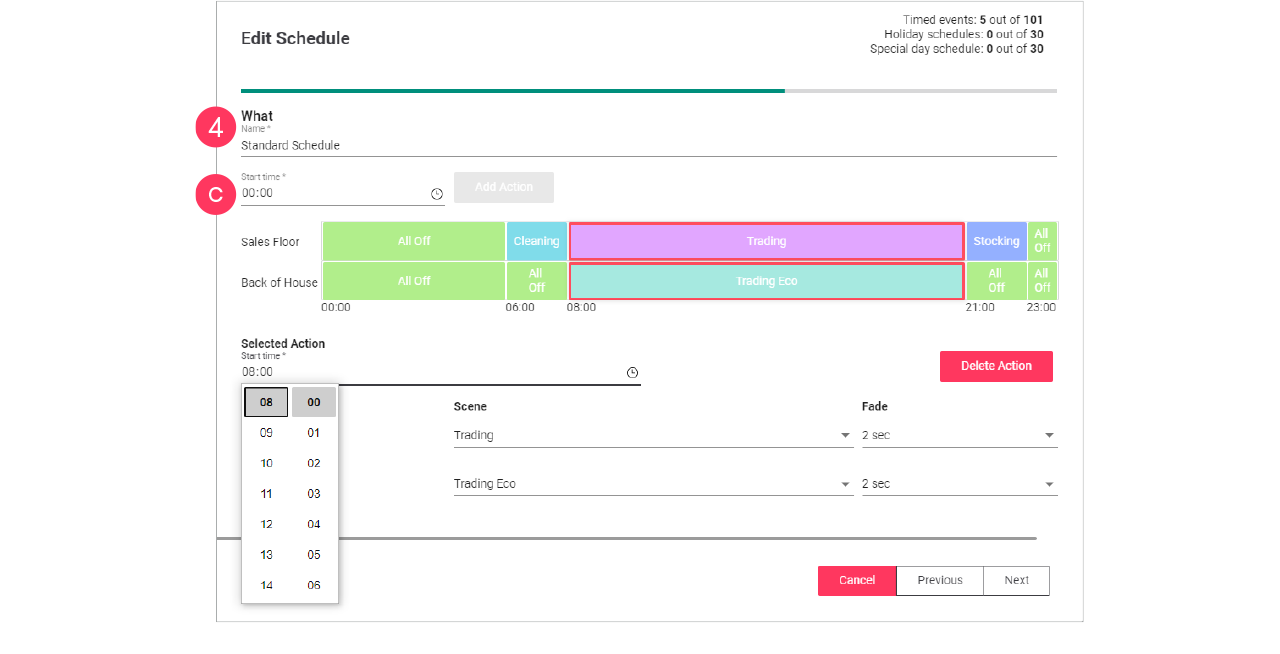
On the What page, make the timer selections:
-
Enter the Name for the schedule.
-
Click the clock (
 ) to define the Start time.
 -
Click Add Action.
-
Select the Scene and Fade.
-
-
Repeat for other timeframes.
Make sure to select the Scene and Fade for all timeframes on the timeline.
Click Next.Always make sure that the timeline covers 24 hours. A timeframe labeled Unknown is not allowed. -
Check the summary. Click Previous to correct the settings.
Or: Click Add to close the wizard and add the schedule to the list.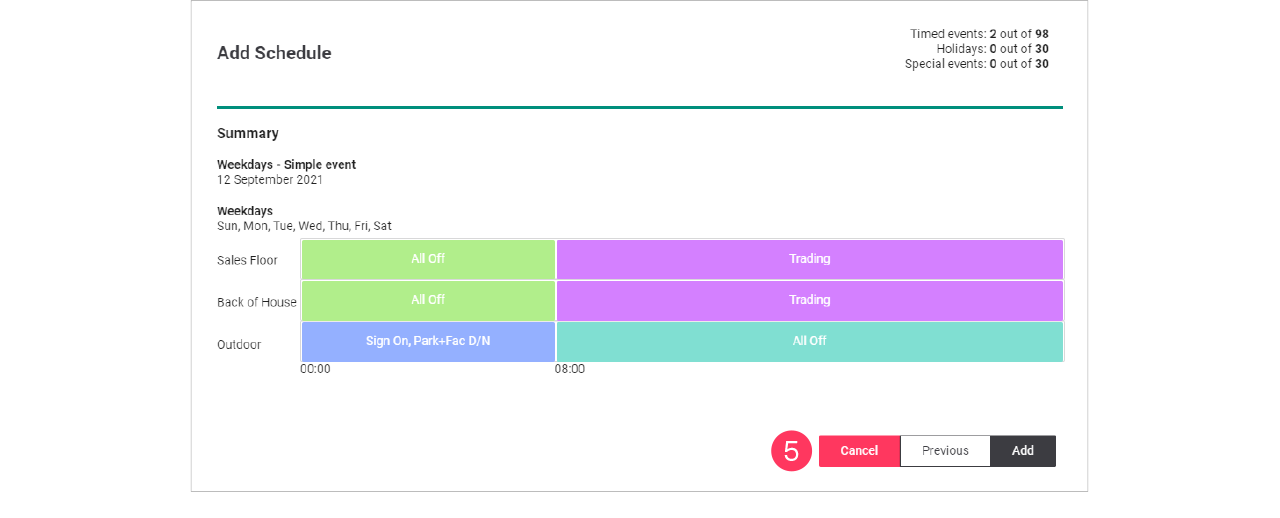
Adjust site opening hours
When the opening hours of a site may differ during the season, for example because of holidays or another event. The simplest way to do this is to clone a schedule and copy an event and change this to the specific needs.
Clone the schedule
-
In the menu, click Light control.
-
If applicable, in the dropdown Select a customer, select the customer to show the known formats.
-
Select a format.
-
Click Schedules (
). -
In the list of Multisite schedules, find one the deployed schedules for the site
The currently running schedule is labeled Default. -
With the mouse, hover over the Action menu icon (
) of the Multisite schedule to clone. Click Clone.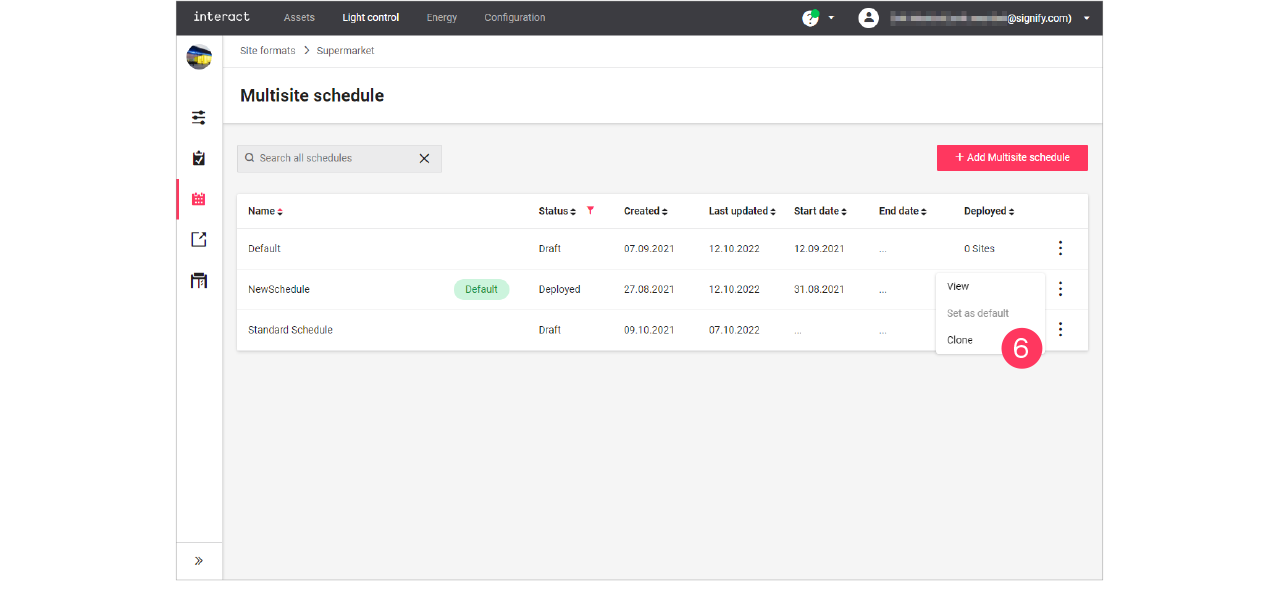
-
Enter the Name of the New Multisite schedule.
Click Clone.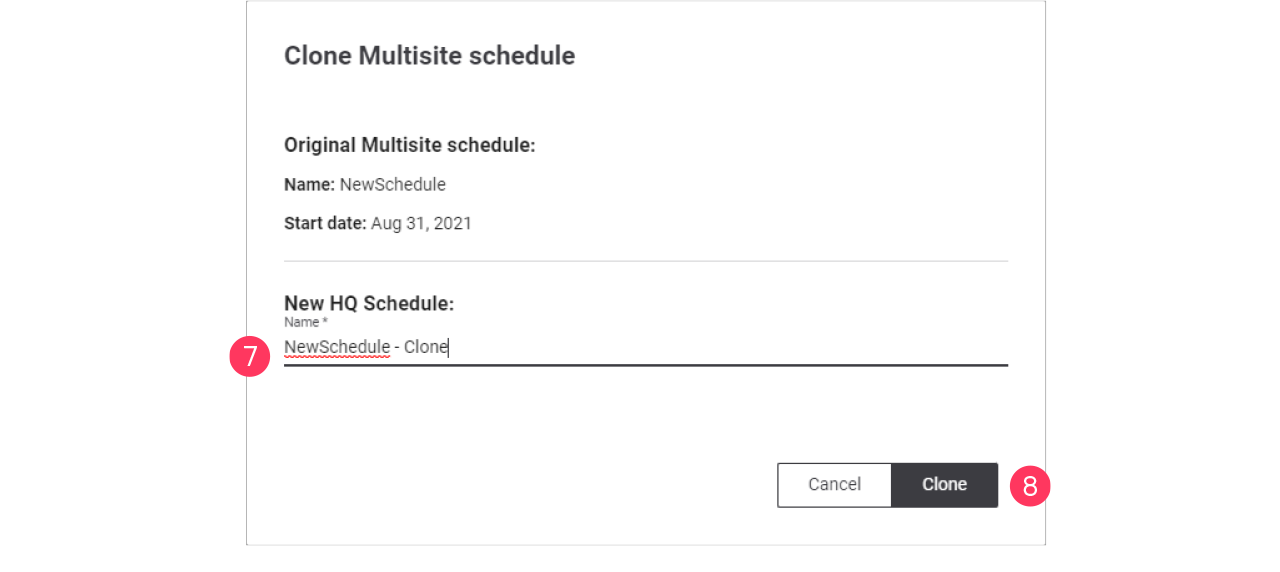
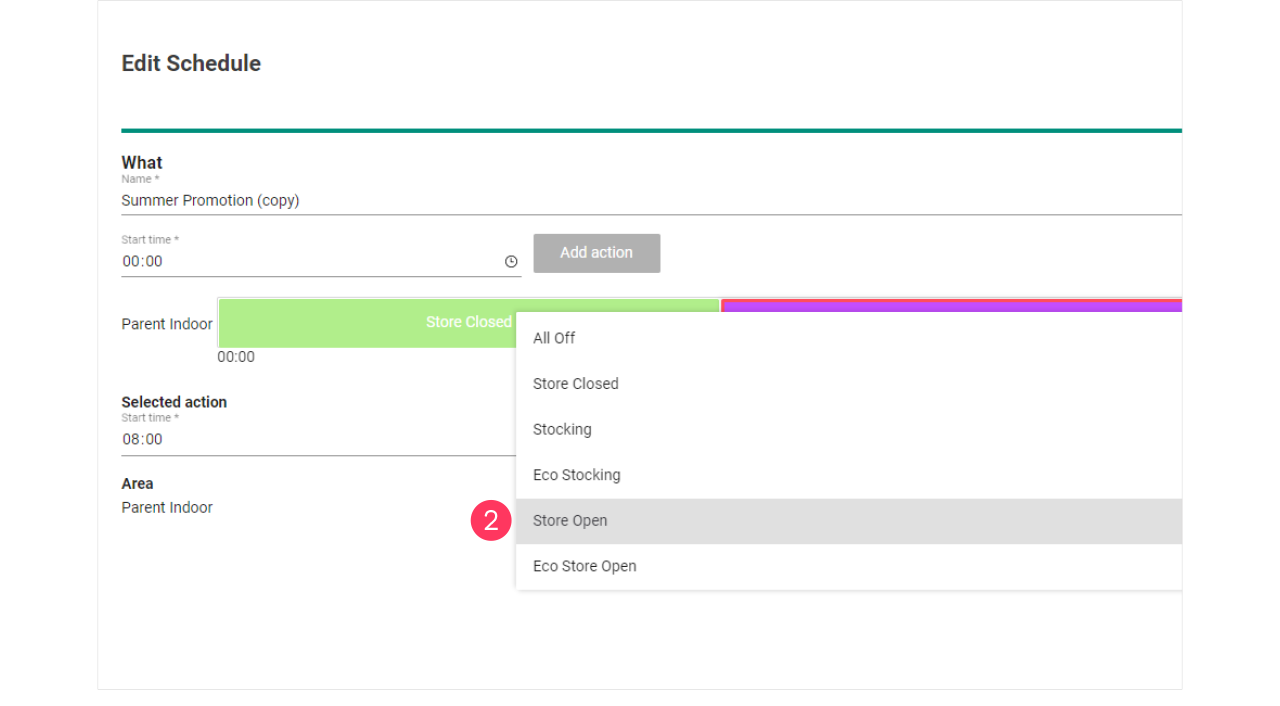
Edit the schedule
-
In the list of Multisite schedules, find the cloned schedule.
-
With the mouse, hover over the Action menu icon (
) of the schedule to edit. Click Edit.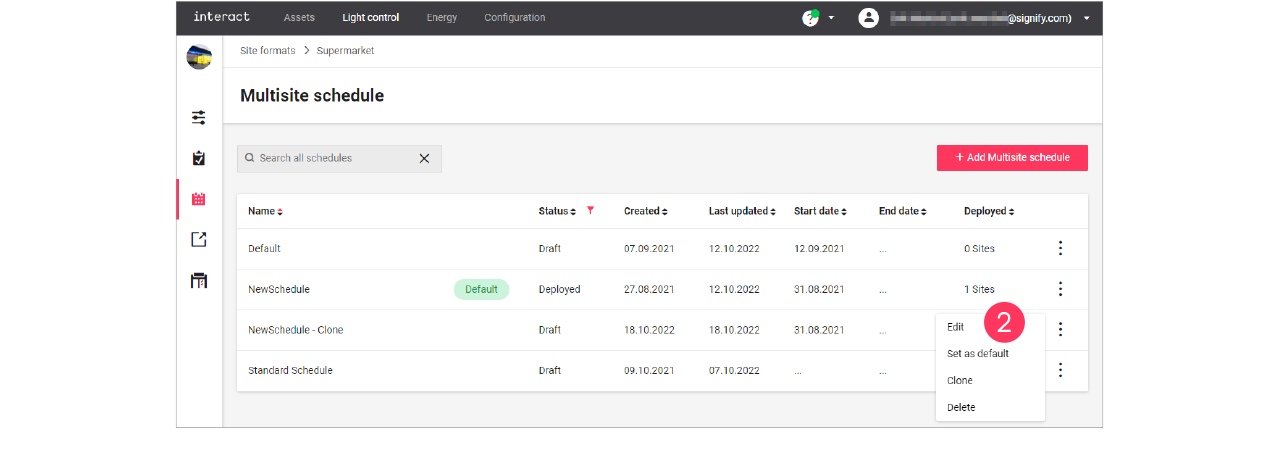
-
With the mouse, hover over the Action menu icon (
) of the event to edit. Click Edit schedule.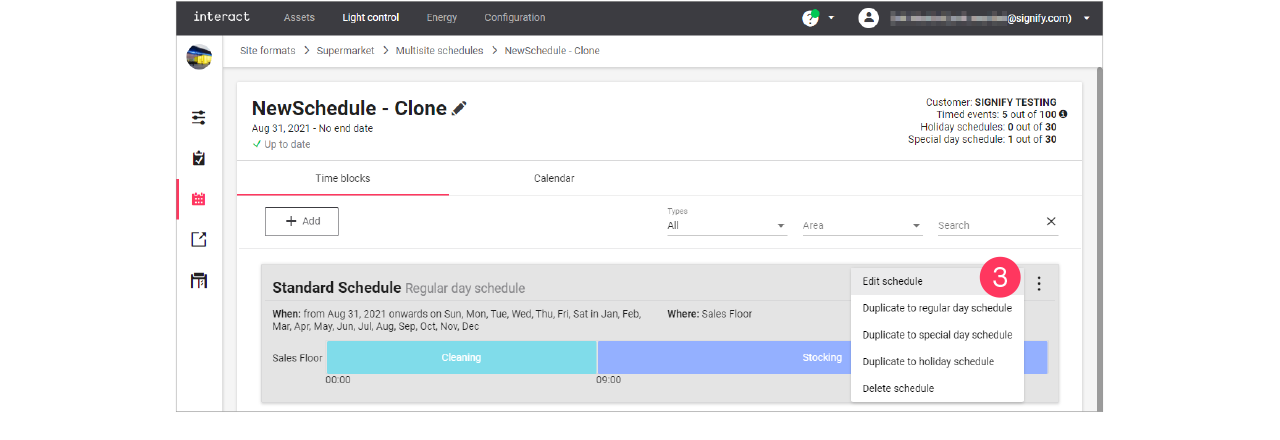
-
Following the wizard, change the settings of the schedule:
-
When page: select the Start date and if applicable the Weekly pattern and the Monthly pattern.
Click Next.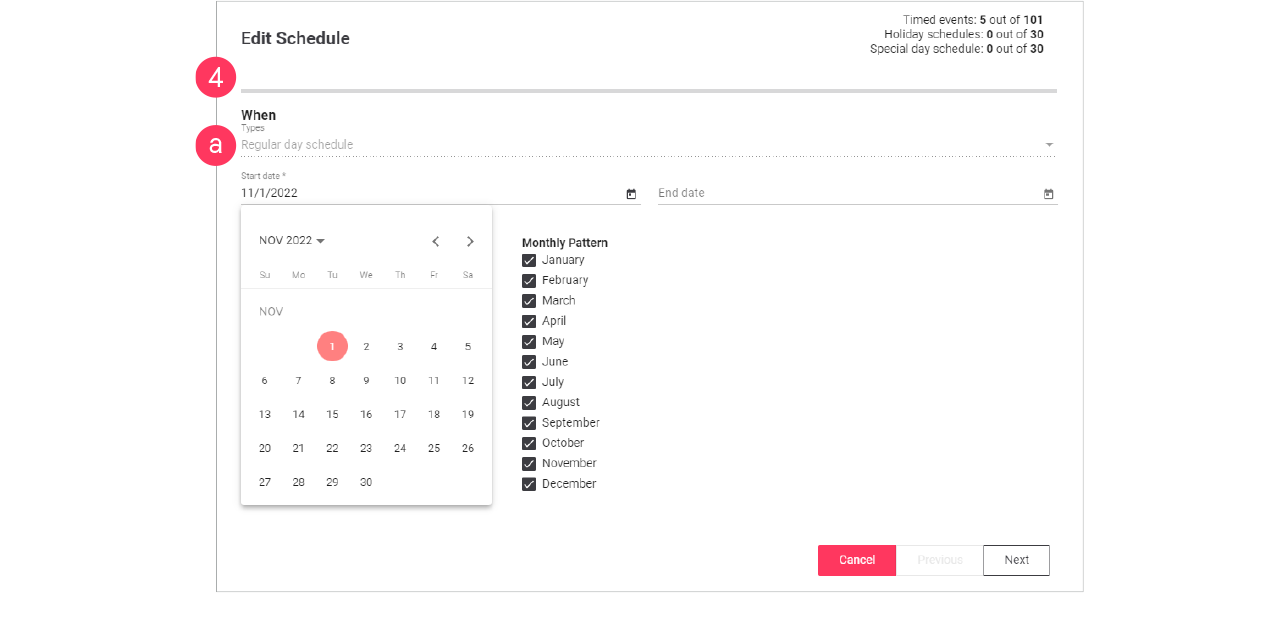
-
Where page: select the areas the schedule applies to. Make sure if a change is required.
Otherwise, click Next. -
What page: change the Start time(s) of the actions in the schedule.
Click Next.
-
-
Check the summary. Click Previous to correct the settings.
Or: Click Update to close the wizard. -
Repeat for the other regular day events in the schedule.
Adjust seasonal opening times
When the opening hours of a site may differ during the season, for example because of holidays or another event. The simplest way to do this is to clone a schedule and copy an event and change this to the specific needs.
Clone the schedule
-
In the menu, click Light control.
-
If applicable, in the dropdown Select a customer, select the customer to show the known formats.
-
Select a format.
-
Click Schedules (
). -
In the list of Multisite schedules, find one the deployed schedules for the site
The currently running schedule is labeled Default. -
With the mouse, hover over the Action menu icon (
) of the Multisite schedule to clone. Click Clone.
-
Enter the Name of the New Multisite schedule.
Click Clone.
Duplicate event
-
In the list of Multisite schedules, find the cloned schedule.
-
With the mouse, hover over the Action menu icon (
) of the schedule to edit. Click Edit.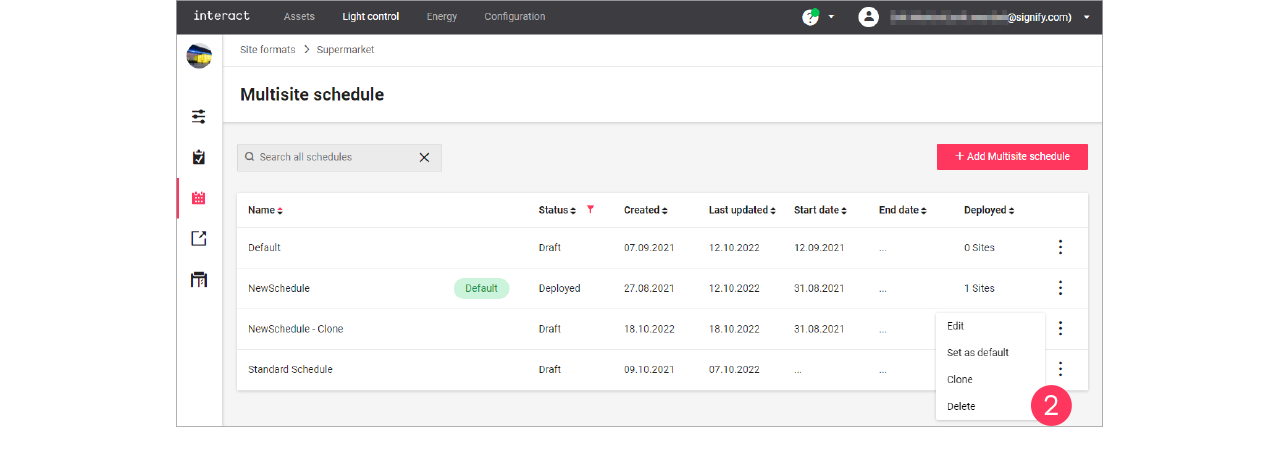
-
With the mouse, hover over the Action menu icon (
) of the event to edit. Click Duplicate to special day schedule.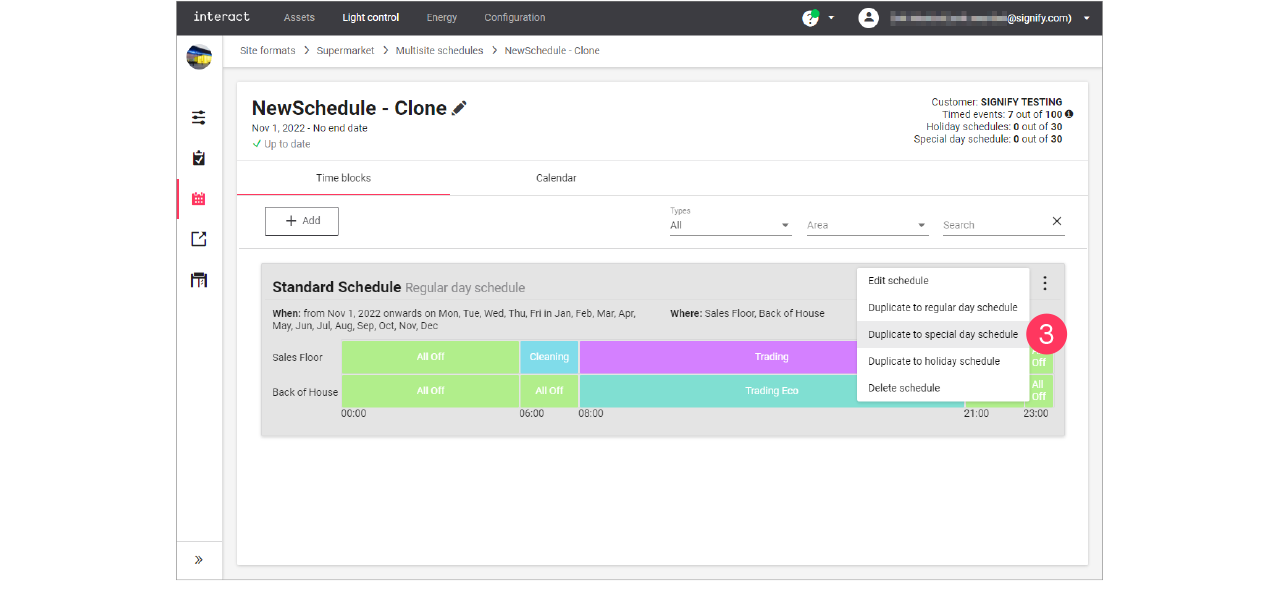
Edit the schedule
-
In the list of events, find the duplicated event.
You can find it by the word (copy) in the name. -
With the mouse, hover over the Action menu icon (
) of the schedule to edit. Click Edit schedule.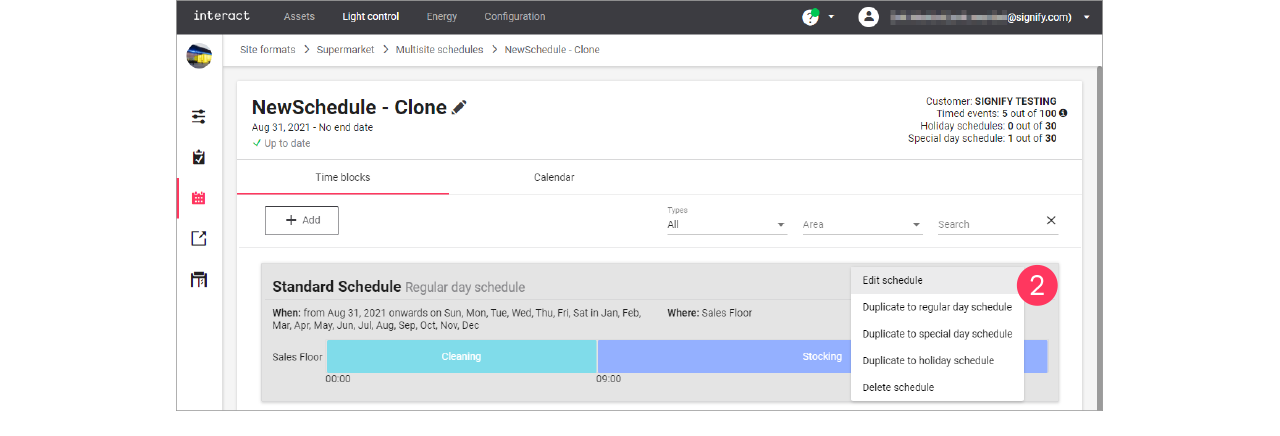
-
When page: make the calendar selections:
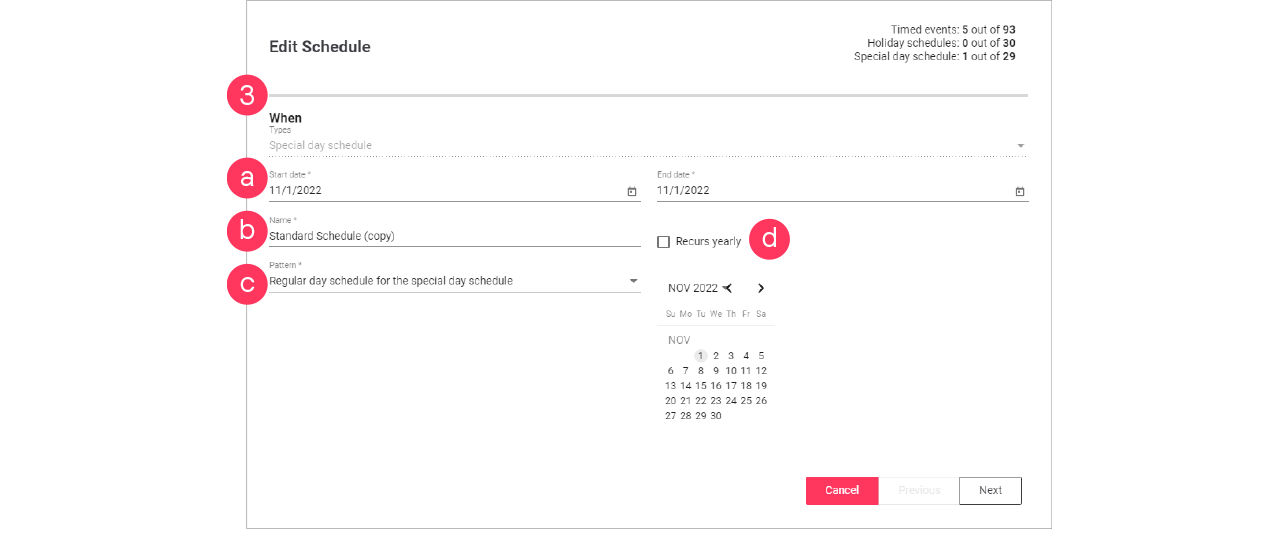
-
Start date and End date
-
Name
-
Pattern (single schedule for all days, or two schedules different for weekdays and weekends)
-
If applicable, select the Recurs yearly checkbox.
Click Next.
-
-
Where page: select the Areas the schedule applies to.
Or: Select Reuse an existing schedule and select an existing schedule for the selected date/pattern.
Click Next. -
What page: change the Name and change the Actions to the desired settings.
Click Next.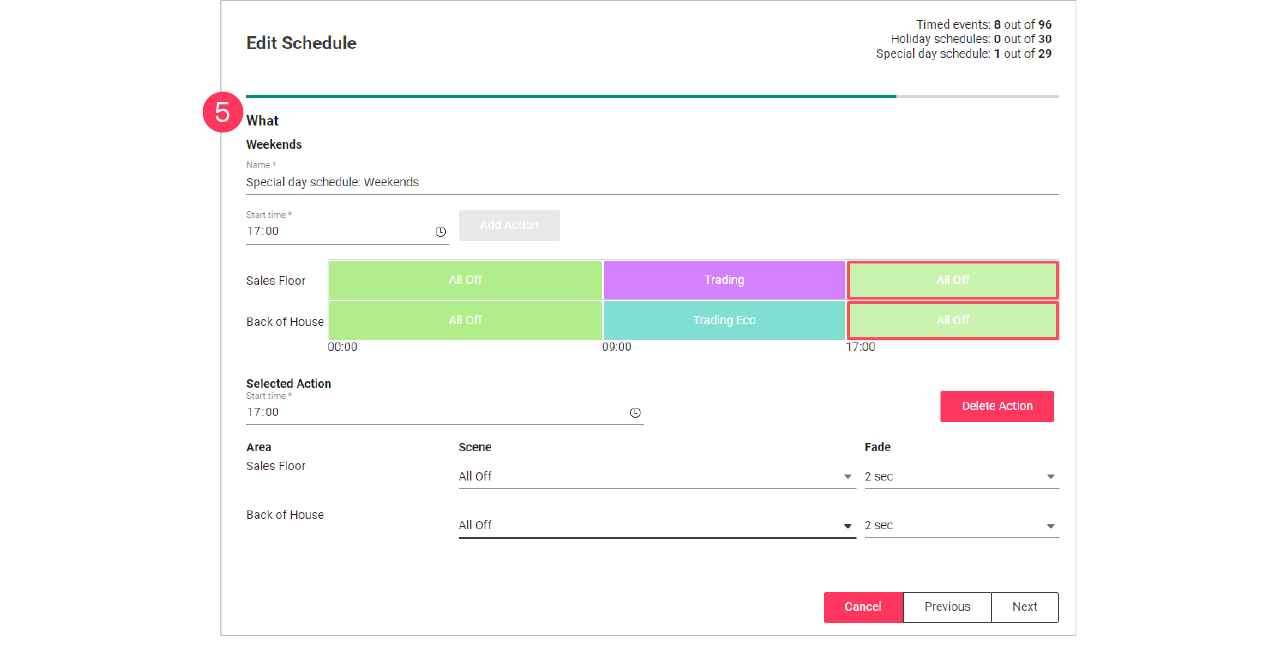
-
In case of two schedules, you now start editing the schedule for the weekend.
-
You can also select Reuse the weekday schedule to copy this schedule to the weekend.
-
-
Click Next.
-
Check the summary. Click Previous to correct the settings.
Or: Click Update to close the wizard.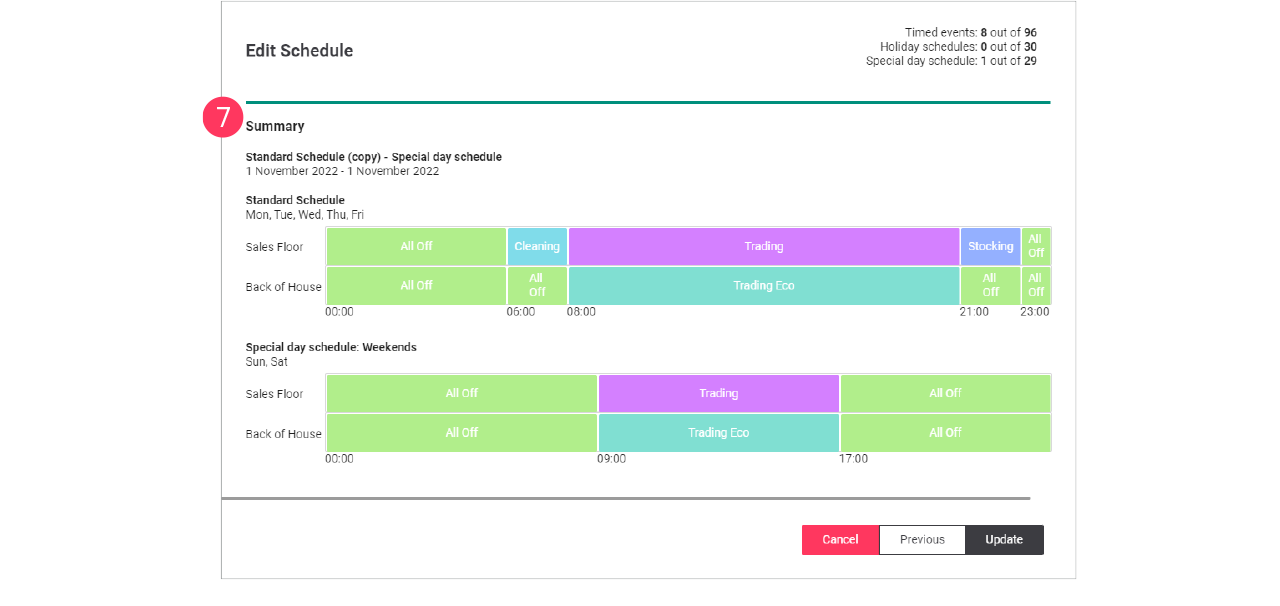
Create holiday schedule
To create a holiday schedule, you can either Add a new schedule, and select the type Holiday schedule, or duplicate an existing schedule using Duplicate to holiday schedule.
| It’s possible to create only one (1) schedule of the type Holiday schedule, but you can add up to 30 days to this schedule. |
When editing the schedule:
-
On the When page, make the calendar selections:

-
Select the date the holiday schedule applies to.
-
If applicable, select the Recurs yearly checkbox.
-
Give the schedule a Name. Click Add.
-
Repeat for other dates the holiday schedule applies to.
Click Next.
-
Use the Recurs yearly checkbox for example for bank holidays that always occur on the same date (New Year’s Day, etcetera).
-
For holidays with shifting dates (Easter, etcetera), don’t select the Recurs yearly checkbox. You need to create these separately every time.
-
Use the Bin icon (
 ) to delete a specific date (for example when it’s the past).
-
-
On the Where page, select the Areas the schedule applies to.
Click Next.
-
On the What page, change the Name and change the Actions to the desired settings.
Click Next.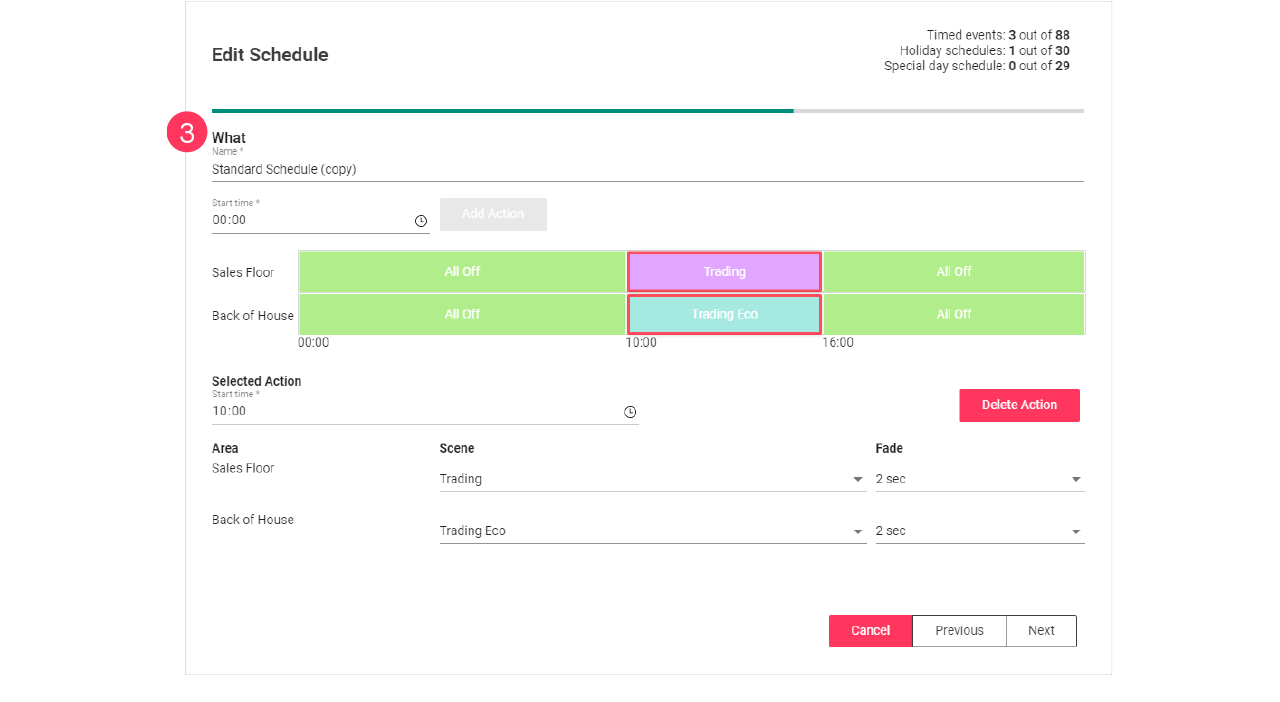
-
Check the summary. Click Previous to correct the settings.
Or Click Add or Update to close the wizard.
 Add and edit deployments
Deployments are used to roll out concepts and schedules to a site or a batch of sites.
Create new concept
-
In the menu, click Light control.
-
If applicable, in the dropdown Select a customer, select the customer to show the known formats.
-
Select a format.
-
Click Concepts (
). -
Click + New concept.
-
Enter the Name for the concept.
Click Create. The concept is now available with the status Draft. -
Click the concept and start editing.
Clone existing concept
When you want to reuse an existing concept, for example in case there are only some light levels to change, then you can clone a concept. Cloning is possible for concepts that are in Draft or Deployed status.
-
In the menu, click Light control.
-
If applicable, in the dropdown Select a customer, select the customer to show the known formats.
-
With the mouse, hover over the action menu icon (
) of the schedule to edit.
Click Clone.
-
Enter the Name for the concept.
Click Create. The concept is now available with the status Draft. -
Click the concept and start editing.
Deploy a concept and schedule
Add concept to the deployment
-
In the menu, click Light control.
-
If applicable, in the dropdown Select a customer, select the customer to show the known formats.
-
Select a format.
-
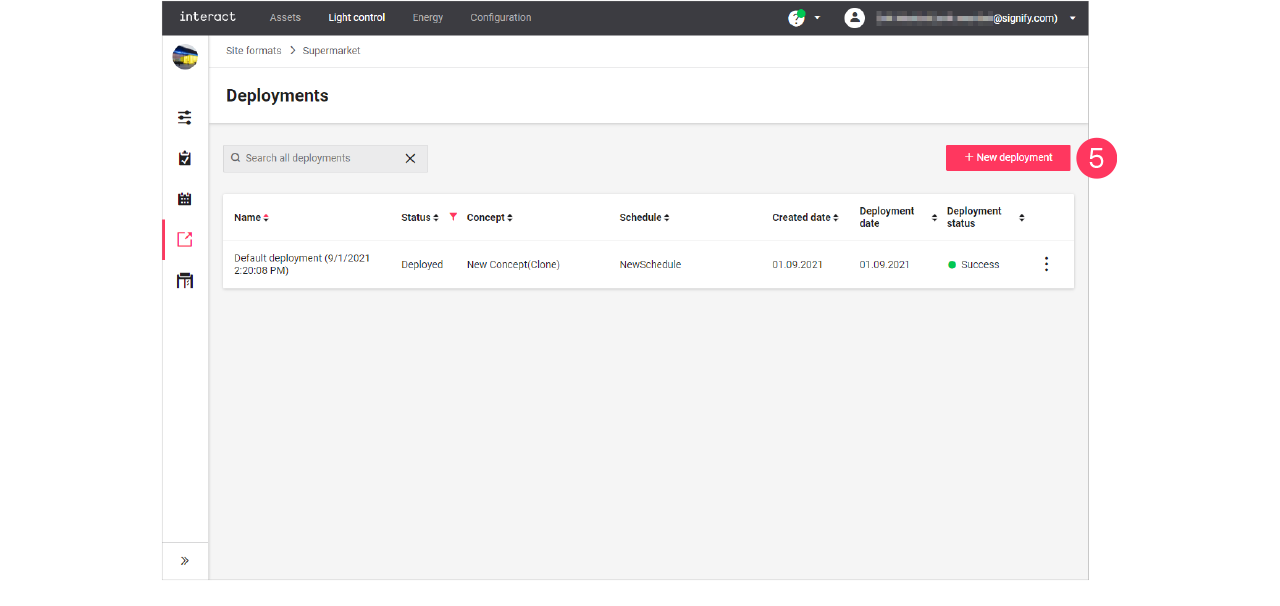
Click Deployments (
). -
Click + New deployment.
-
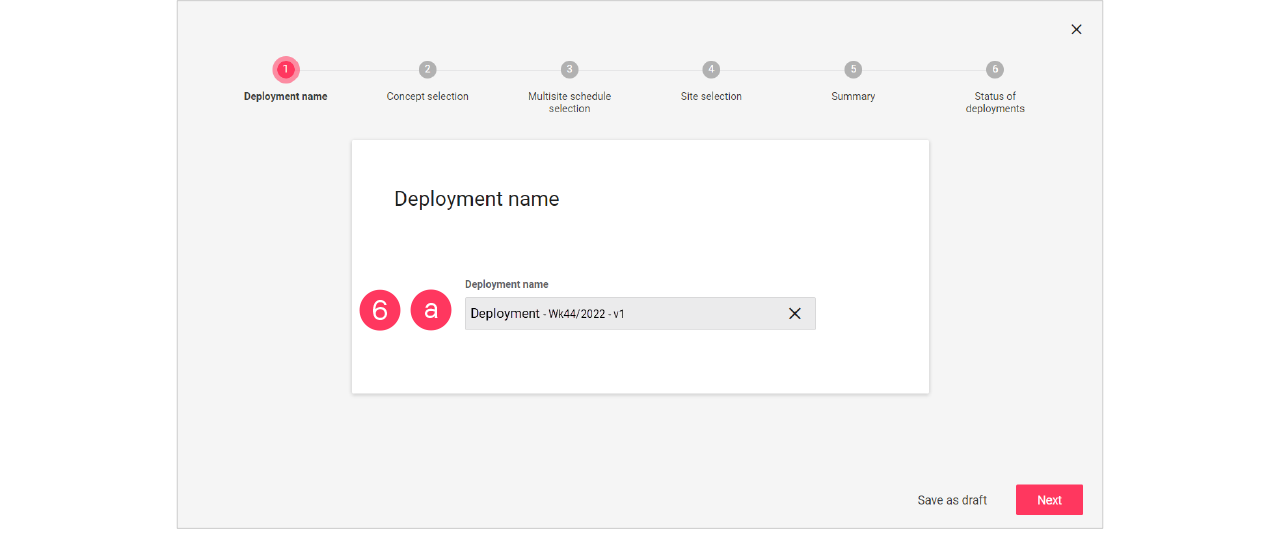
Follow the steps in the wizard, click Next for the next step:
-
Enter the Name for the deployment.
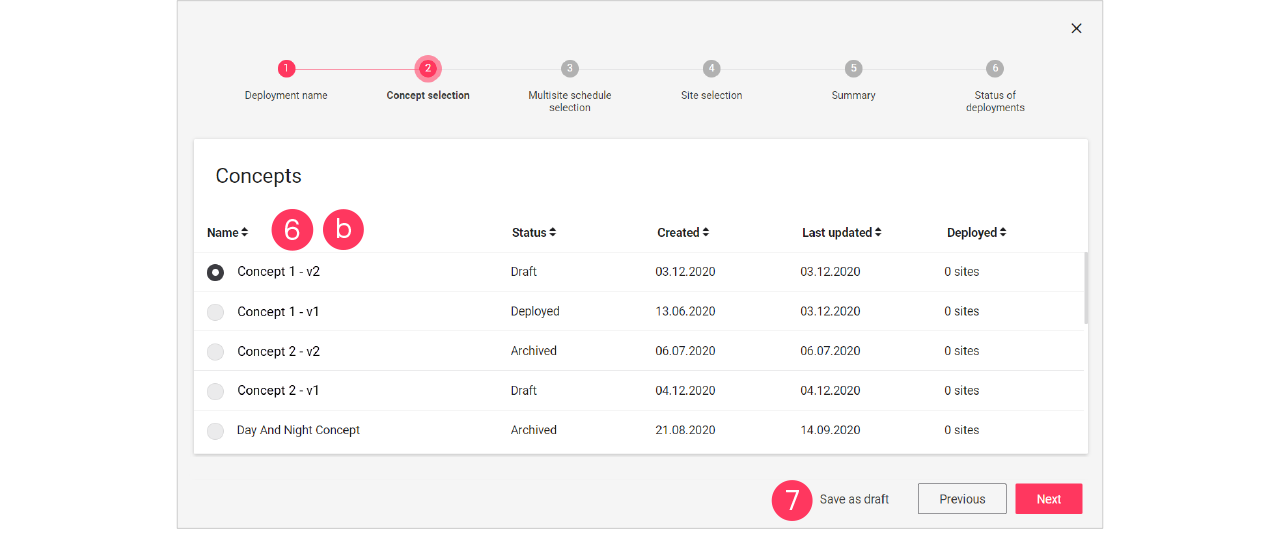
-
Select the Concept.
-
-
Click Save as draft to save the deployment for later use.
Add schedule and site to the deployment
-
In the menu, click Light control.
-
If applicable, in the dropdown Select a customer, select the customer to show the known formats.
-
Select a format.
-
Click Deployments (
). -
Click a deployment labeled with Draft to start editing.
-
Click Next until you reach the step Multisite schedule selection.
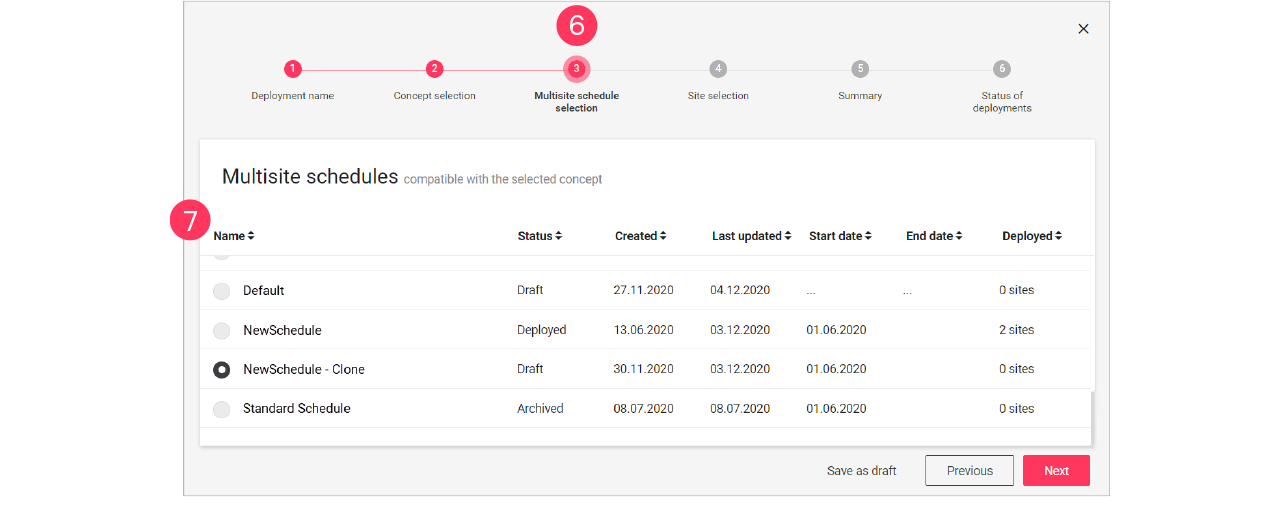
-
Select the Schedule that must be applied in the deployment.
Click Next. -
Select the Site(s) that must receive the deployment.
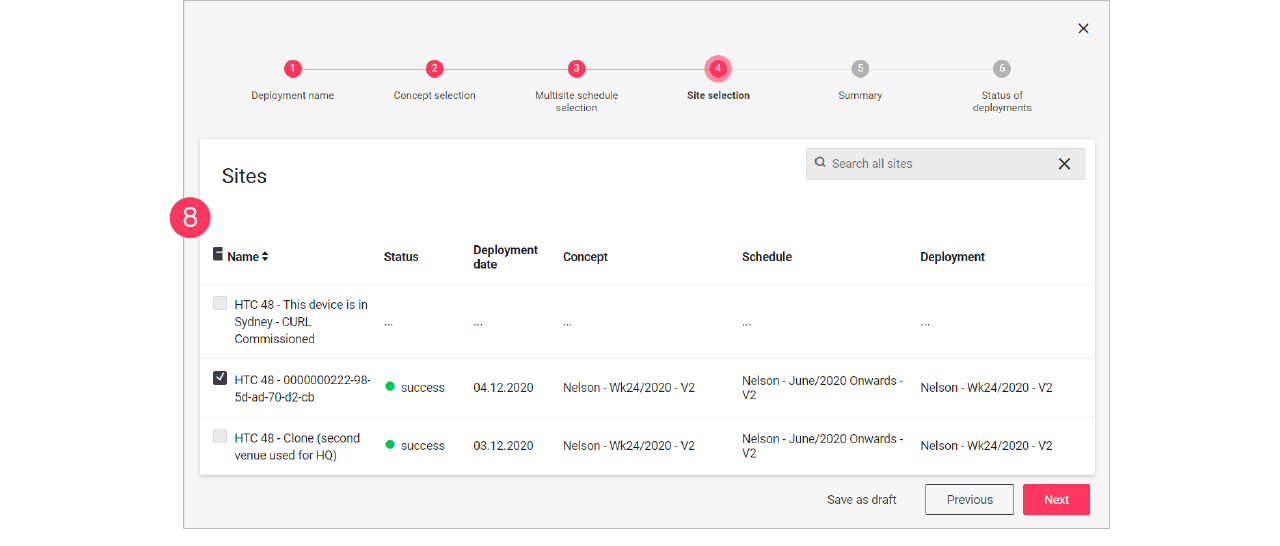
-
Click Save as draft to save the deployment for later use.
Finalize the deployment
-
In the menu, click Light control.
-
If applicable, in the dropdown Select a customer, select the customer to show the known formats.
-
Select a format.
-
Click Deployments (
). -
Click a deployment labeled with Draft to start editing.
-
Click Next until you reach the step Summary.
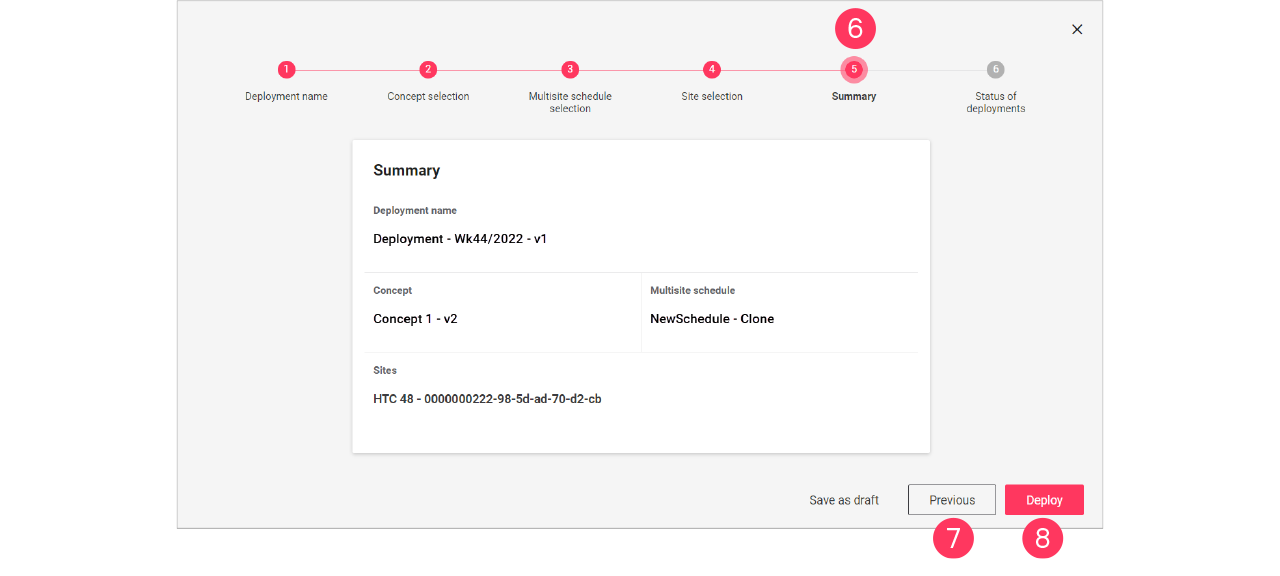
-
Check if the concept, schedule, and sites chosen are correct. Click Previous to go back to correct.
Or: Click Deploy to start the deployment.
 Site view
The site view gives you an overview of the current status of the site you are viewing. Also, some generic site settings can be made on this page. The site view consists of the following sections:
-
Overview
-
Scenes
-
Setting
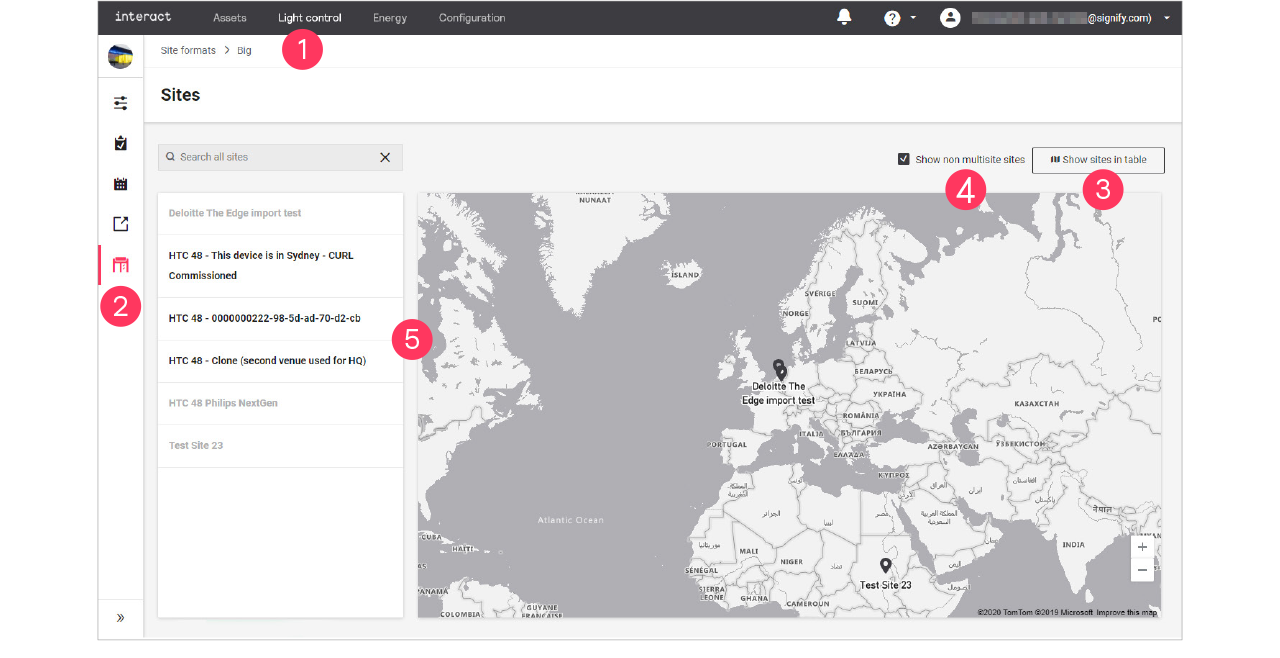
To enter the Site view:
-
In the menu, click Light control.
-
Click Sites (
). -
Click
 Show sites on map or Show sites in table to toggle the view.
 -
Optionally, selecting the Show non multisite sites checkbox to show all sites.
-
Select the site you want to view or edit.
| Non multisite sites are not selectable. |
Overview
-
In the Sites view, click Overview.
-
For the chosen site you see an overview of the currently active Deployment, Concept and Schedule.
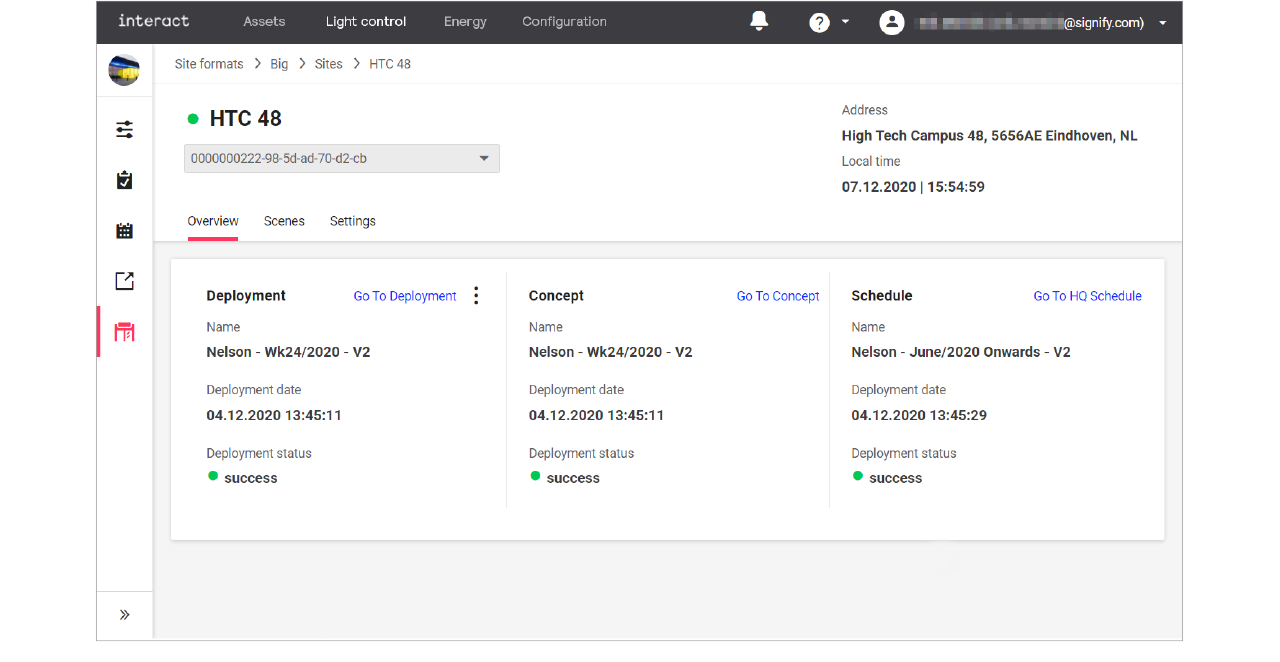
-
Click:
-
Go To Deployment to see the details of the deployment;
-
Go To Concept to see the details of the concept;
-
Go To HQ Schedule to see the details of the schedule.
-
-
With the mouse, hover over the action menu icon (
) in the Deployment section.
-
Click:
-
View logs to open an overview of the logs for the deployment.
-
Redeploy to start the deployment again.
-
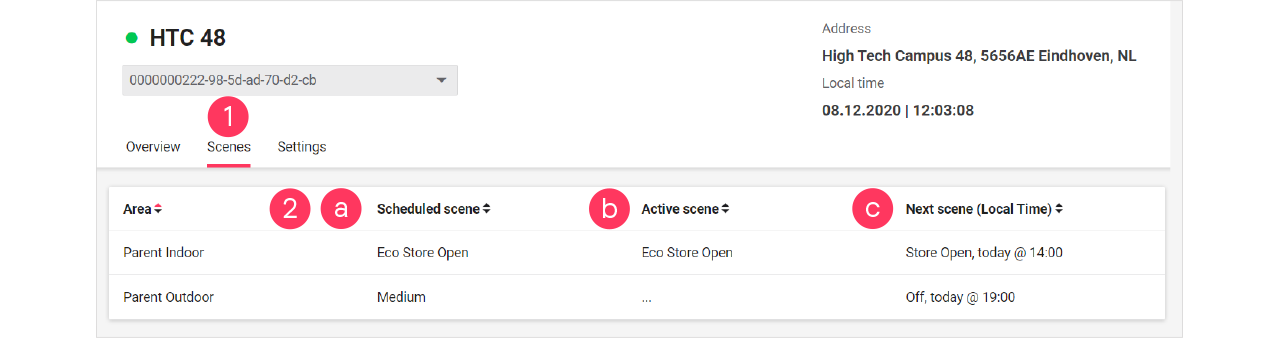
Scenes
-
In the Sites view, click Scenes.
-
For the chosen site you see per area an overview of:
-
the currently scheduled scene
-
the active scene (which may be different from the scheduled scene in case of local manual override)
-
the upcoming scene, including the time this scene activates.
-
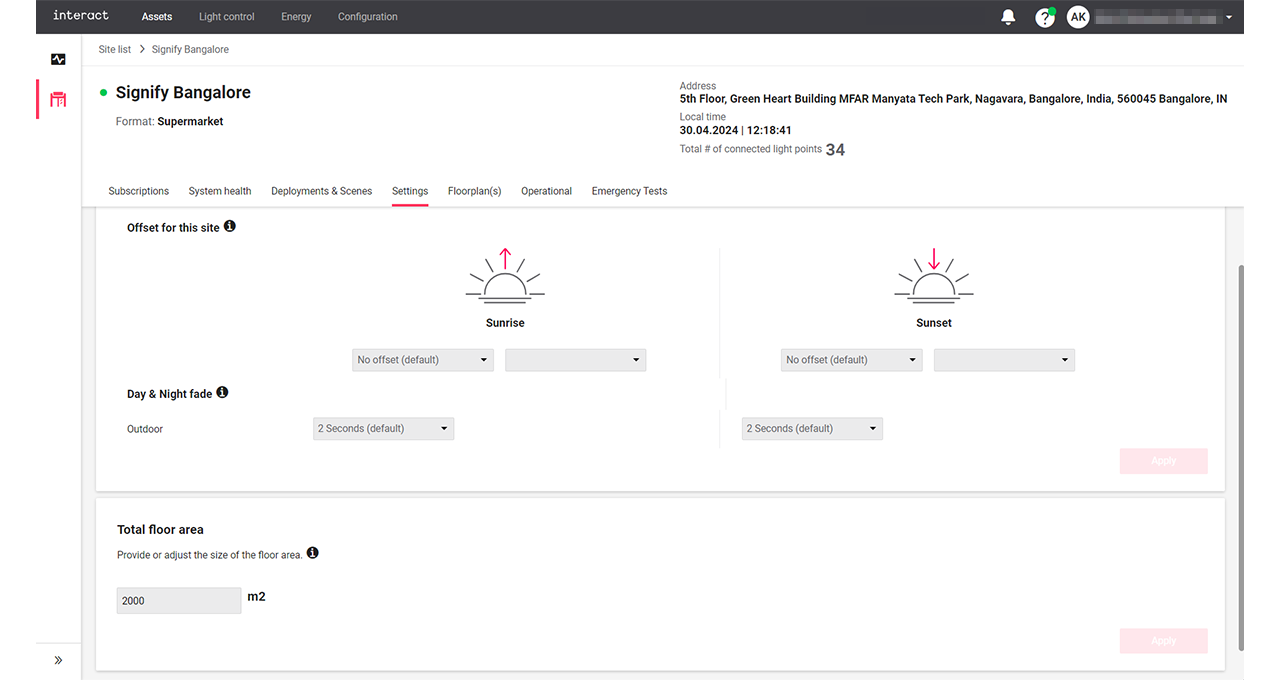
Settings
The Settings section is used to set generic settings that are applicable for the selected site.
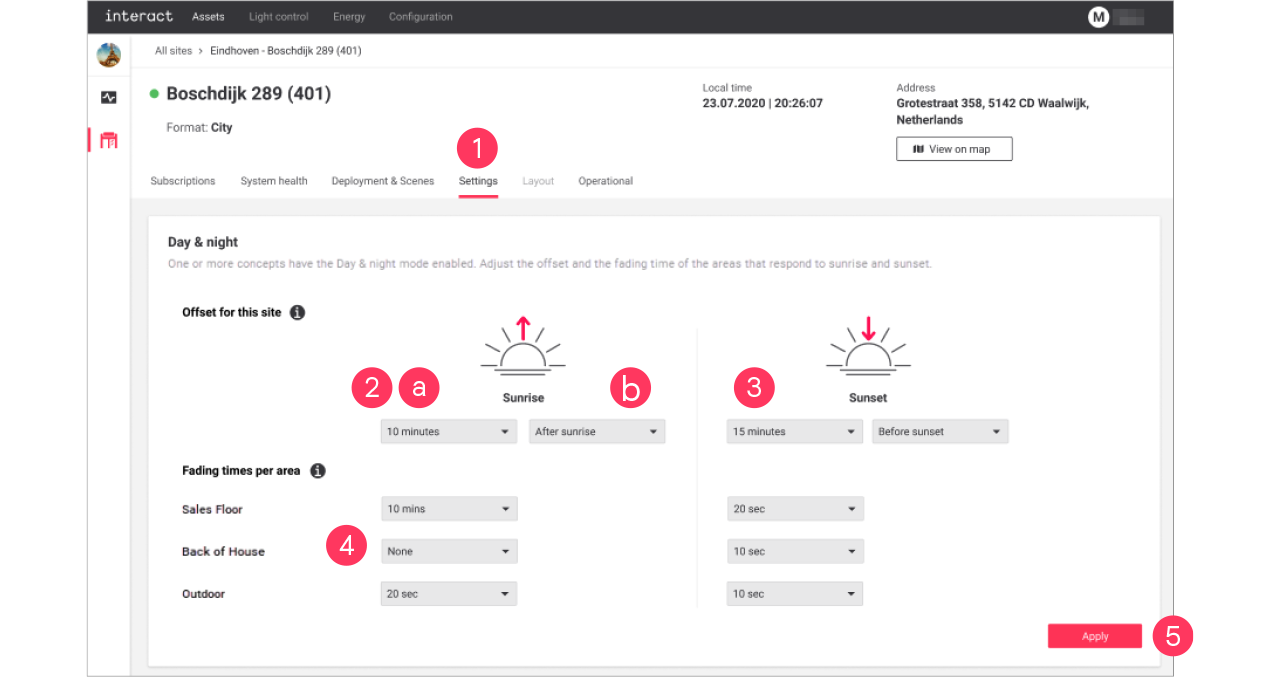
Set day and night offset
With day and night offset, you can set the moment of the switching action of the lights to before or after sunrise or sunset. When also setting the fading times per area, you define the time it takes for the lights to dim up or down to the set level at sunrise or sunset, taking the offset into account.
-
In the Sites view, click Settings.
-
In the dropdowns for Sunrise:
-
Select the offset time (by default: No offset)
-
Select if the offset should apply Before or After sunrise.
-
-
Repeat both steps for Sunset.
-
Set the Fading times per area that should apply at sunrise or sunset.
-
Click Apply.
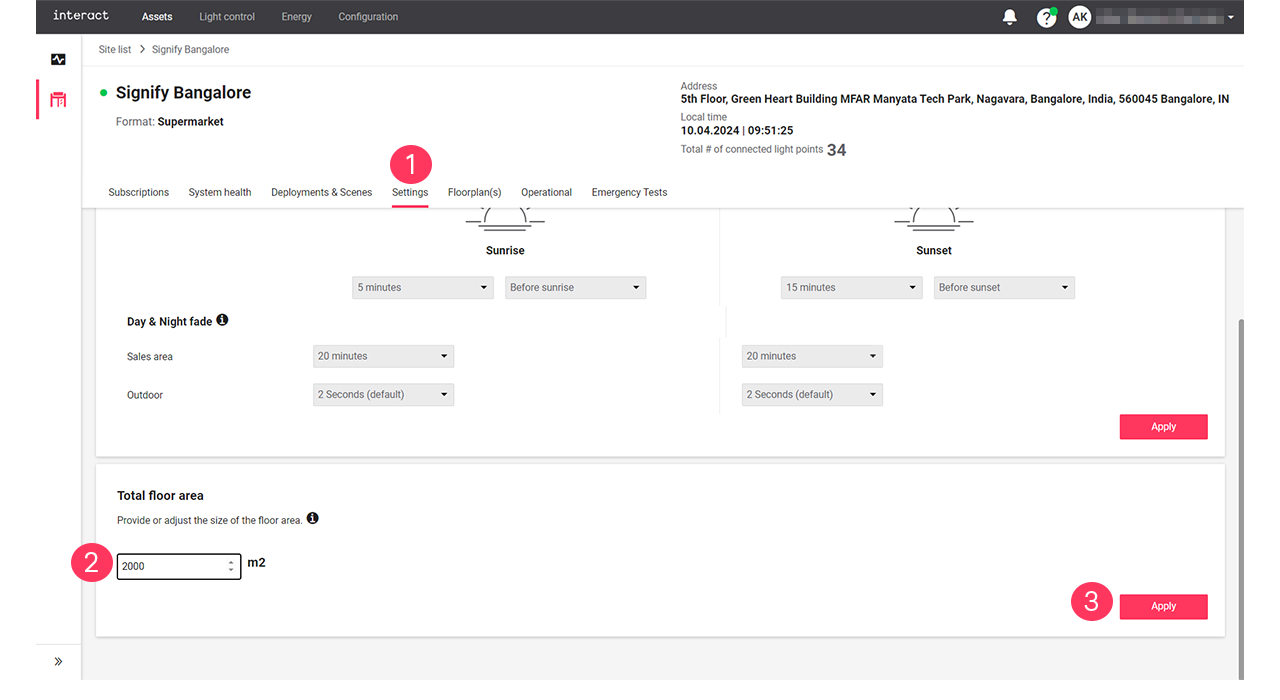
Set total floor area
With Total floor area, you can customize the size of the floor area of the selected site. Setting this parameter correctly allows for comparing the energy consumed and saved data per m2 in the energy Site list.
-
In the Sites view, click Settings.
-
Check if the Total floor area value is correct. Enter the correct size of the floor area in m2.
-
Click Apply.
Eco-mode
With the Eco-mode, it is possible to reduce energy consumption during peak hours.
The steps to follow to enable the eco mode are:
-
Create Scenes per area with adjusted light levels to match the required energy savings. See section Eco-scenes and Add, edit and reorder scenes for more information.
-
Clone the current running Schedule giving it a clear name and edit the schedule to change the Scenes, for example Store Open to Eco Store Open. See section Add and edit schedules for more information.
-
Clone the current used Concept and limit per area the light levels to achieve the desired energy saving. See section Change light levels for more information.
-
Deploy the Concept with the new Schedule to the applicable site(s). See section Add and edit deployments for more information.
Local manual override
For personnel that doesn’t have access to the dashboard, there are user interfaces available that can be used to override the automatic schedules manually. In general, the system resumes the automatic schedule after two hours of operation in the local manual override.
User interfaces that can be used for local manual override are:
-
Wall switches (with dry contact)
-
Antumbra Button and Display
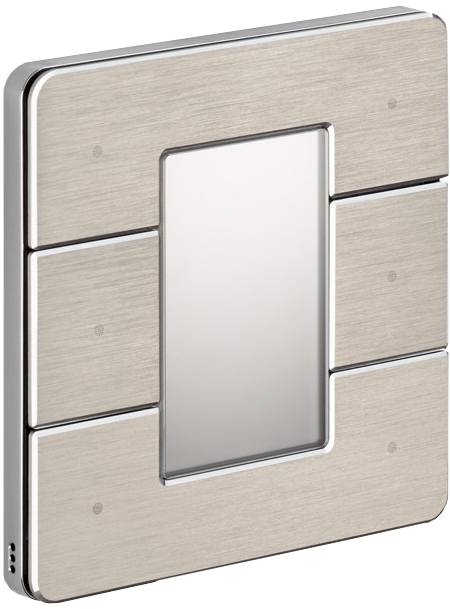
-
PDTS touch screen
These interfaces can be installed at the appropriate locations on request.
Energy
The Energy dashboard provides insights in the energy consumption and savings of all your sites. This dashboard shows you the most relevant parameters, including:
-
Energy consumption
-
Energy savings
-
Energy trend compared with the previous period or selected site
On the Energy dashboard, it’s easy to switch between views for notional or metered energy. You can choose a site and time period to view data, and compare it with another site or time period. The energy trend graph shows more detailed data. It’s also possible to show a breakdown of the energy savings or the energy consumption for notional or metered energy. The Site list view shows a ranking of all the sites in your portfolio.
About notional and metered energy
The Energy dashboard can show both notional and metered energy. Because both methods are quite different, it’s very well possible to use them alongside each other and even complementary to each other.
Notional energy gives a theoretical, indicative value calculated from the given installed power of all light points controlled by the system and their behavior (switching, dimming). It’s possible to divide between the energy consumption per logical or physical channel, showing high granularity and keeping track of notional burning hours of the light points. As notional energy is a calculated value, it even allows to predict energy consumption of scenes and schedules that are intended for use.
Metered energy gives an absolute number based on physically metering the energy consumption per electrical circuit (power group). As you can add electricity meters in virtually all circuits, you can also monitor the energy consumption of circuits beyond lighting, for example refrigerators or HVAC.
The numbers in both notional and metered energy are derived in completely different ways, which makes it highly unlikely that you can compare both numbers.
Energy dashboard
The Energy dashboard shows a complete overview of energy consumption and savings of all your connected sites. You can choose between a view of all sites, but you can also view the data of a single store. If enabled, the dashboard shows the difference between notional and metered energy, otherwise metered energy will be disabled.
Select type and timeframe
-
In the menu, click Energy. The Energy dashboard (
 ) shows.
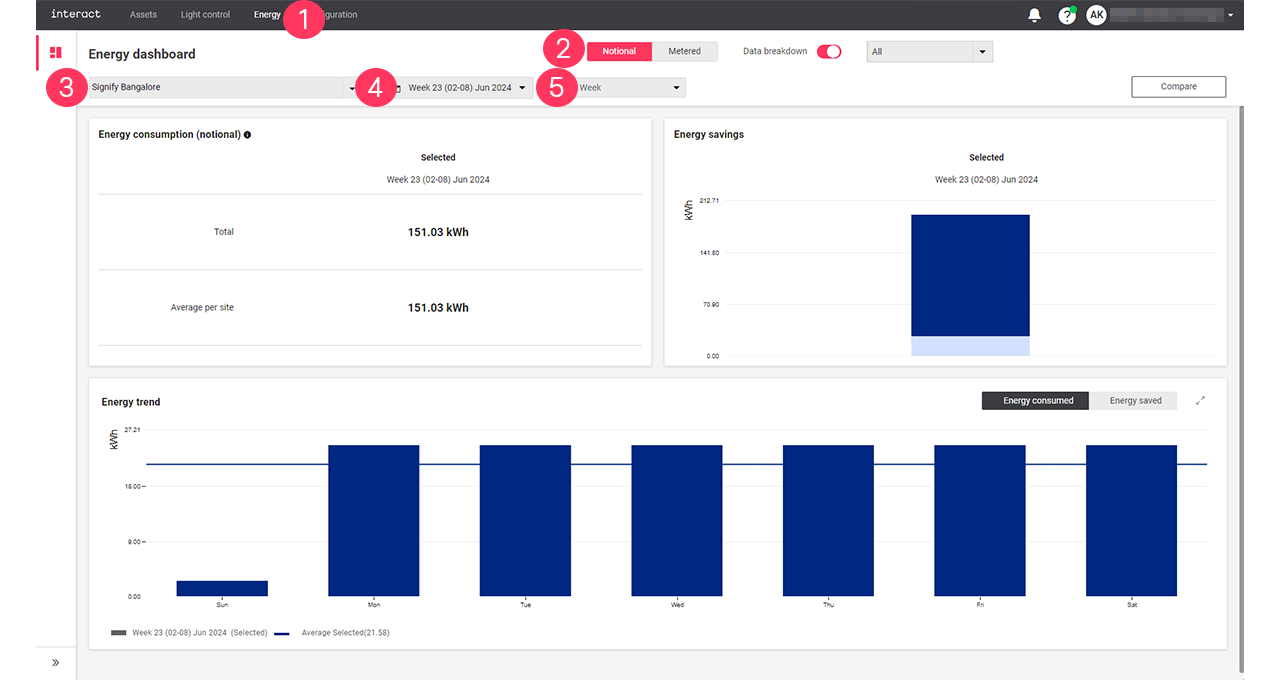
-
Choose between Notional and Metered to distinguish between the different types.
-
Select All sites, or a specific site to show the energy data of.
-
Select a date or a date range to select a specific period.
-
Click on the unit to refine the details of the selection.
| You can either select a day, week, or month. |
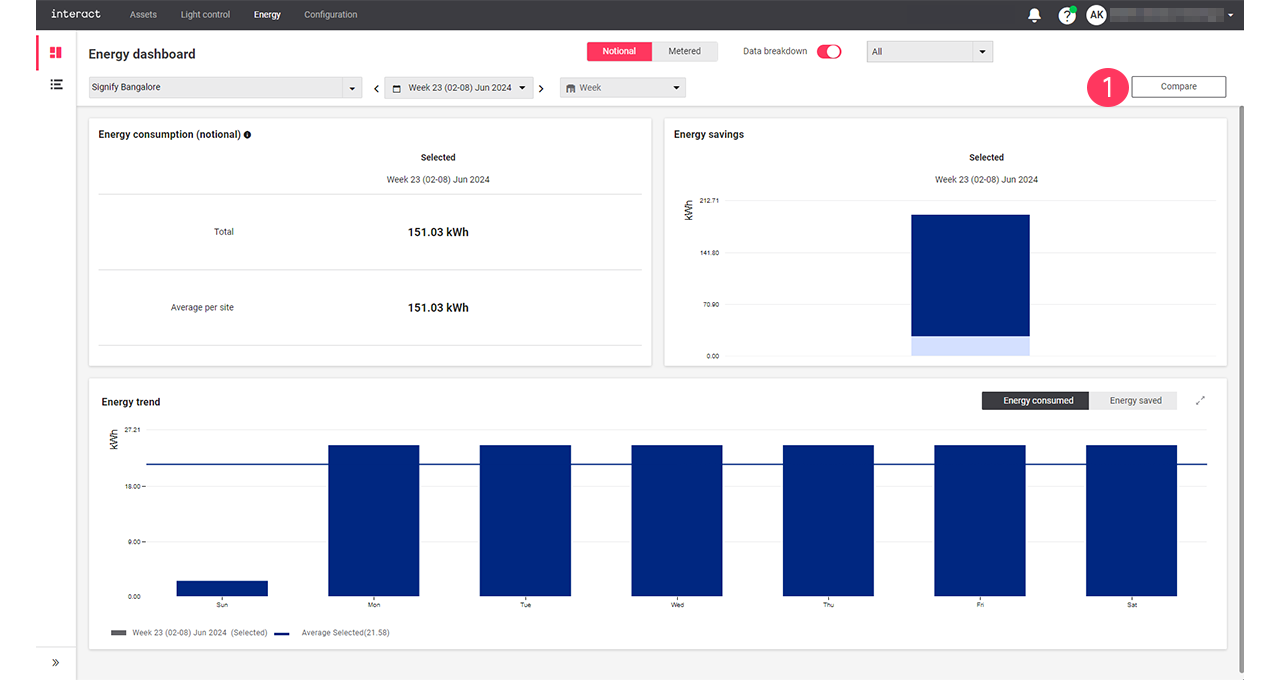
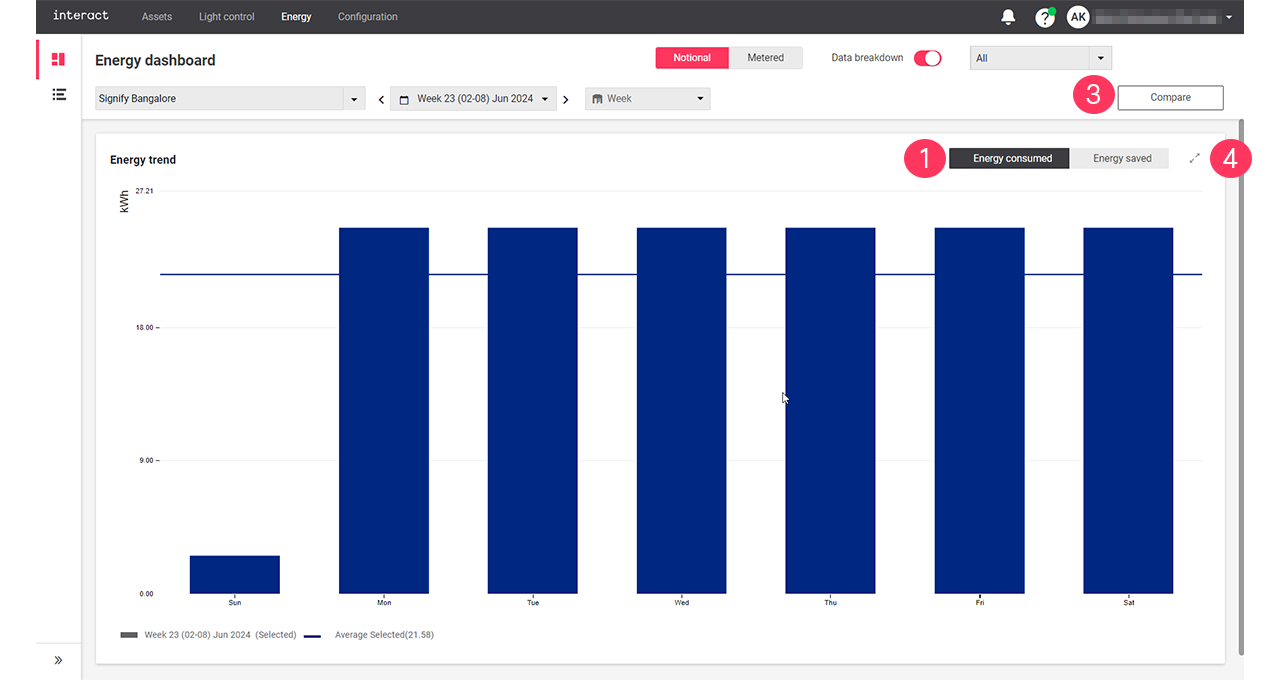
The dashboard explained: Notional
-
When you selected Notional, the dashboard shows the following information:
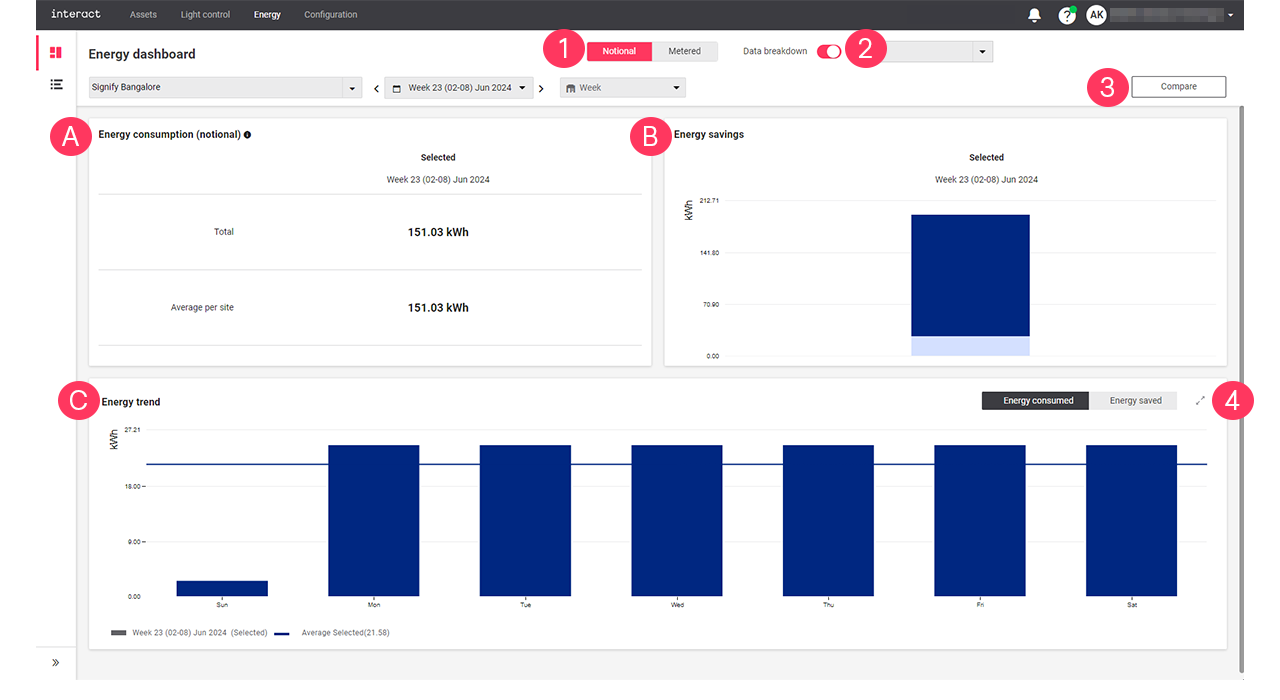
-
Energy consumption (notional): shows the total energy consumption and the average energy consumed per site of the selected period.
-
Energy savings: shows the amount of saved energy of the selected period.
-
Energy trend: shows a detailed overview of the energy consumption or savings of the selected period.
-
-
Turn on/turn off the Data breakdown toggle button and select a filter Select All, Dim savings, or Switch-off savings from the dropdown arrow to view the Energy savings breakdown.
-
Click Compare to compare notional energy data.
-
In Energy trend, click the expand button (
 ) to open the Energy trend view.
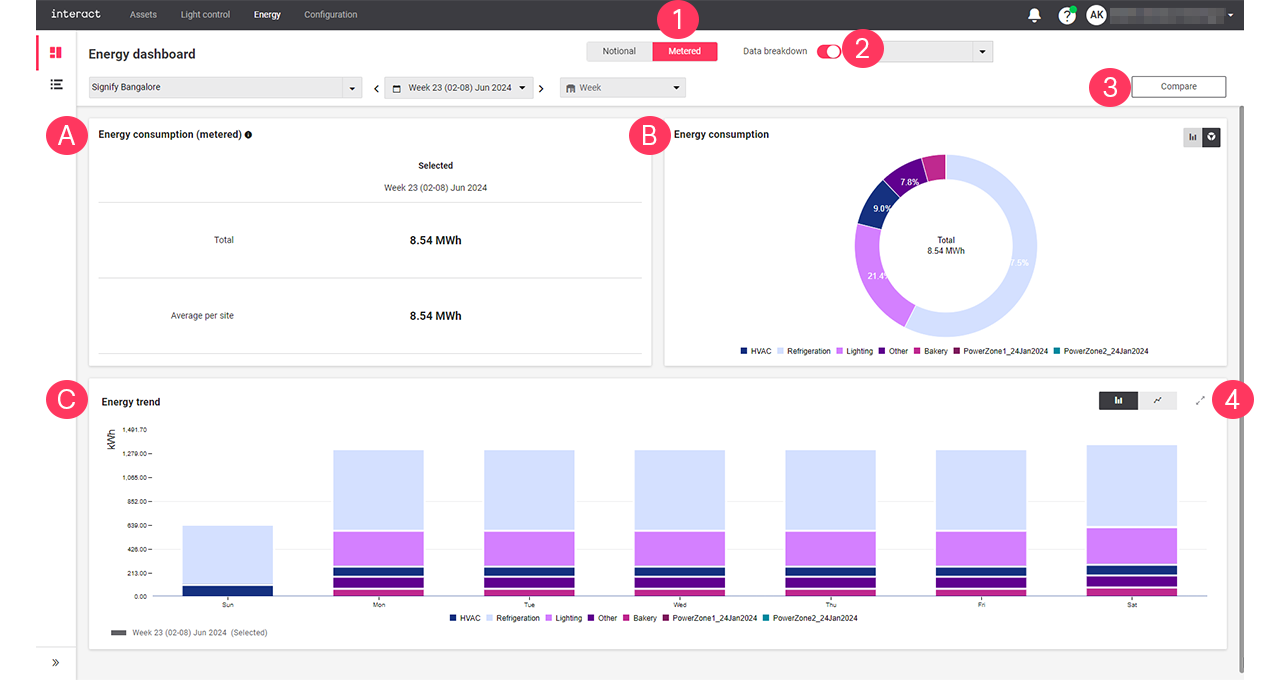
The dashboard explained: Metered
-
When you selected Metered, the dashboard shows the following information:
-
Energy consumption (metered): shows the total energy consumption and the average energy consumed per site of the selected period.
-
Energy consumption: shows a detailed energy consumption of each metered groups for the selected period. Use either
 or
or  to toggle between a bar chart or a pie chart.
 -
Energy trend: shows a detailed overview of the energy consumption or savings of the selected period.
-
-
Turn on/turn off the Data breakdown toggle button and select the Meter groups from the dropdown arrow to view the Energy consumption breakdown.
-
Click Compare to compare metered energy data.
-
In Energy trend, click the expand button (
) to open the Energy trend view.
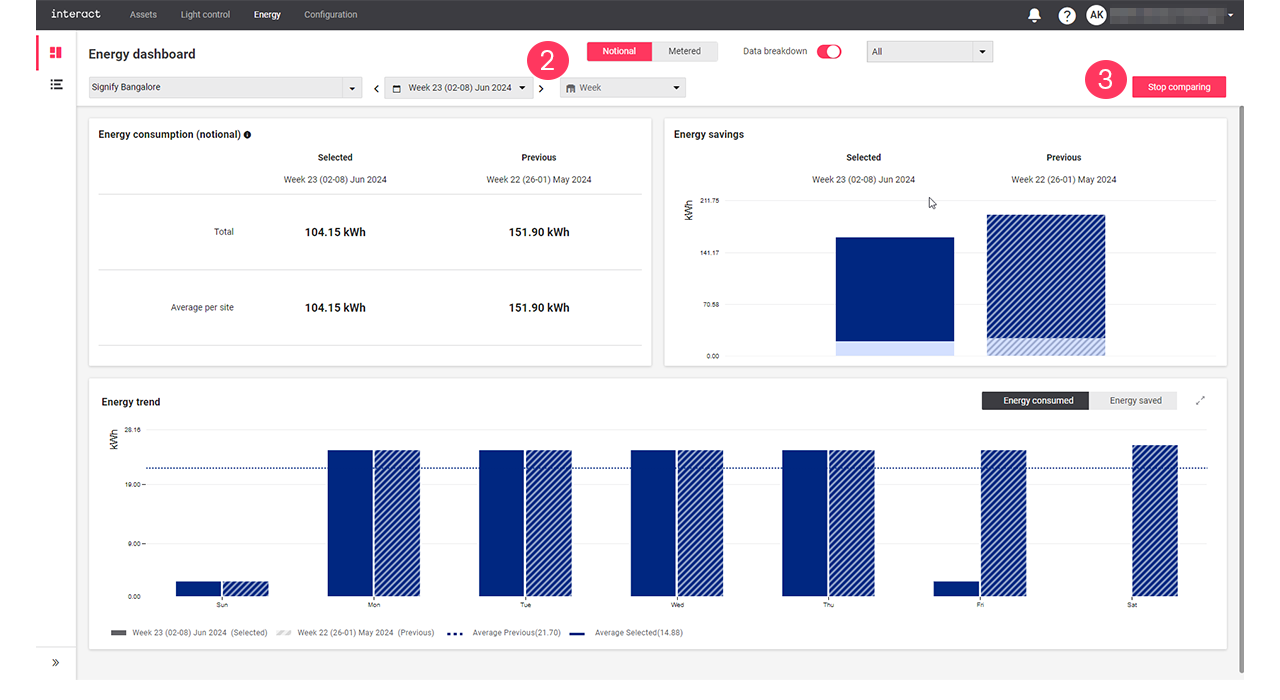
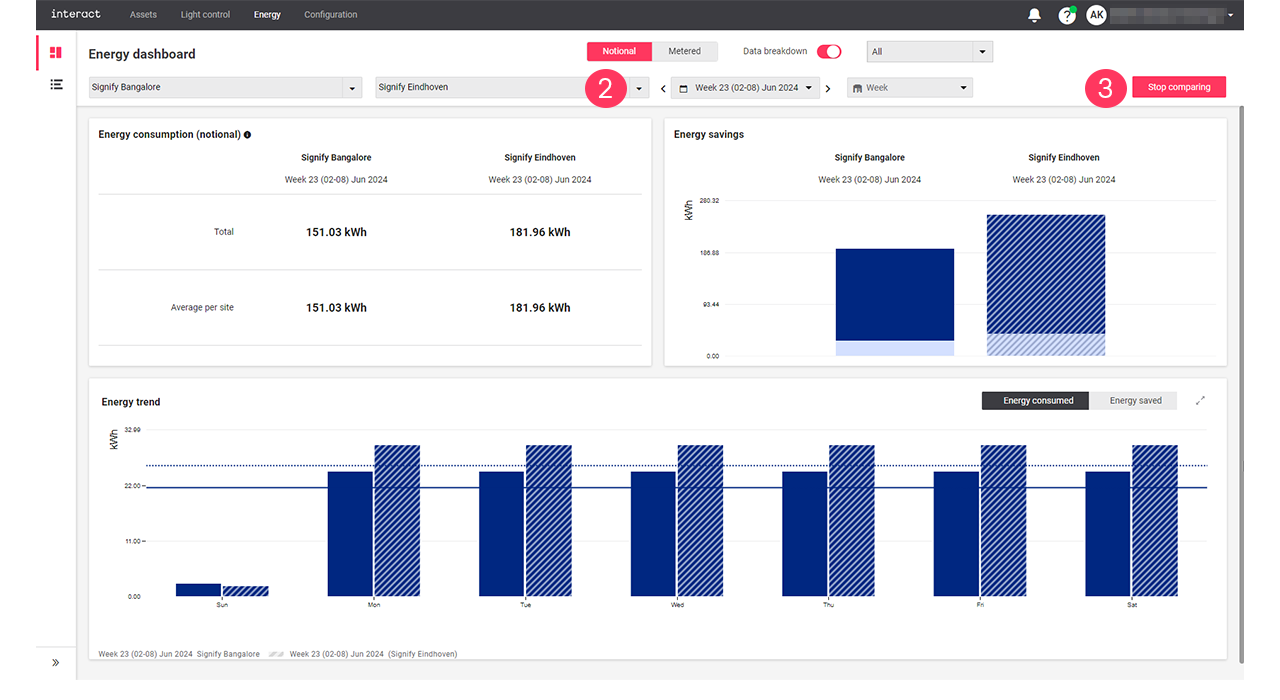
The dashboard explained: Compare
Use Compare when you want to compare the energy dashboard data of the selected period and the previous period or the current selected site with another selected site.
| The Compare button is used to compare data for both Notional and Metered. |
Energy trend view
The energy trend view shows a detailed diagram of either energy consumption or energy savings, that can be compared with an identical previous period.
-
For Notional only: Click Energy consumed or Energy saved to switch between views.
-
For Metered only: Use either
 or
or  to toggle between a bar chart or a line chart.
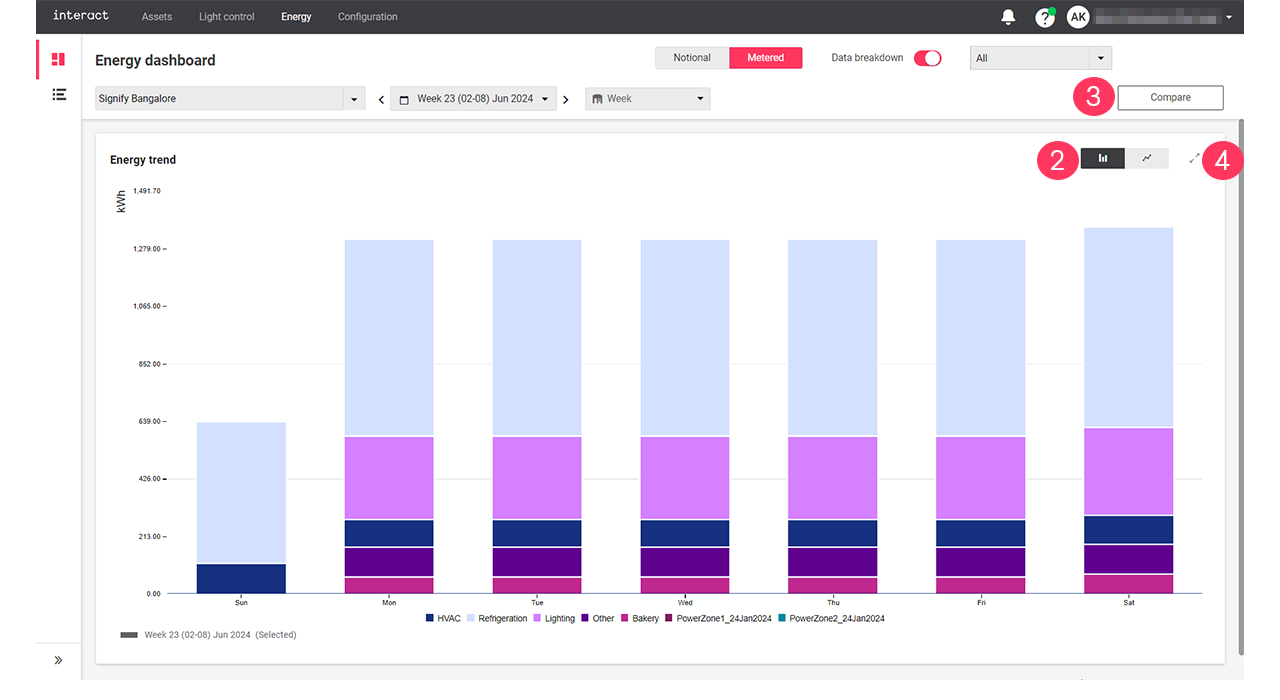
-
Click Compare to set a view to compare the energy consumption and energy saved with the previous period or another sites. For more information, see compare.
-
Click the collapse button (
 ) to return to the Energy dashboard.
| With the mouse cursor, hover over the diagrams to see the details. A dotted line shows the average over the selected period. |
Site list view
The Site list view shows a table summary of energy consumption and savings for all sites. It also includes the site names, their formats, and the number of light points each site has. The Consumed energy and Saved energy are two distinct columns, each consisting of four sub-columns: MWh, kWh/Light points, Wh/m2, and %.
| The unit of measurement can be Wh (watt-hours), kWh (kilowatt-hours), MWh (megawatt-hours), or TWh (terawatt-hours). These units automatically change depending on the period (Days, Weeks, Months, and Year). |
-
Use the sorting (
) to define the order from lowest to highest, or vice versa.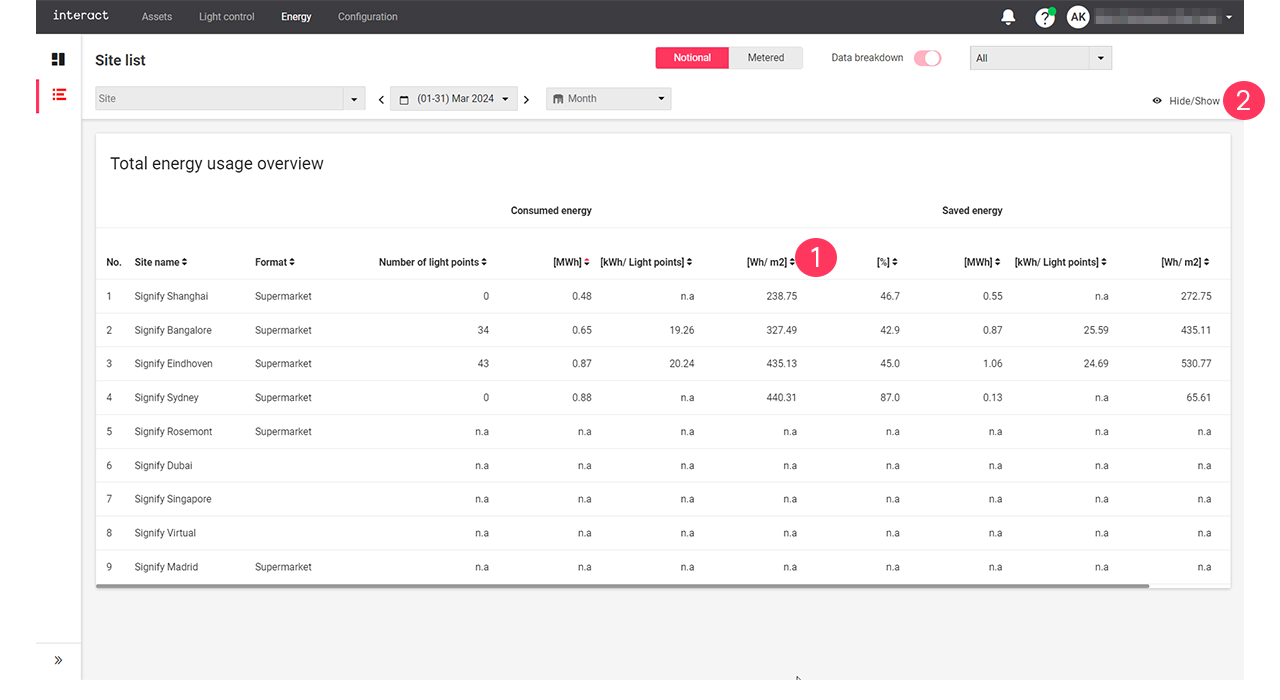
-
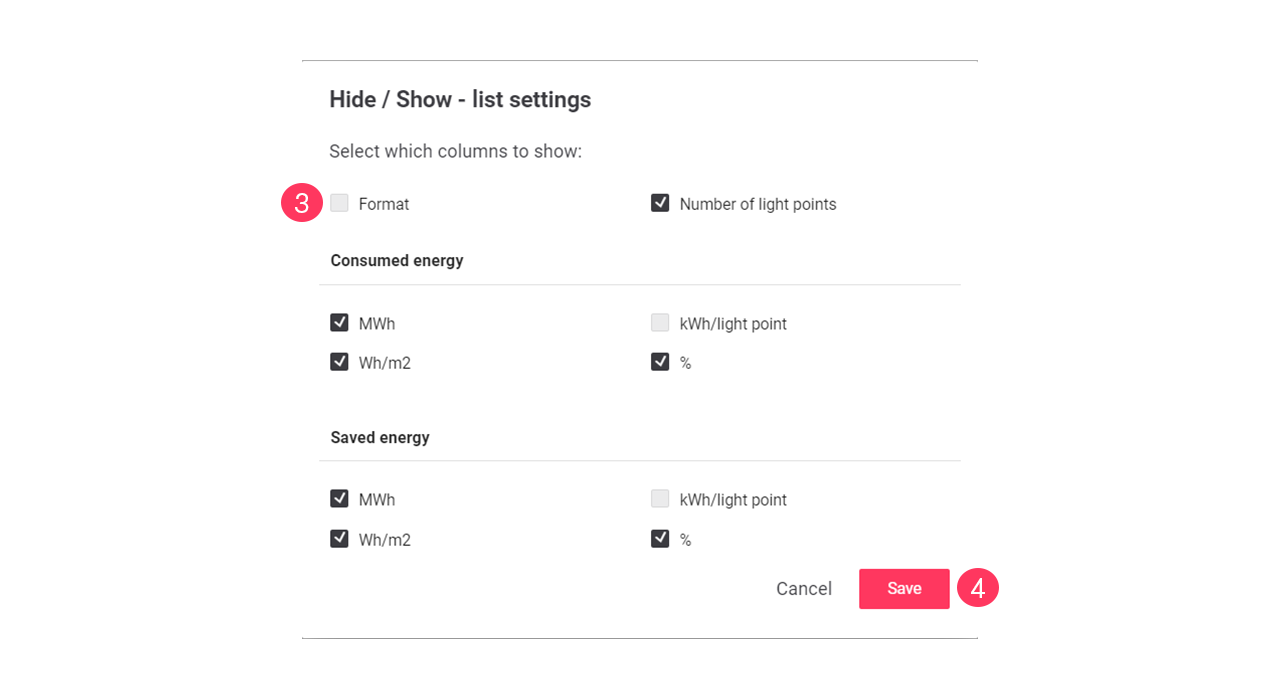
Click the Hide/unhide button in the Site list view.
-
Clear/select the checkboxes you want to hide/show in the table respectively.
-
Click Save.
Configuration
About formats
In the retail industry, each brand identifies a hierarchy of formats, all having their own characteristics. The typical characteristics per format are listed here, but brands may differentiate in the exact definition.
Convenience stores and express formats

Convenience stores and express formats are smaller local stores.
-
Stores with a smaller assortment
-
Convenient formats are found in smaller villages, city centers or for example holiday resorts
-
Express formats are typically found in places with high traffic
Typical size:
-
Floor area: ≤ 500 m2
-
Light points: ≤ 200
Supermarkets

Stores in this format are typically larger supermarkets, fashion, and DIY retail formats.
-
Stores with a large assortment
-
Supermarkets and fashion retails found in all kinds of shopping areas, e.g., city centers
-
DIY retails mostly found at the edges of a town
Typical size:
-
Floor area: 500 to 3,000 m2
-
Light points: 200 to 1,000
Hypermarkets

This format includes all very large stores that often have more assortments than groceries alone, or department stores.
-
Stores with multiple assortments
-
Hypermarkets/Wholesalers mostly found at the edges of a town
-
Department stores often in the city centers
Typical size:
-
Floor area: 3,000 to 10,000+ m2
-
Light points: 1,000 to 5,000+
About scenes and naming
This section introduces the scenes that are most recognized in the retail industry and how these are applied.
Trading
The lights adapt to the specific settings defined in this scene, to attract the customer with. This can also include areas with RGB lighting that highlight special areas with discounts or seasonal articles.
Stocking
The lights adapt to levels that makes the visual task of stocking comfortable. Some areas may be switched off or at low light levels (office, cash registers), where other areas are 100 % on (storage area, sales floor). Special lighting is switched off.
Cleaning
For cleaning purposes, other light levels are required when compared to stocking, think of the area with cash registers, office, canteen etcetera. Special lighting is switched off.
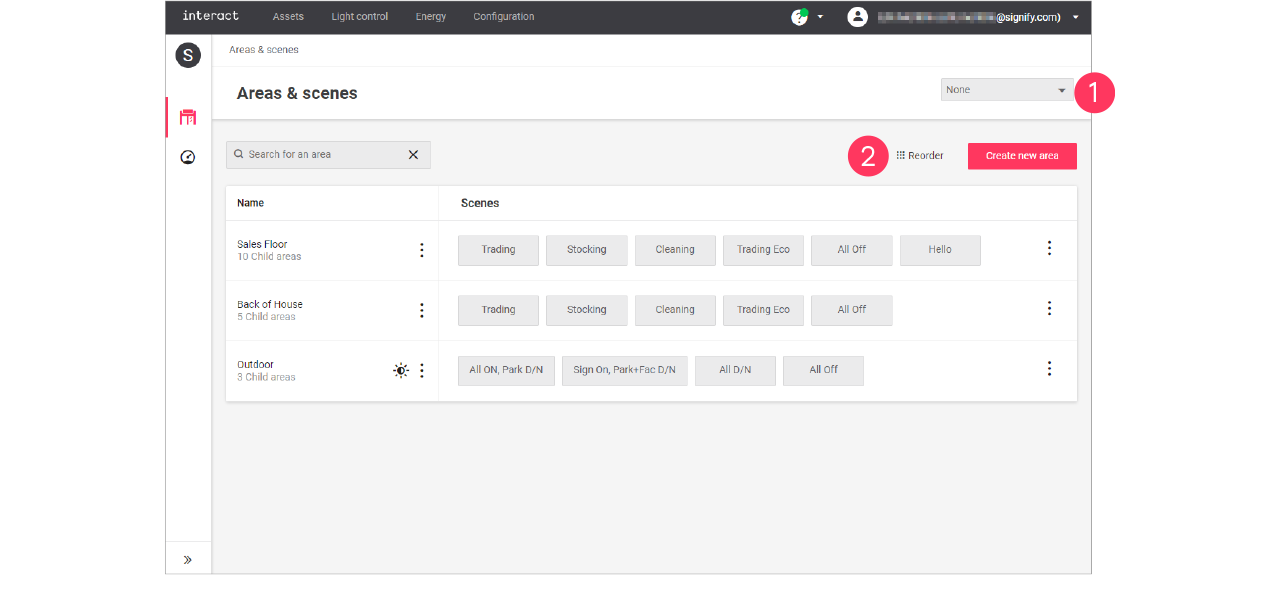
Areas and Scenes
Add, edit and reorder areas
| Keep in mind that adding or editing areas impacts all sites that use the selected format. Therefore, this should be done with caution. |
Add area
-
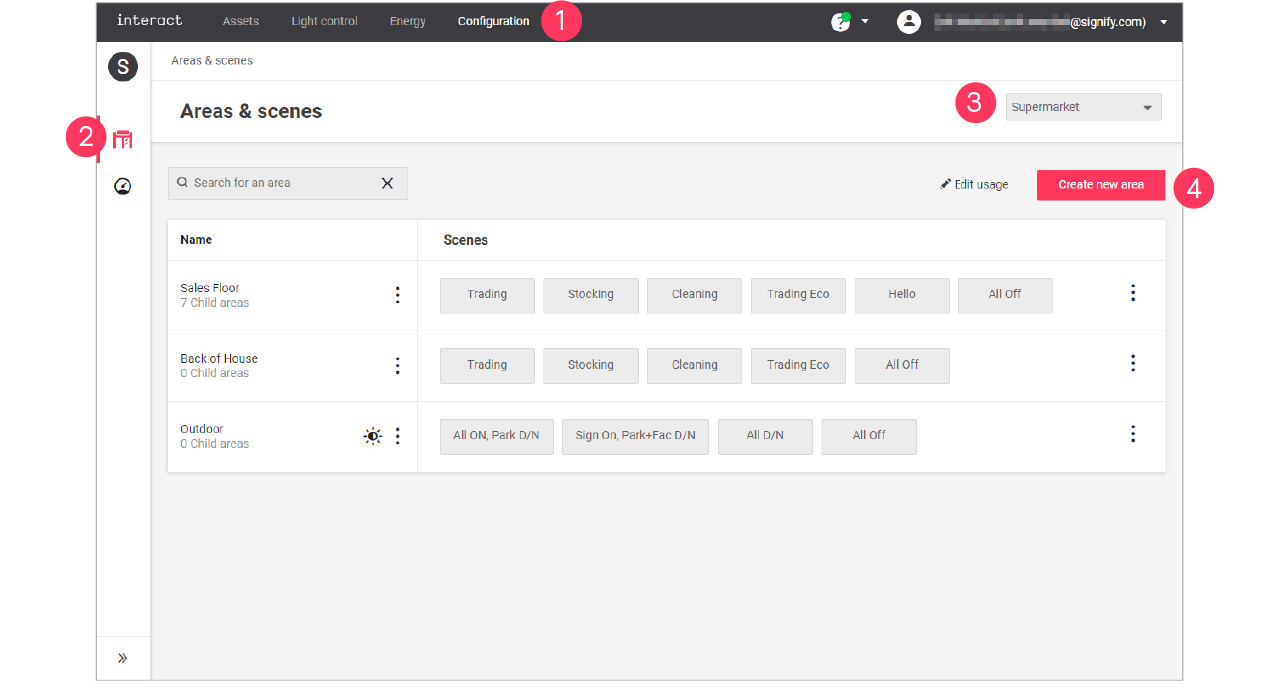
In the menu, click Configuration.
-
Select Areas & scenes (
). -
Optionally, select the Format.
-
Click Create new area.
-
Enter the ID number for the area.
Area IDs are part of the intake document and correspond with area usage for all sites. It’s important to use IDs consistent on newly created areas and not reusing them. 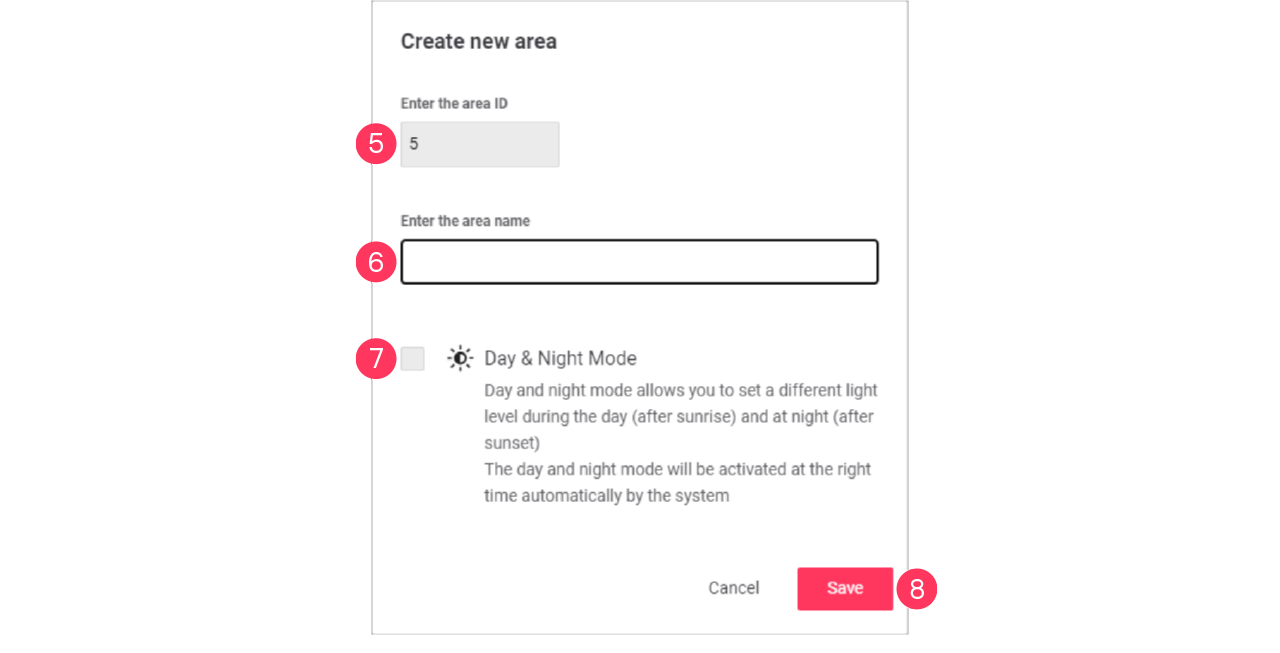
-
Enter the Name of the area.
-
Optionally, select the checkbox
 Day & Night Mode to enable this option.
 -
Click Save.
|
Edit area
-
With the mouse, hover over the Action menu icon (
) of the area to edit.
Click Edit area.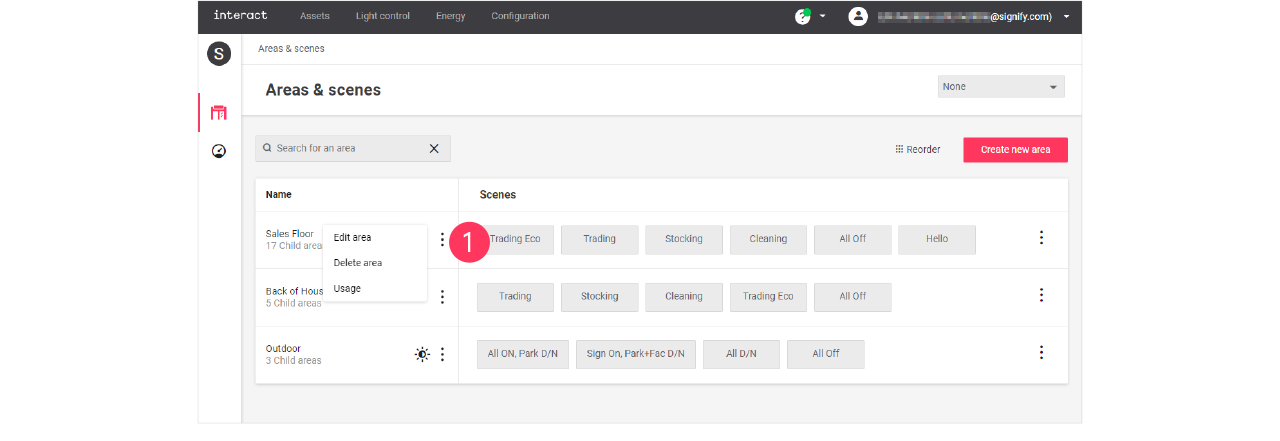
-
In the Edit area menu, change the required settings (ID, Name, Day & Night Mode).
Click Save.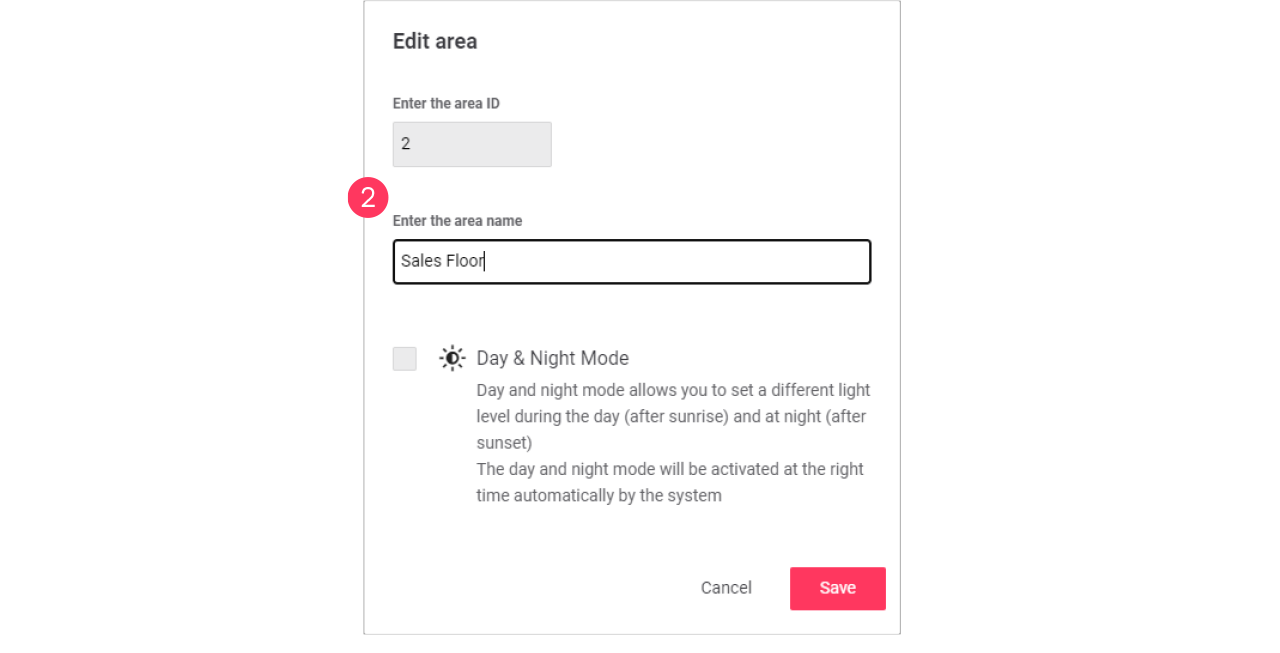
-
Enabling the day and night mode activates automatic switching of the area by the system based on sunrise and sunset.
-
Areas with the day and night mode enabled can be identified by the
icon. -
See section Day and night mode for more information.
-
Edit usage of an area
-
With the mouse, hover over the Action menu icon (
) of the area to edit.
Click Usage to change which format can use the area.
-
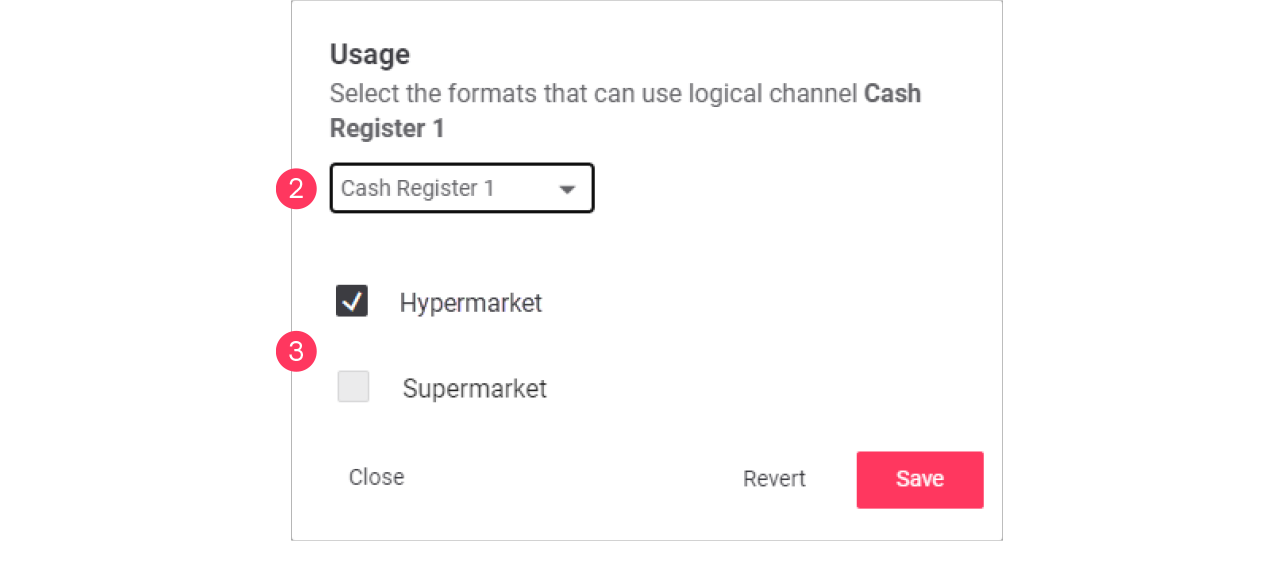
In the Usage menu, select the formats that can include the selected area.
Click Save.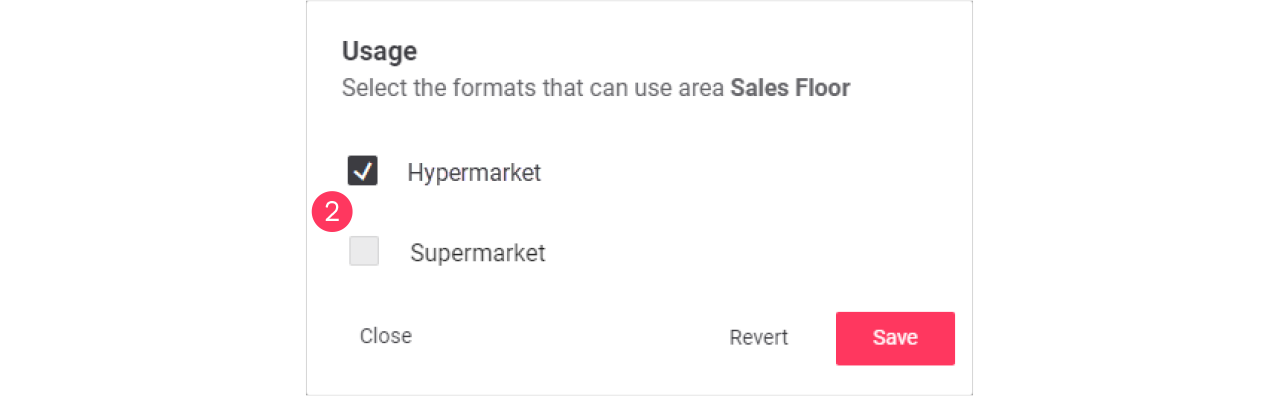
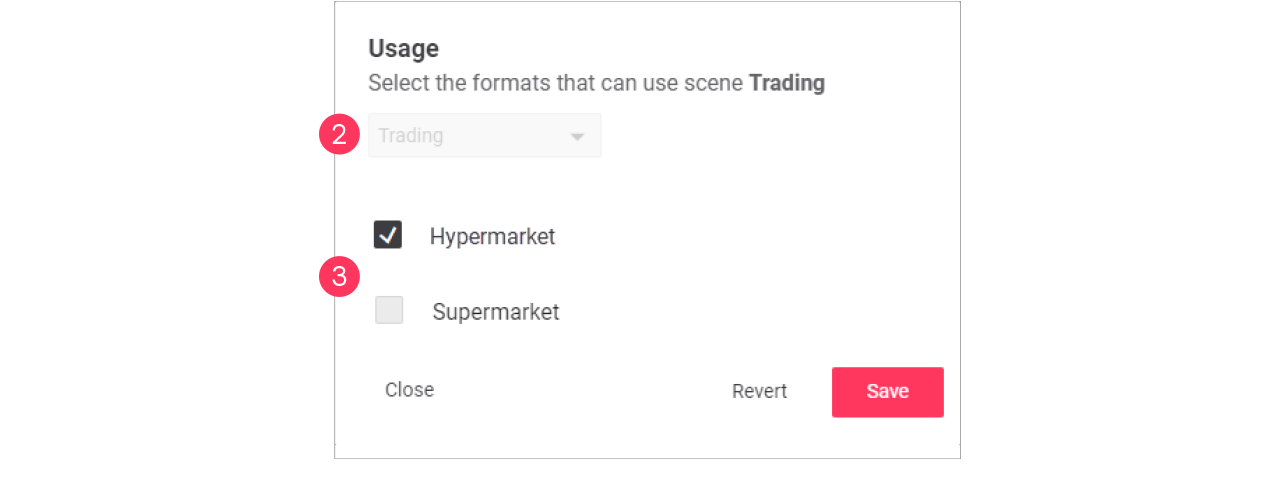
Advanced usage editing
Most brands operate multiple formats, that have their commonalities and differences. Usage editing gives you the possibility to enable or disable the usage of areas for a specific format.
-
Start with selecting the Format.
-
Click (
 ) Edit usage.
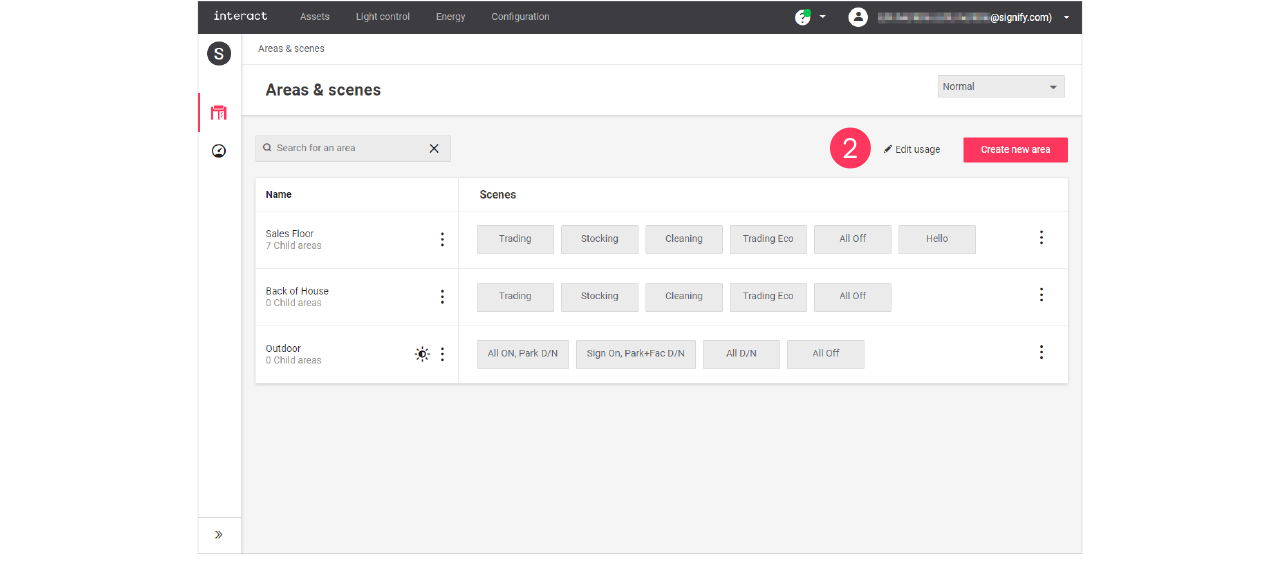
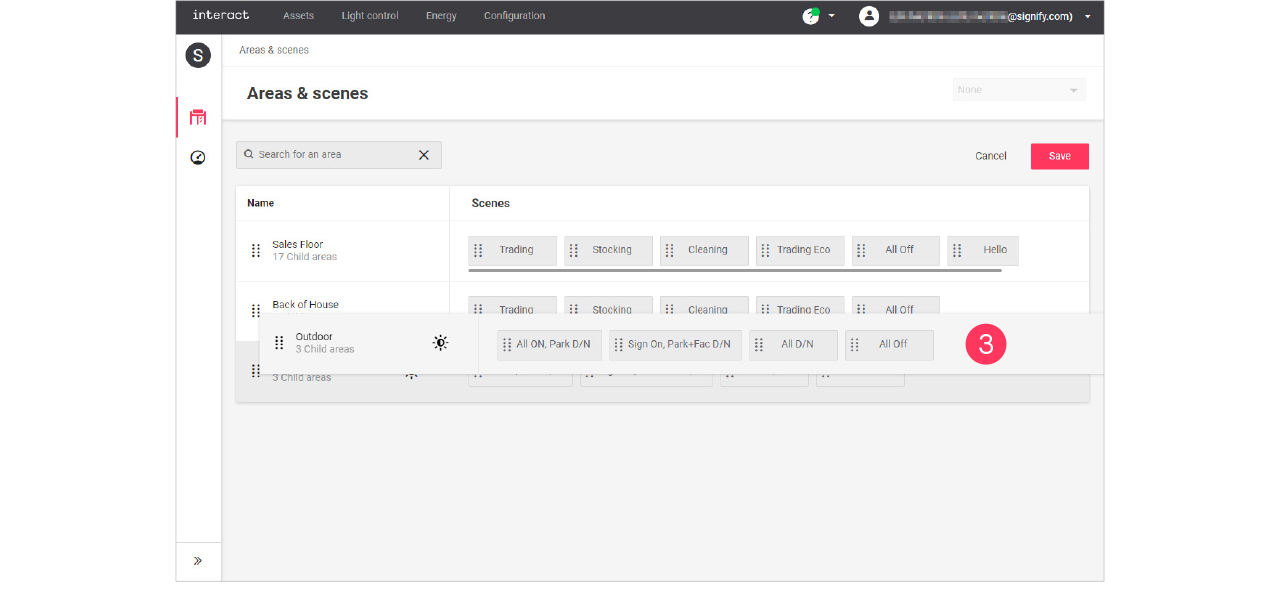
-
Clear the checkmark next to the Name of the area to change its usage in the format.
-
Click the names of the Scenes to change usage of the area in the format.
Click Save.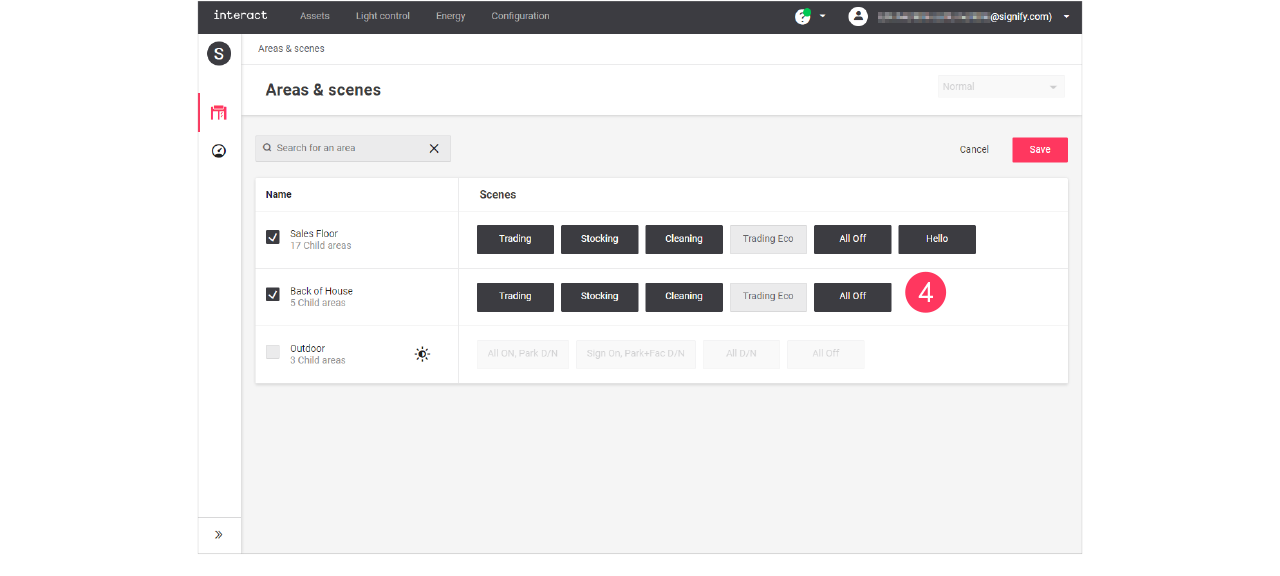
Areas and/or scenes that are greyed out are excluded for usage in the selected format.

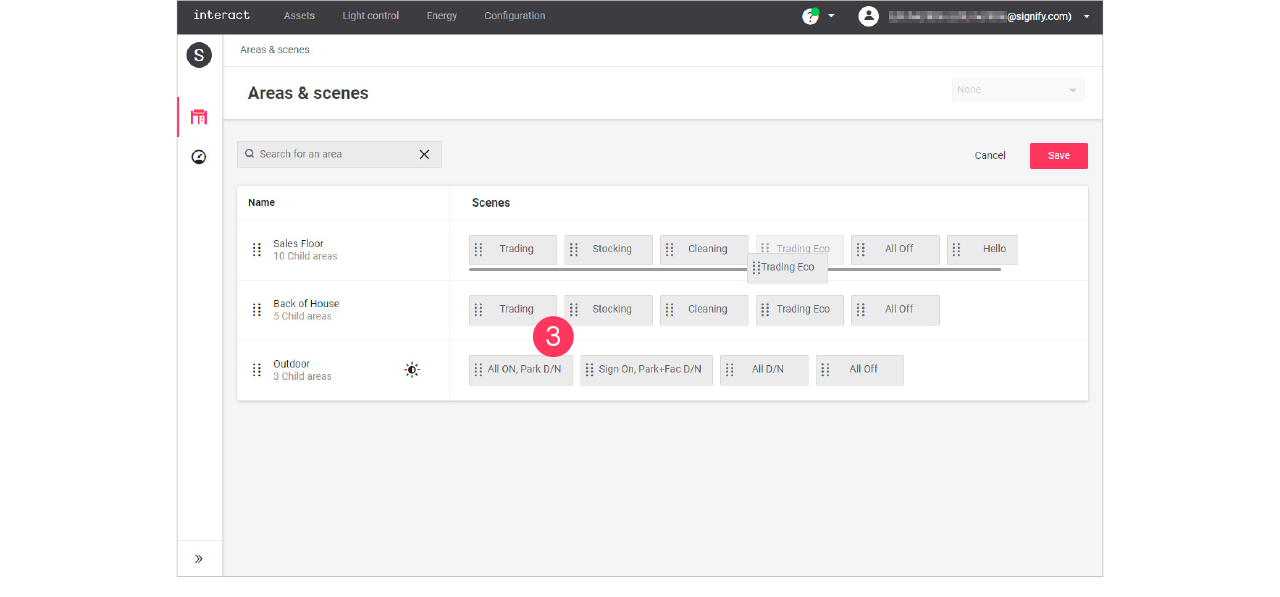
Add, edit and reorder scenes
Add scene
-
In the menu, click Configuration.
-
Select Areas & scenes (
).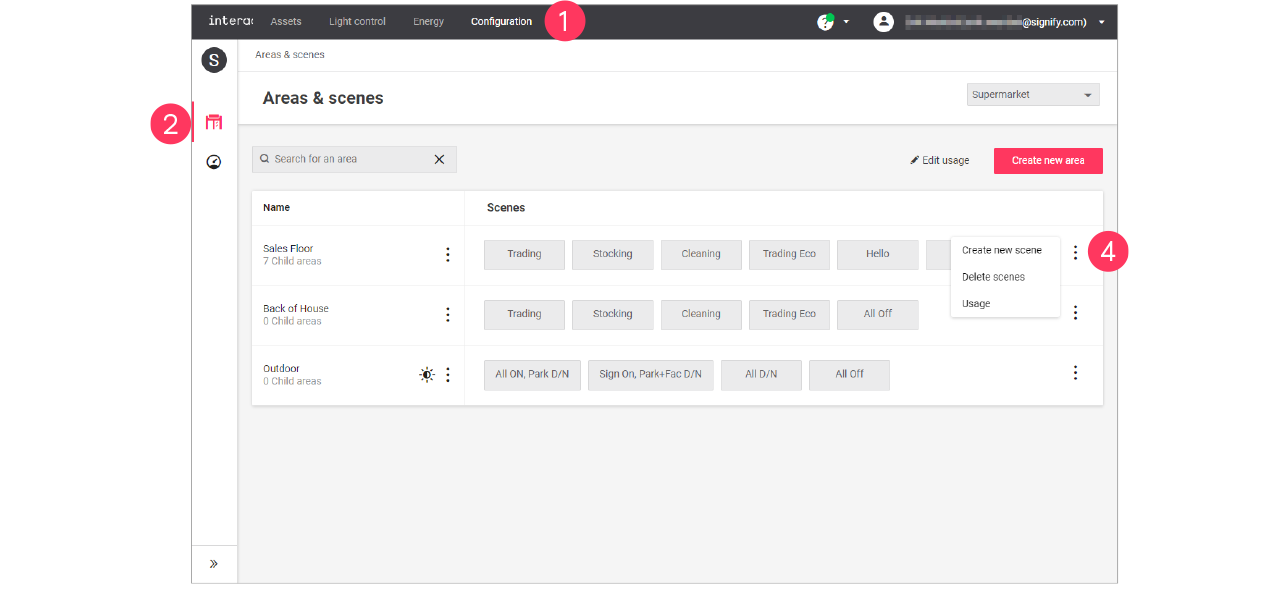
-
Optionally, select the Format.
-
With the mouse, in the Scenes column next to the area to add the scene to, hover over the Action menu icon (
).
Click Create new scene. -
Enter the ID number for the scene.
The ID numbers follow a sequential order. -
Enter the Name of the scene.

Click Save.
Edit a scene
-
With the mouse, in the Scenes column, click the Scene to edit.
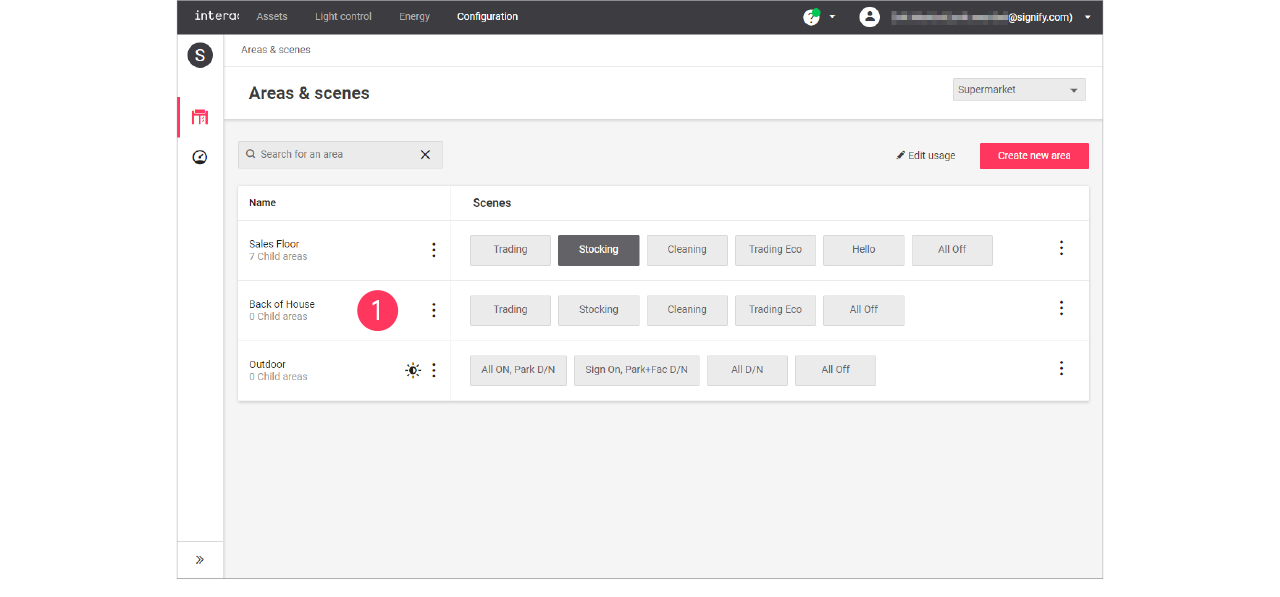
-
In the Edit scene menu, change the required settings (ID, Name).
Click Save.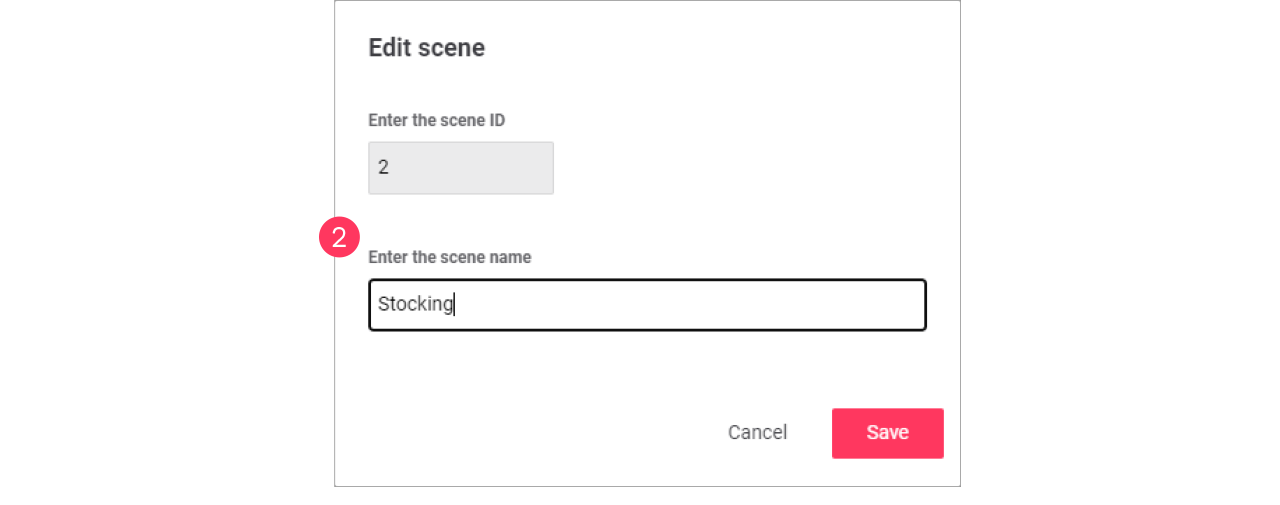

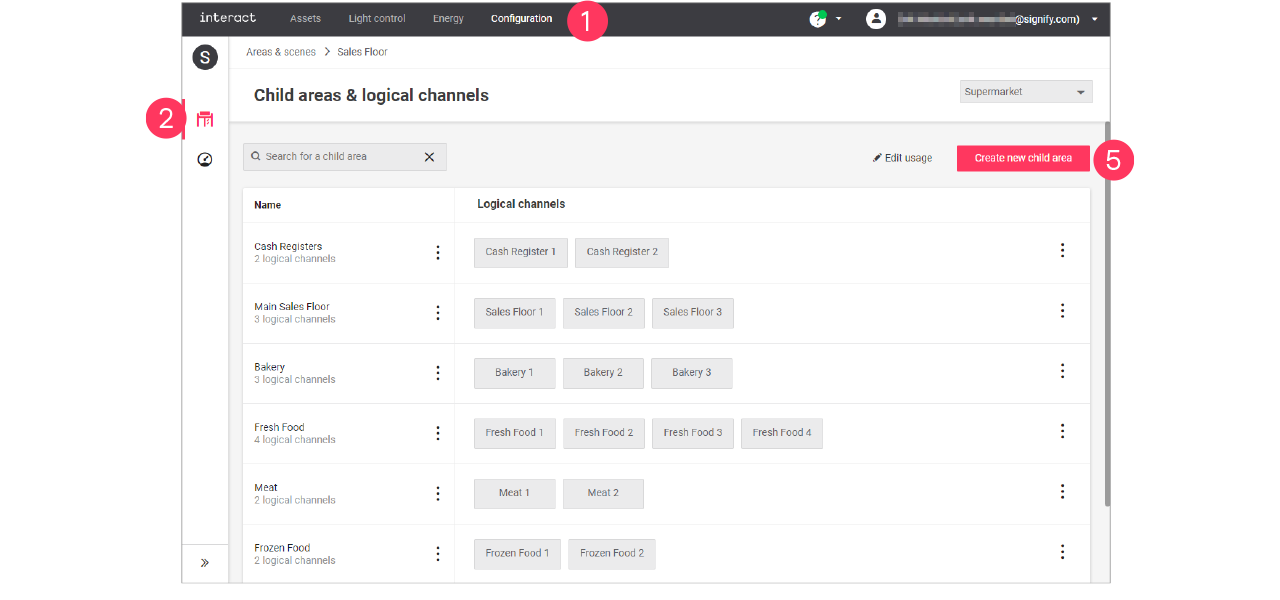
Zones and Channels
Add, edit and reorder control zones
| Keep in mind that adding or editing control zones impacts all sites that use the selected format. Therefore, this should be done with caution. |
| Control zones are also called child or nested areas. |
Child areas, or control zones, are smaller groups of lights that can have their own setting in the area.
Add child area
-
In the menu, click Configuration.
-
Select Areas & scenes (
). -
Optionally, select the Format.
-
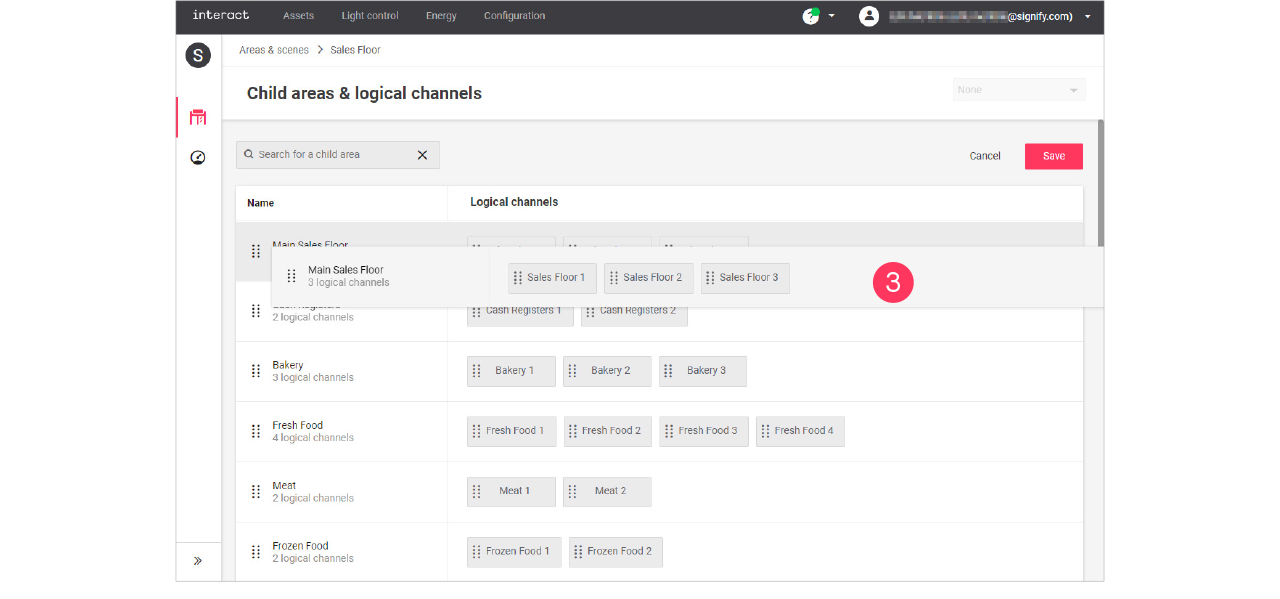
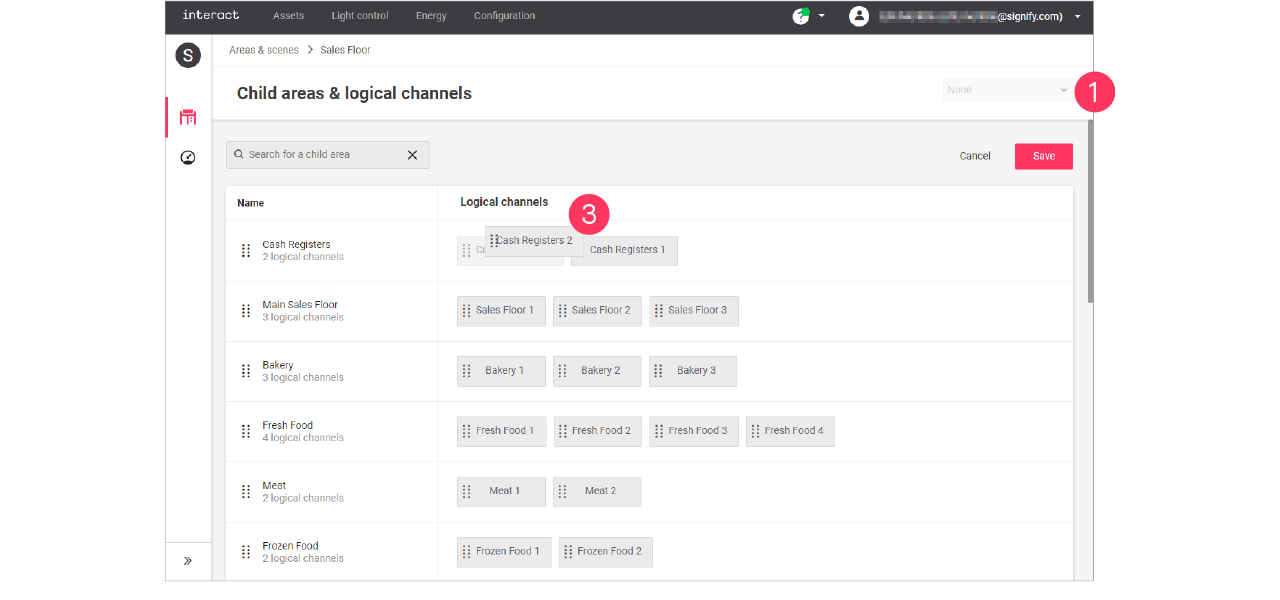
Click an Area to show the list of child areas.
-
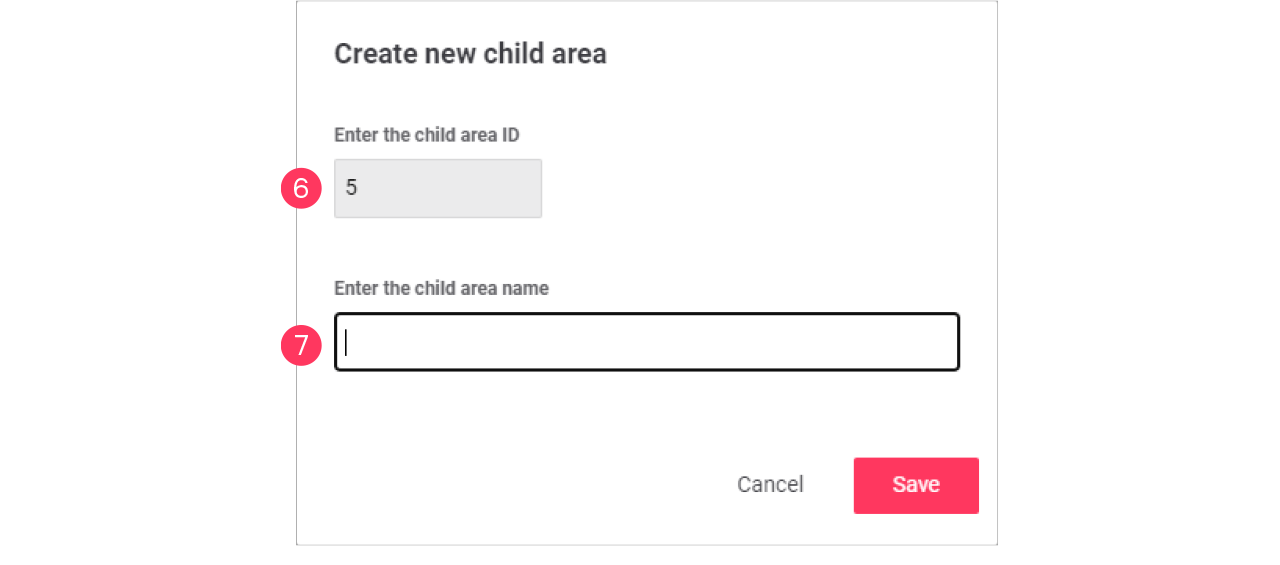
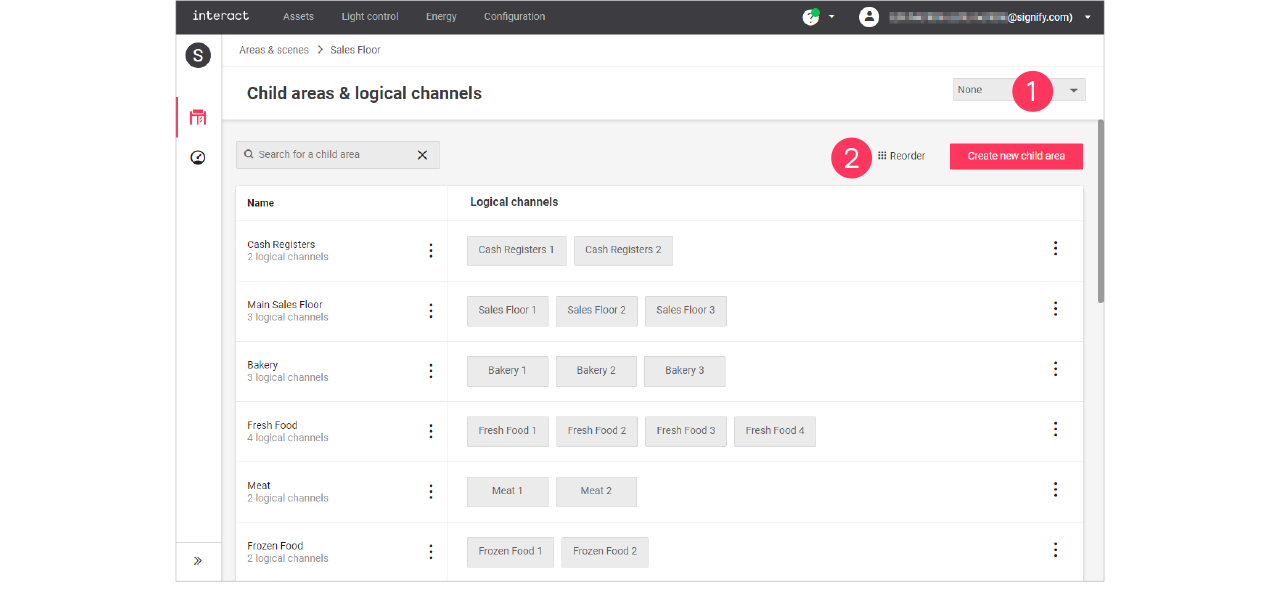
Click Create new child area.
-
Enter the ID number for the child area.
-
Enter the Name of the child area.
Click Save.
Edit child area
-
With the mouse, hover over the Action menu icon (
) of the child area to edit.
Click Edit child area.
-
In the Edit child area menu, change the required settings (ID, Name).
Click Save.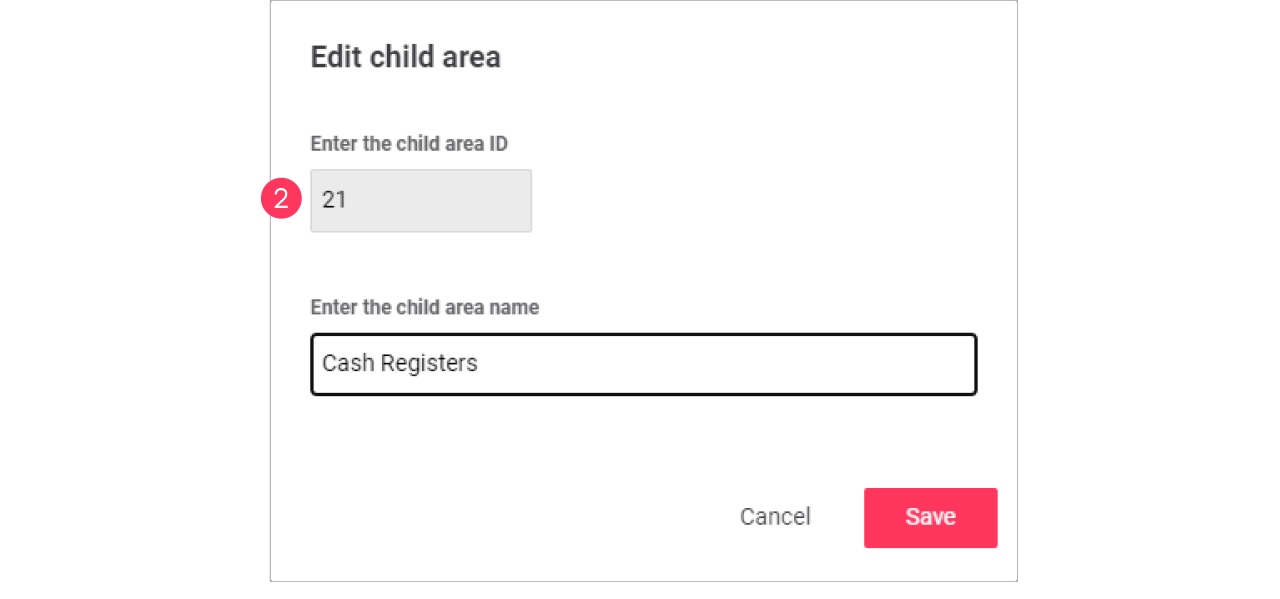
Edit usage of a child area
-
With the mouse, hover over the Action menu icon (
) of the child area to edit.
Click Usage to change which format can use the child area.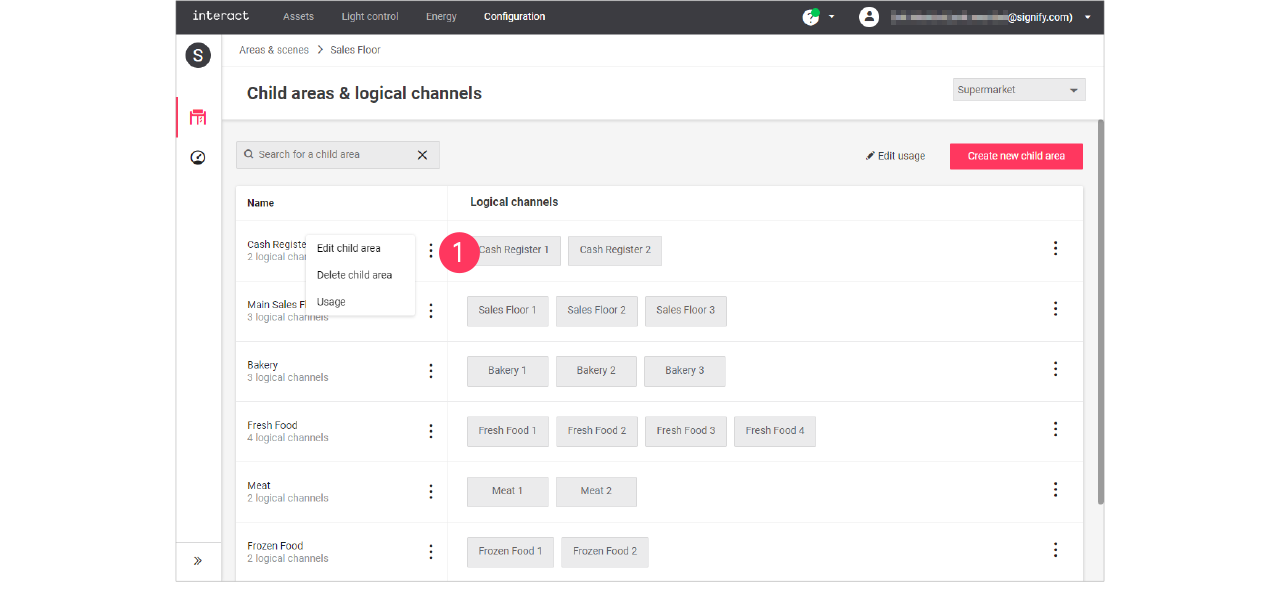
-
In the Usage menu, select the formats that can include the selected child area.
Click Save.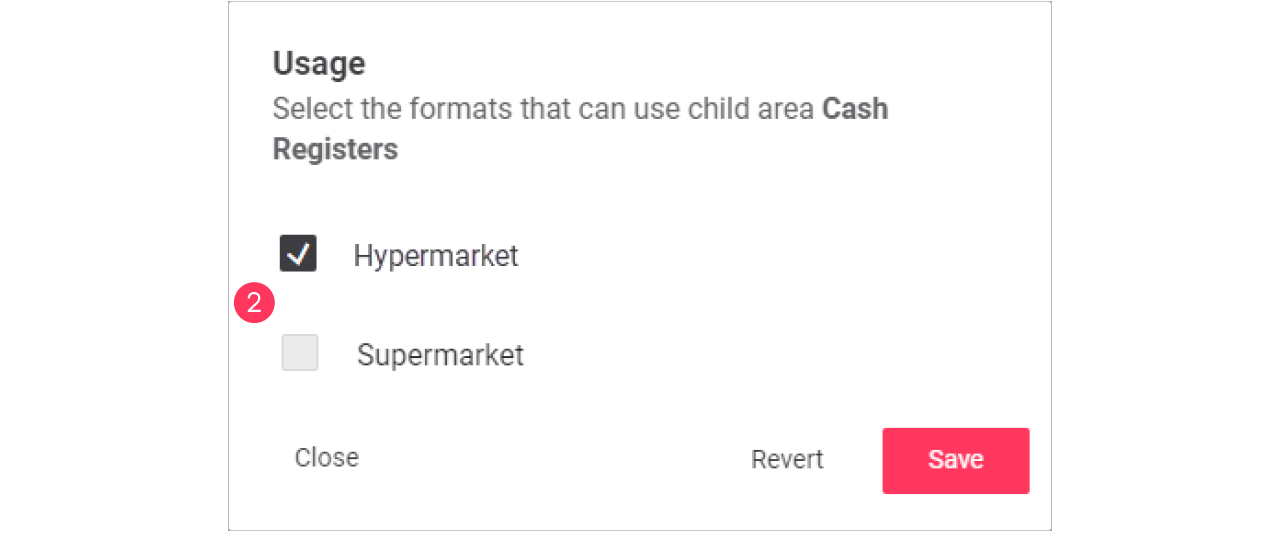
Advanced usage editing
The differences between the formats has also an effect on the scenes that can be used. The average size of a format plays a role in the number of scenes used per area, but also a more luxurious feel for one format would require more scenes. Usage editing gives you the possibility to enable or disable the usage of scenes for a specific format.
-
Start with selecting the Format.
-
Click (
) Edit usage.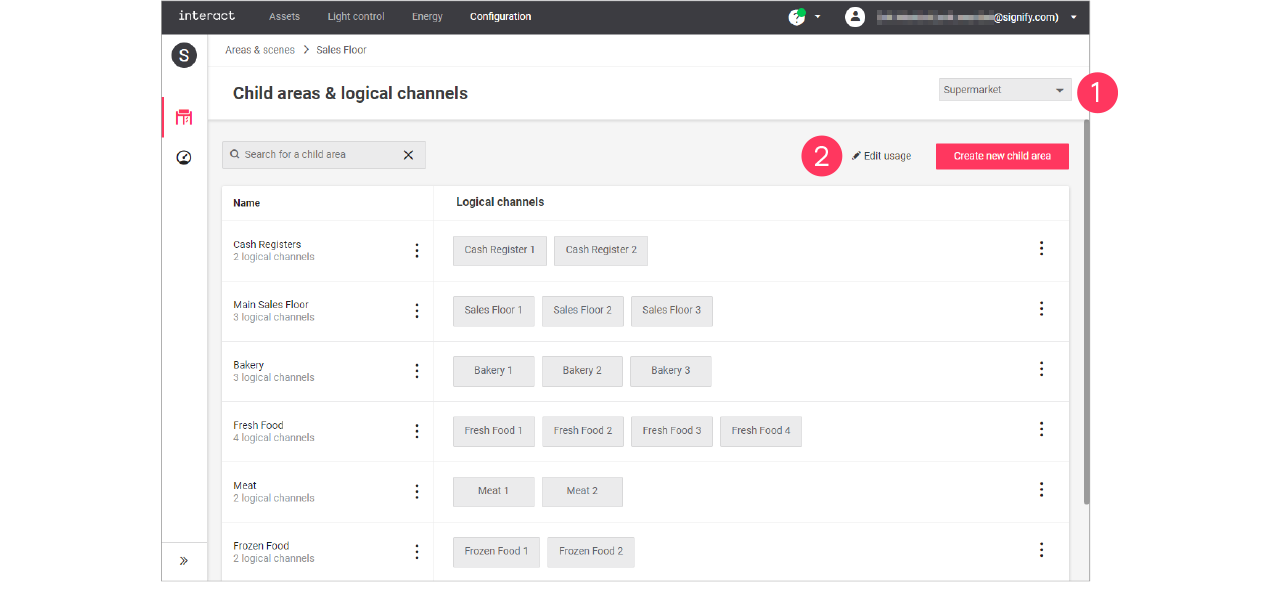
-
Clear the checkmark next to the Name of the child area to change its usage in the format.
-
Click the names of the Logical channels to change its usage in the format.
Click Save.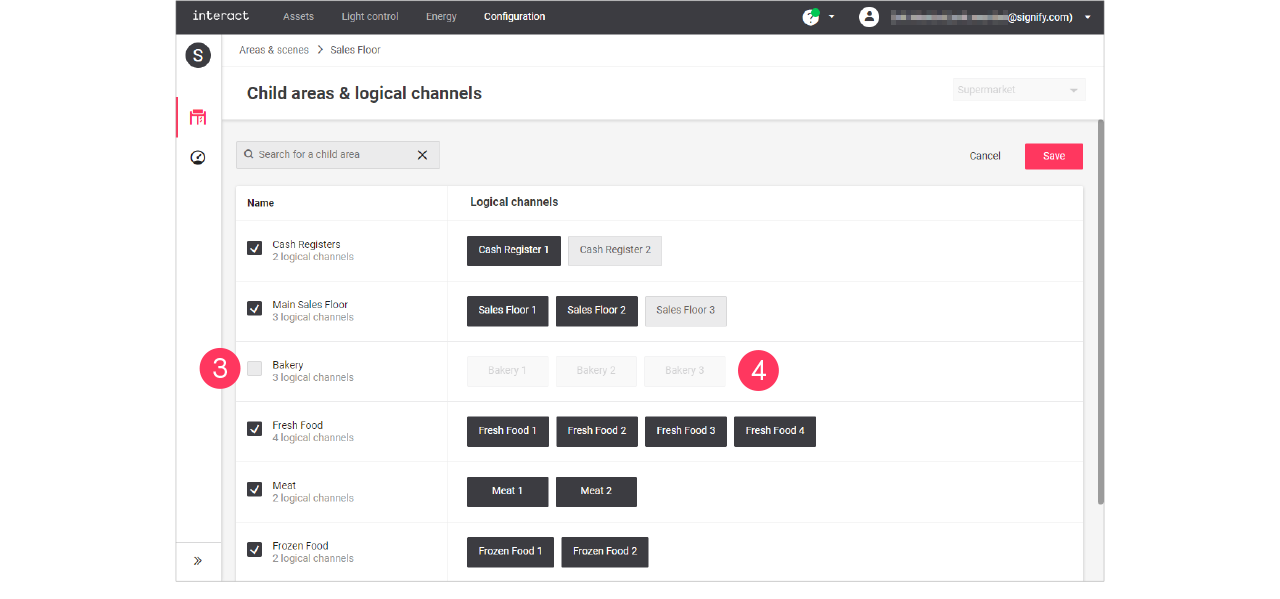
Child areas and/or Logical channels that are greyed out are excluded for usage in the selected format.
Add, edit and reorder logical channels
| Keep in mind that adding or editing logical channels impacts all sites that use the selected format. Therefore, this should be done with caution. |
Add logical channel
-
In the menu, click Configuration.
-
Select Areas & scenes (
). -
Optionally, select the Format.
-
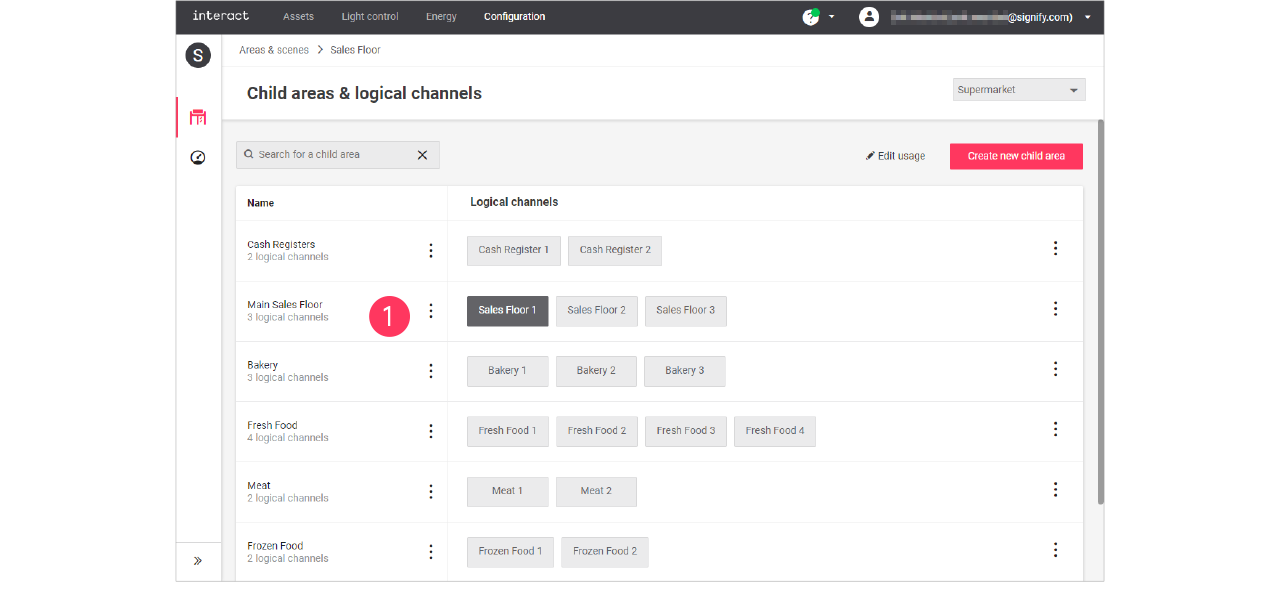
Click an Area to show the list of child areas.
-
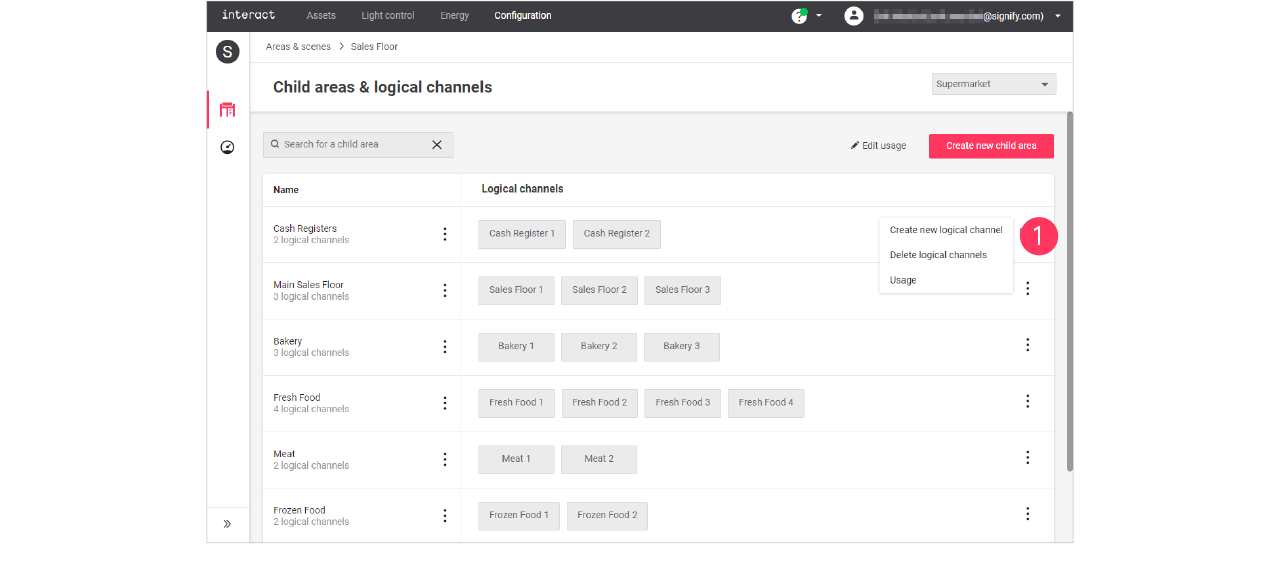
With the mouse, in the Logical channels column next to the child area to add the channel to, hover over the Action menu icon (
).
Click Create new logical channel.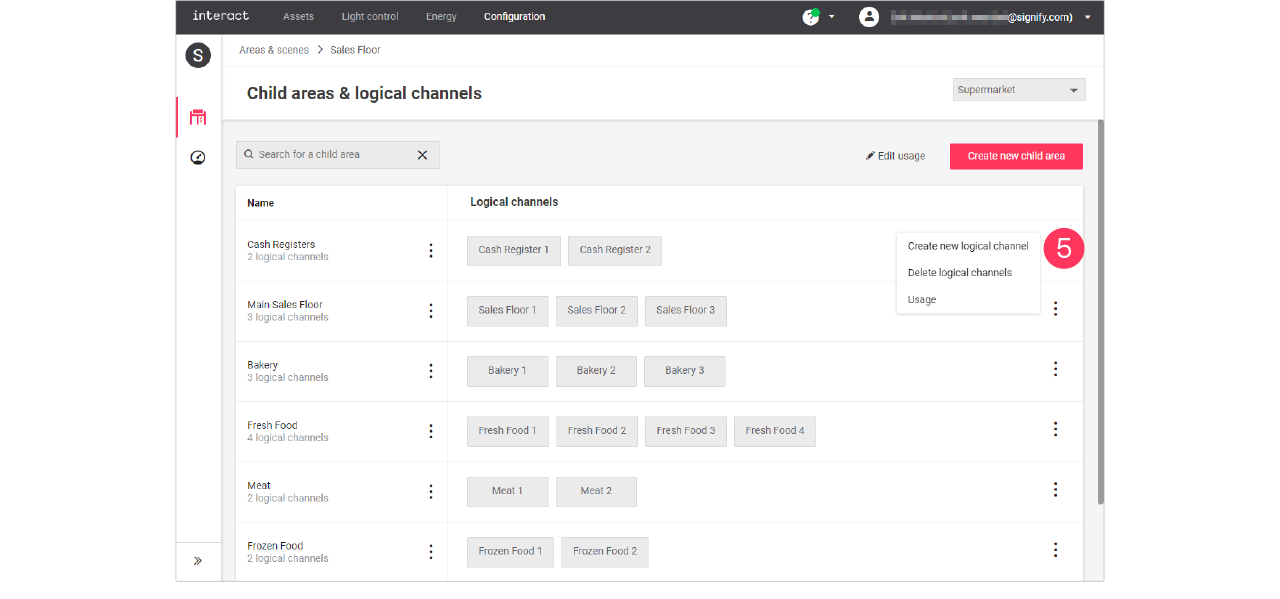
-
Use the dropdown to select the type of logical channel, set by default to Dimming/Switching.
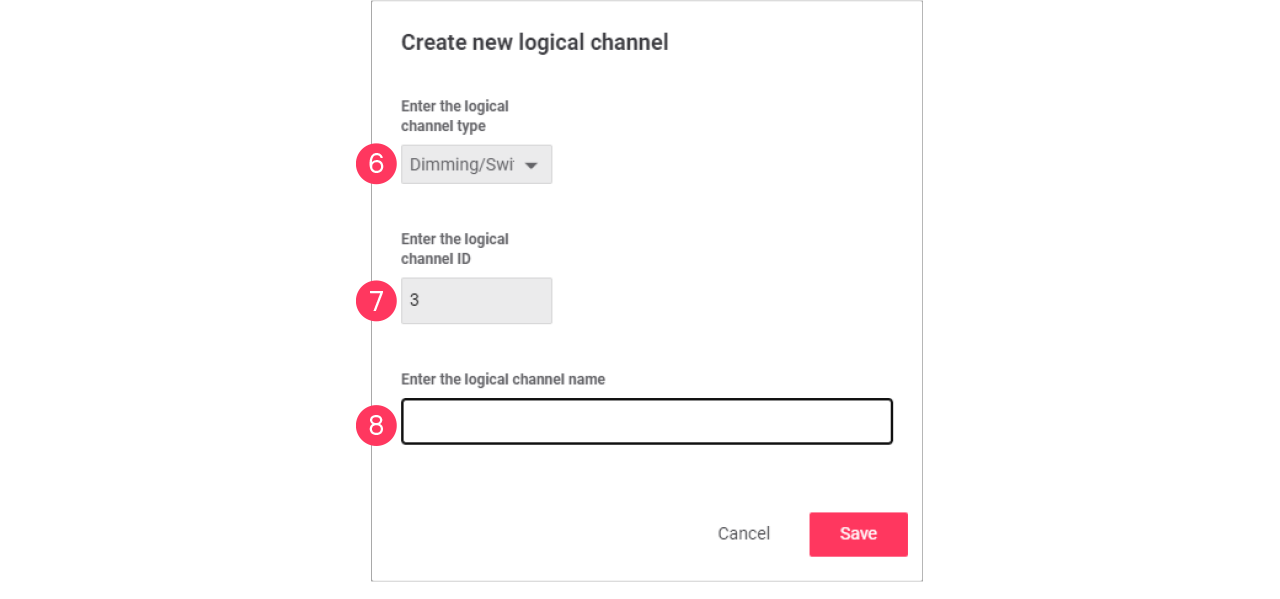
-
Enter the ID number for the channel.
-
Enter the Name of the child area.
Click Save.
| Select the type RGB when the use of the channel is intended for, for example, colored accent lighting. |
Edit a logical channel
-
With the mouse, in the Logical channels column, click the Channel to edit.
-
In the Edit logical channel menu, change the required settings (type, ID, Name).
Click Save.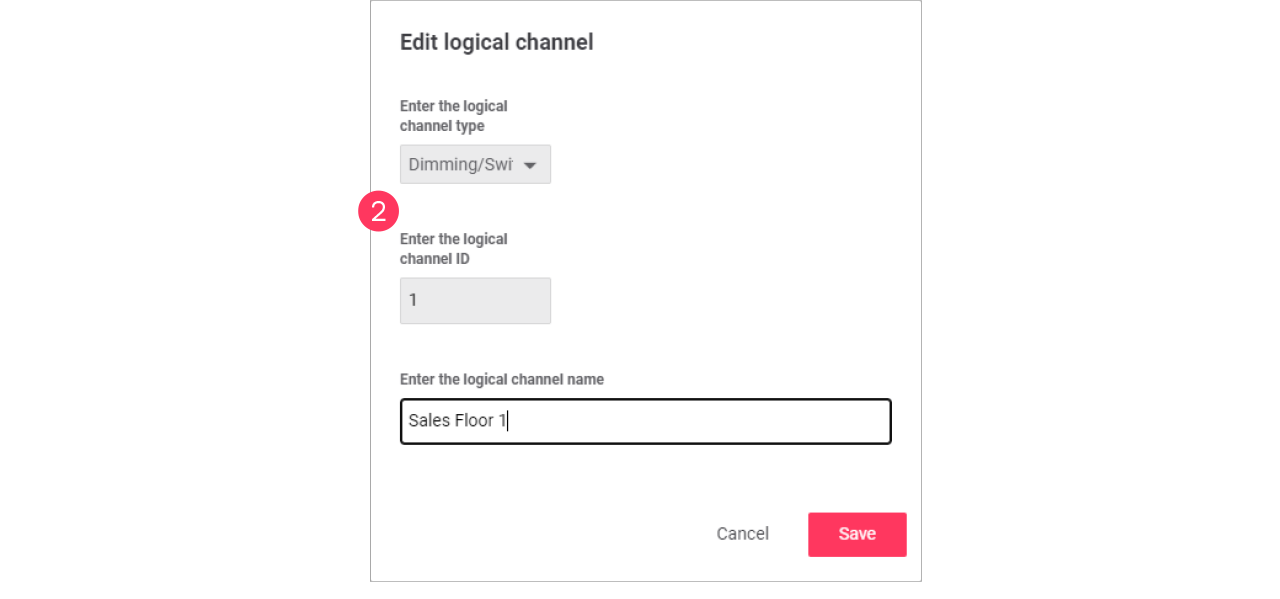
Synchronize time and time zone
Synchronizing the time and time zone with the site location is important for the schedules to run on the local time. This is equally important for the day and night mode to be in sync with the times of sunrise and sunset.
Synchronization with the time zone is configured during commissioning of the gateway using the GPS coordinates of the site. These coordinates are given as part of the intake.
The system checks the local time of the gateway remotely. In case the time on the gateway is out of sync, the customer is given the possibility to trigger synchronization.
-
In the menu, click Light control.
-
Click Sites (
), then click Overview. -
When the local time is out of sync, an orange exclamation mark appears next to the time.
-
Hover over the
 symbol, a popup appears.
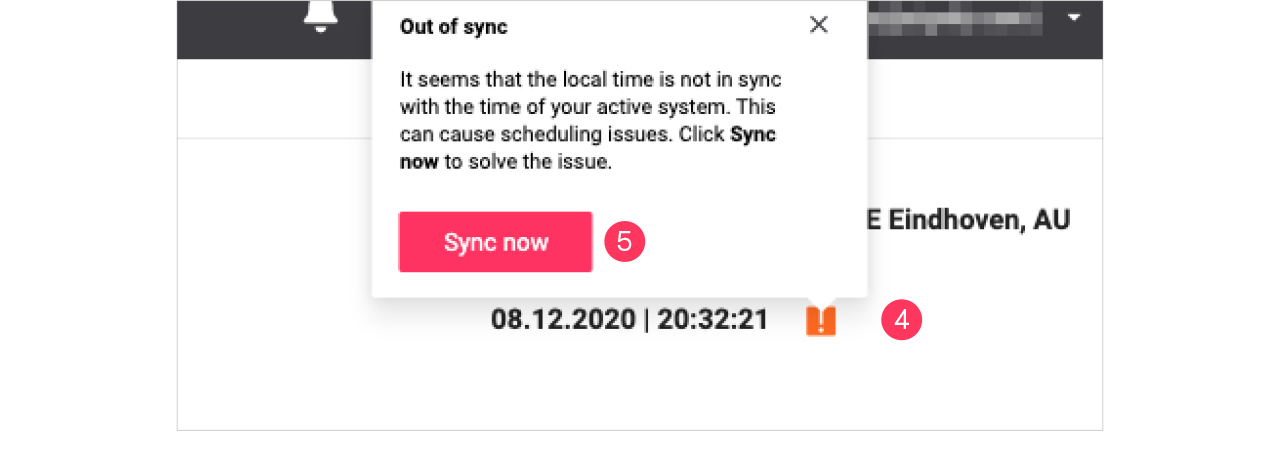
-
Click Sync now to synchronize the time with your system time.